php原生開發新聞站之添加新聞
在之前的一堂課我們完成了新聞清單的分頁功能,那麼從這堂課開始我們開始要完成新聞的增刪改查,現在查已經完成了,接下來就是刪除,編輯以及新增!今天主要跟大家介紹如何實現添加!
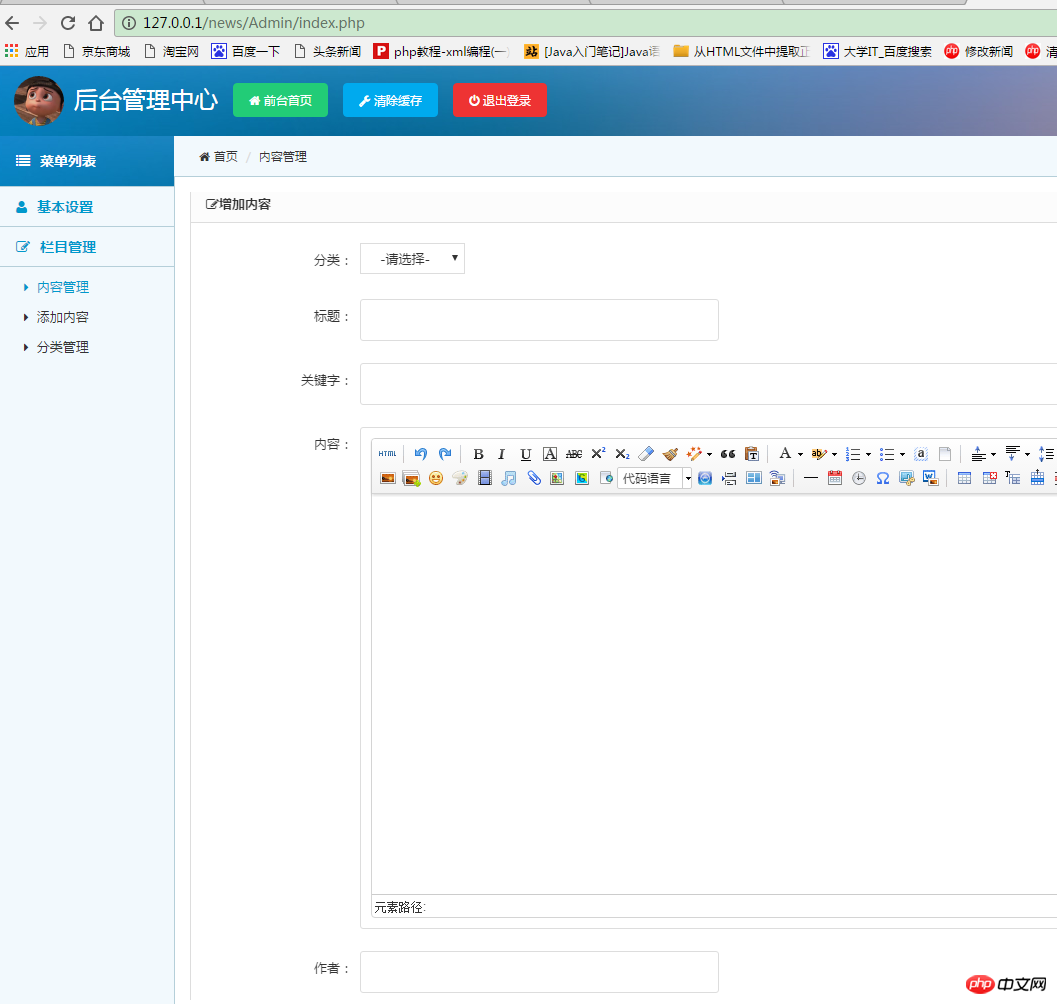
同樣,我們找到添加的模板,根據我們創建的數據表裡的字段,選擇需要的部分~添加新聞我們使用form表單提交然後插入數據庫
<form method="post" class="form-x" action="" enctype="multipart/form-data">
    <div class="form-group">
        <div class="label">
            <label>分类:</label>
        </div>
        <select name="category_id" style="padding:5px 15px; border:1px solid #ddd;">
                <option value="">-请选择-</option>
                <?php
                foreach( $arr_news_category as $val){
                    echo "<option value='{$val['id']}'>{$val['name']}</option>";
                }
                ?>
            </select>
        </select>
    </div>
    <div class="form-group">
        <div class="label">
            <label>标题:</label>
        </div>
        <div class="field">
            <input type="text" class="input w50" value="" name="title" data-validate="required:请输入标题" />
            <div class="tips"></div>
        </div>
    </div>
    <div class="clear"></div>
    <div class="form-group">
        <div class="label">
            <label>关键字:</label>
        </div>
        <div class="field">
            <input type="text" class="input" name="tag" value="" />
        </div>
    </div>

    <div class="form-group">
        <div class="label">
            <label>内容:</label>
        </div>
        <div class="field">
            <textarea name="content" class="input" id="content" style="height:450px; width: 98%; border:1px solid #ddd;"></textarea>
        </div>
    </div>
    <div class="form-group">
        <div class="label">
            <label>作者:</label>
        </div>
        <div class="field">
            <input type="text" class="input w50" name="author" value=""  />
            <div class="tips"></div>
        </div>
    </div>


    <div class="form-group">
        <div class="label">
            <label>图片:</label>
        </div>
        <div class="field">
            <input type="file" id="url1" name="pic" class="input tips" style="width:25%; float:left;"  value=""
            data-toggle="hover" data-place="right" data-image="" />
            <input type="button" class="button bg-blue margin-left" id="image1" value="+ 浏览上传"  style="float:left;">
            <div class="tipss">图片尺寸:500*500</div>
        </div>
    </div>


    <div class="form-group">
        <div class="label">
            <label>发布时间:</label>
        </div>
        <div class="field">
            <script src="../js/laydate/laydate.js"></script>
            <input type="text" class="laydate-icon input w50" name="created_at"
            onclick="laydate({istime: true, format: 'YYYY-MM-DD hh:mm:ss'})" value=""
            data-validate="required:日期不能为空" style="padding:10px!important;
            height:auto!important;border:1px solid #ddd!important;" />
            <div class="tips"></div>
        </div>
    </div>

    <div class="form-group">
        <div class="label">
            <label></label>
        </div>
        <div class="field">
            <button class="button bg-main icon-check-square-o" type="submit"> 提交</button>
        </div>
    </div>
</form>
form表單裡我們用post傳輸資料method="post"
action="" 這個是提交哪裡我這裡是提交到本頁面,但是推薦大家另外建立一個處理頁面
enctype="multipart/ form-data" 這個是上傳圖片不可或缺的!
內容這裡我們使用的編輯器,很簡單的,大家在網路上下載一個,放到你的專案裡面,然後呼叫使用<textarea></textarea>
<div class="form-group">
        <div class="label">
            <label>内容:</label>
        </div>
        <div class="field">
            <textarea name="content" class="input" id="content" style="height:450px; width: 98%; border:1px solid #ddd;"></textarea>
        </div>
    </div>
呼叫編輯器重要的就是<script>程式碼如下:
<script type="text/javascript">
    //实例化编辑器
    //建议使用工厂方法getEditor创建和引用编辑器实例,如果在某个闭包下引用该编辑器,直接调用UE.getEditor('editor')就能拿到相关的实例
    UE.getEditor('content',{initialFrameWidth:1500,initialFrameHeight:400,});

</script>
form表單設定好,我們就開始寫php處理頁面
第一步:連接資料庫
<?php
// 连接mysql数据库
$link = mysqli_connect('localhost', 'root', 'root');
if (!$link) {
    echo "connect mysql error!";
    exit();
}
// 选中数据库 news为数据库的名字
$db_selected = mysqli_select_db($link, 'news');
if (!$db_selected) {
    echo "<br>selected db error!";
    exit();
}
// 设置mysql字符集 为 utf8
$link->query("set names utf8");
?>
因為我們這裡要上傳圖片。所以我對圖片上傳,保存做處理:
<?php
if(count($_FILES['pic']) > 0){
    // 检查文件类型
    if(  !in_array($_FILES['pic']['type'], array('image/jpeg','image/png', 'image/gif')) ){
        echo "只运行上传jpg或png图片, 文件类型不合法,不允许上传";
    }
    // 检查文件大小
    if ($_FILES['pic']['size'] > 5*1024*1024){
            echo "文件最大尺寸为5M,不允许上传.";
        }
    $file_ext= pathinfo($_FILES['pic']['name'], PATHINFO_EXTENSION); // 获取文件后缀名
    $tmp_file = $_FILES['pic']['tmp_name']; // 临时文件
    $dest_file = pathinfo($tmp_file, PATHINFO_FILENAME).".".$file_ext; // 保存的文件名
    //move_uploaded_file($tmp_file, "d:/wamp/www/upload/".$dest_file);  // 使用绝对地址保存图片
    move_uploaded_file($tmp_file, "../../upload/".$dest_file); // 使用绝对路径地址保存图片
    $avatar_path ="../../upload/".$dest_file; // 注意,保存的时候,设置从服务器的根目录开始
}
?>
圖片處理完以後我們要開始講form表單傳輸過來資料插入資料庫:
 <?php
 if ($_POST['created_at']){
        $current_time  = $_POST['created_at'];
    }else{
        $current_time = date("Y-m-d H:i:s");
    }
    $sql = "insert into new(category_id,title,content,tag,author,pic,created_at)
                    VALUES ('{$_POST['category_id']}',
                            '{$_POST['title']}',
                            '{$_POST['content']}',
                            '{$_POST['tag']}',
                            '{$_POST['author']}',
                            '{$avatar_path}',
                            '$current_time'
                            )";
    $result = mysqli_query($link,$sql);
    if($result){
        $url = "http://127.0.0.1/news/Admin/new/new_list.php";
        header("Location: $url");
        exit;
    }else{
        echo "添加新闻失败!";
        echo mysqli_error($link);
        exit;
    }
}
?>
這裡我們還有一個分類要選擇,所以我們還需要查詢分類表:
$sql  = "select * from new_category ";
$result = mysqli_query($link, $sql);
$arr_news_category = mysqli_fetch_all($result, MYSQL_ASSOC);
然後在分類這個input框一欄循環出分類
    <div class="form-group">
        <div class="label">
            <label>分类:</label>
        </div>
        <select name="category_id" style="padding:5px 15px; border:1px solid #ddd;">
                <option value="">-请选择-</option>
                <?php
                foreach( $arr_news_category as $val){
                    echo "<option value='{$val['id']}'>{$val['name']}</option>";
                }
                ?>
            </select>
    </div>
這樣添加新聞功能到這就完成了!

<?php
include_once "../common/mysql.php";
$sql = "select * from new_category ";
$result = mysqli_query($link, $sql);
$arr_news_category = mysqli_fetch_all($result, MYSQL_ASSOC);
if(count($_POST)>0){
if(count($_FILES['pic']) > 0){
// 检查文件类型
if( !in_array($_FILES['pic']['type'], array('image/jpeg','image/png', 'image/gif')) ){
echo "只运行上传jpg或png图片, 文件类型不合法,不允许上传";
}
// 检查文件大小
if ($_FILES['pic']['size'] > 5*1024*1024){
echo "文件最大尺寸为5M,不允许上传.";
}
$file_ext= pathinfo($_FILES['pic']['name'], PATHINFO_EXTENSION); // 获取文件后缀名
$tmp_file = $_FILES['pic']['tmp_name']; // 临时文件
$dest_file = pathinfo($tmp_file, PATHINFO_FILENAME).".".$file_ext; // 保存的文件名
//move_uploaded_file($tmp_file, "d:/wamp/www/upload/".$dest_file); // 使用绝对地址保存图片
move_uploaded_file($tmp_file, "../../upload/".$dest_file); // 使用绝对路径地址保存图片
$avatar_path ="../../upload/".$dest_file; // 注意,保存的时候,设置从服务器的根目录开始
}
if ($_POST['created_at']){
$current_time = $_POST['created_at'];
}else{
$current_time = date("Y-m-d H:i:s");
}
$sql = "insert into new(category_id,title,content,tag,author,pic,created_at)
VALUES ('{$_POST['category_id']}',
'{$_POST['title']}',
'{$_POST['content']}',
'{$_POST['tag']}',
'{$_POST['author']}',
'{$avatar_path}',
'$current_time'
)";
$result = mysqli_query($link,$sql);
if($result){
$url = "http://127.0.0.1/news/Admin/new/new_list.php";
header("Location: $url");
exit;
}else{
echo "添加新闻失败!";
echo mysqli_error($link);
exit;
}
}
?>
<!DOCTYPE html>
<html lang="zh-cn">
<head>
<meta http-equiv="Content-Type" content="text/html; charset=utf-8" />
<meta http-equiv="X-UA-Compatible" content="IE=edge">
<meta name="viewport" content="width=device-width, initial-scale=1.0, maximum-scale=1.0, user-scalable=no" />
<meta name="renderer" content="webkit">
<title></title>
<link rel="stylesheet" href="../css/pintuer.css">
<link rel="stylesheet" href="../css/admin.css">
<script src="../js/jquery.js"></script>
<script src="../js/pintuer.js"></script>
<script type="text/javascript" charset="utf-8" src="../ueditor/ueditor.config.js"></script>
<script type="text/javascript" charset="utf-8" src="../ueditor/ueditor.all.min.js"> </script>
<!--建议手动加在语言,避免在ie下有时因为加载语言失败导致编辑器加载失败-->
<!--这里加载的语言文件会覆盖你在配置项目里添加的语言类型,比如你在配置项目里配置的是英文,这里加载的中文,那最后就是中文-->
<script type="text/javascript" charset="utf-8" src="../ueditor/lang/zh-cn/zh-cn.js"></script>
</head>
<body>
<div class="panel admin-panel">
<div class="panel-head" id="add"><strong><span class="icon-pencil-square-o"></span>增加内容</strong></div>
<div class="body-content">
<form method="post" class="form-x" action="" enctype="multipart/form-data">
<div class="form-group">
<div class="label">
<label>分类:</label>
</div>
<select name="category_id" style="padding:5px 15px; border:1px solid #ddd;">
<option value="">-请选择-</option>
<?php
foreach( $arr_news_category as $val){
echo "<option value='{$val['id']}'>{$val['name']}</option>";
}
?>
</select>
</select>
</div>
<div class="form-group">
<div class="label">
<label>标题:</label>
</div>
<div class="field">
<input type="text" class="input w50" value="" name="title" data-validate="required:请输入标题" />
<div class="tips"></div>
</div>
</div>
<div class="clear"></div>
<div class="form-group">
<div class="label">
<label>关键字:</label>
</div>
<div class="field">
<input type="text" class="input" name="tag" value="" />
</div>
</div>
<div class="form-group">
<div class="label">
<label>内容:</label>
</div>
<div class="field">
<textarea name="content" class="input" id="content" style="height:450px; width: 98%; border:1px solid #ddd;"></textarea>
</div>
</div>
<div class="form-group">
<div class="label">
<label>作者:</label>
</div>
<div class="field">
<input type="text" class="input w50" name="author" value="" />
<div class="tips"></div>
</div>
</div>
<div class="form-group">
<div class="label">
<label>图片:</label>
</div>
<div class="field">
<input type="file" id="url1" name="pic" class="input tips" style="width:25%; float:left;" value="" data-toggle="hover" data-place="right" data-image="" />
<input type="button" class="button bg-blue margin-left" id="image1" value="+ 浏览上传" style="float:left;">
<div class="tipss">图片尺寸:500*500</div>
</div>
</div>
<div class="form-group">
<div class="label">
<label>发布时间:</label>
</div>
<div class="field">
<script src="../js/laydate/laydate.js"></script>
<input type="text" class="laydate-icon input w50" name="created_at" onclick="laydate({istime: true, format: 'YYYY-MM-DD hh:mm:ss'})" value="" data-validate="required:日期不能为空" style="padding:10px!important; height:auto!important;border:1px solid #ddd!important;" />
<div class="tips"></div>
</div>
</div>
<div class="form-group">
<div class="label">
<label></label>
</div>
<div class="field">
<button class="button bg-main icon-check-square-o" type="submit"> 提交</button>
</div>
</div>
</form>
</div>
</div>
</body>
</html>
<script type="text/javascript">
//实例化编辑器
//建议使用工厂方法getEditor创建和引用编辑器实例,如果在某个闭包下引用该编辑器,直接调用UE.getEditor('editor')就能拿到相关的实例
UE.getEditor('content',{initialFrameWidth:1500,initialFrameHeight:400,});
</script>
