Rumah >hujung hadapan web >View.js >Analisis mendalam algoritma perbezaan dalam Vue3 (penjelasan grafik dan teks terperinci)
Analisis mendalam algoritma perbezaan dalam Vue3 (penjelasan grafik dan teks terperinci)
- 青灯夜游ke hadapan
- 2022-01-19 19:57:404037semak imbas
Artikel ini akan memberi anda analisis mendalam tentang algoritma perbezaan dalam Vue3 melalui gambar dan teks saya harap ia akan membantu anda!

Artikel ini terutamanya menganalisis algoritma Vue3 diff Melalui artikel ini, anda boleh mengetahui: Proses utama
<.>, Logik teras
diffialah cara menggunakan semula, mengalih dan menyahpasang nod
diff- dan terdapat contoh soalan yang boleh digabungkan dengan artikel ini untuk Analisis amalan
- Vnode (https ://mp.weixin.qq.com/s/DtFJpA91UPJIevlqaPzcnQ)
- Analisis Renderer (https://mp.weixin .qq.com/s/hzpNGWFCLMC2vJNSmP2vsQ)
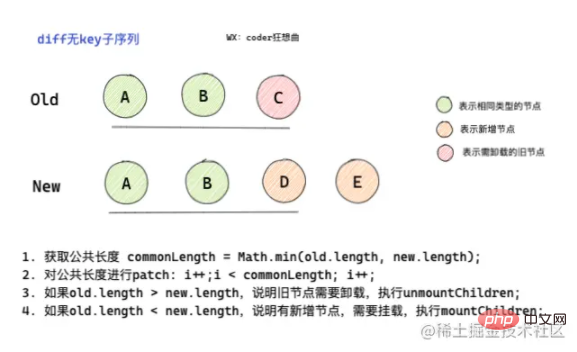
Tiada diff nod anak key
diproses apabila ditanda sebagai . UNKEYED_FRAGMENT
- akan terlebih dahulu memperoleh panjang sepunya minimum
melalui jujukan diri lama dan baharu.
commonLength - Gelung melalui bahagian awam
.
patch Tamat, dan kemudian proses baki nod lama dan baharu.
patch- Jika
, bermakna nod lama perlu
oldLength > newLengthunmount - jika tidak, ia bermakna terdapat a nod baharu dan ia perlu
;
mount

const patchUnkeyedChildren = (c1, c2,...res) => {
    c1 = c1 || EMPTY_ARR
    c2 = c2 || EMPTY_ARR
    // 获取新旧子节点的长度
    const oldLength = c1.length
    const newLength = c2.length
    // 1. 取得公共长度。最小长度
    const commonLength = Math.min(oldLength, newLength)
    let i
    // 2. patch公共部分
    for (i = 0; i < commonLength; i++) {
      patch(...)
    }
    // 3. 卸载旧节点
    if (oldLength > newLength) {
      // remove old
      unmountChildren(...)
    } else {
      // mount new
      // 4. 否则挂载新的子节点
      mountChildren(...)
    }
  }
Seperti yang anda lihat daripada kod di atas, apabila berurusan dengan nod anak tanpa , logiknya masih sangat mudah dan kasar. Tepatnya, kecekapan memproses nod tanpa key kanak-kanak adalah tidak tinggi. key
pada bahagian awam atau secara langsung patch pada nod baharu (sebenarnya melintasi nod anak dan melakukan operasi mountChildren), ia sebenarnya dilakukan secara rekursif patch , yang akan menjejaskan prestasi. patch
mempunyai diff jujukan subnod key
Apabila mempunyai diff jujukan, ia akan dibahagikan. Ia akan dinilai terutamanya oleh salah satu daripada situasi berikut: key
- Jenis nod kedudukan permulaan adalah sama.
- Jenis nod kedudukan akhir adalah sama.
- Bahagian yang sama telah diproses dan nod baharu telah ditambah.
- Selepas bahagian yang sama diproses, terdapat nod lama yang perlu dinyahpasang.
- Permulaan dan penghujung adalah sama, tetapi terdapat nod tidak tertib yang boleh digunakan semula di tengah.
- , menunjuk kepada kedudukan permulaan jujukan lama dan baharu
i = 0 - , menunjuk ke kedudukan akhir jujukan lama
e1 = oldLength - 1 - , menunjuk ke kedudukan akhir jujukan baharu
e2 = newLength - 1

let i = 0
const l2 = c2.length
let e1 = c1.length - 1 // prev ending index
let e2 = l2 - 1 // next ending index
Mari kita mulakan dengan situasi
Memproses. diff
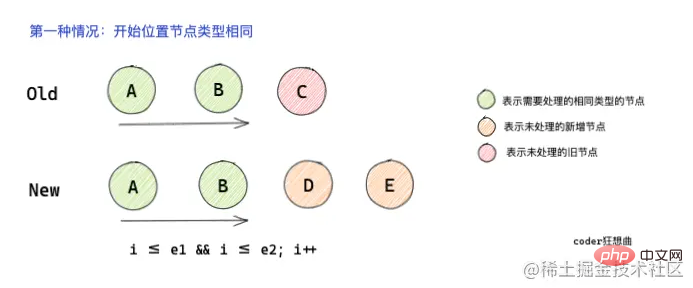
2.1 Jenis nod kedudukan permulaan adalah sama

- Untuk kedudukan permulaan Nod jenis yang sama dilalui dari kiri ke kanan.
diffJika jenis nod lama dan baharu adalah sama, lakukan - pemprosesan
patchJika jenis nod berbeza, - , melompat keluar dari traversal
breakdiff
//  i <= 2 && i <= 3
while (i <= e1 && i <= e2) {
  const n1 = c1[i]
  const n2 = c2[i]
  if (isSameVNodeType(n1, n2)) {
    // 如果是相同的节点类型,则进行递归patch
    patch(...)
  } else {
    // 否则退出
    break
  }
  i++
}
Seperti yang anda boleh ketahui daripada kod, apabila melintasi, tiga penunjuk yang diisytiharkan sebelum ini dalam konteks global fungsi digunakan untuk membuat pertimbangan traversal.
Pastikan kedudukan yang sama dengan kedudukan permulaan dapat dilalui sepenuhnya,
.i Sebaik sahaja nod jenis berbeza ditemui, traversal
diff
2.2 Jenis nod kedudukan akhir adalah sama
 Kedudukan mula adalah sama
bermula dari penghujung urutan. diffdiffPada masa ini, penunjuk ekor
e1、e2
//  i <= 2 && i <= 3
// 结束后: e1 = 0 e2 =  1
while (i <= e1 && i <= e2) {
  const n1 = c1[e1]
  const n2 = c2[e2]
  if (isSameVNodeType(n1, n2)) {
    // 相同的节点类型
    patch(...)
  } else {
    // 否则退出
    break
  }
  e1--
  e2--
}
pada asasnya sama dengan yang pertama, dan jenis yang sama diproses. diffpatchJenis yang berbeza
breakDan kurangkan penunjuk ekor.
2.3 Traversal bahagian yang sama selesai, terdapat nod baharu dalam urutan baharu, dan ia dipasang Selepas memproses di atas dua situasi, ia telah
Selepas menamatkan nod dengan bahagian yang sama pada permulaan dan akhir, langkah seterusnya ialah memproses nod baharu dalam urutan baharu. patchpatch
在经过上面两种请款处理之后,如果有新增节点,可能会出现 i > e1 && i 的情况。
这种情况下意味着新的子节点序列中有新增节点。
这时会对新增节点进行patch。
// 3. common sequence + mount
// (a b)
// (a b) c
// i = 2, e1 = 1, e2 = 2
// (a b)
// c (a b)
// i = 0, e1 = -1, e2 = 0
if (i > e1) {
  if (i <= e2) {
    const nextPos = e2 + 1
    // nextPos < l2,说明有已经patch过尾部节点,
    // 否则会获取父节点作为锚点
    const anchor = nextPos < l2 ? c2[nextPos].el : parentAnchor
    while (i <= e2) {
      patch(null, c2[i], anchor, ...others)
      i++
    }
  }
}从上面的代码可以知道,patch的时候没有传第一个参数,最终会走mount的逻辑。
可以看这篇 主要分析patch的过程
https://mp.weixin.qq.com/s/hzpNGWFCLMC2vJNSmP2vsQ
在patch的过程中,会递增i指针。
并通过nextPos来获取锚点。
如果nextPos ,则以已经<code>patch的节点作为锚点,否则以父节点作为锚点。
2.4 相同部分遍历结束,新序列中少节点,进行卸载

如果处理完收尾相同的节点,出现i > e2 && i 的情况,则意味着有旧节点需要进行卸载操作。
// 4. common sequence + unmount
// (a b) c
// (a b)
// i = 2, e1 = 2, e2 = 1
// a (b c)
// (b c)
// i = 0, e1 = 0, e2 = -1
// 公共序列 卸载旧的
else if (i > e2) {
  while (i <= e1) {
    unmount(c1[i], parentComponent, parentSuspense, true)
    i++
  }
}
通过代码可以知道,这种情况下,会递增i指针,对旧节点进行卸载。
2.5 乱序情况
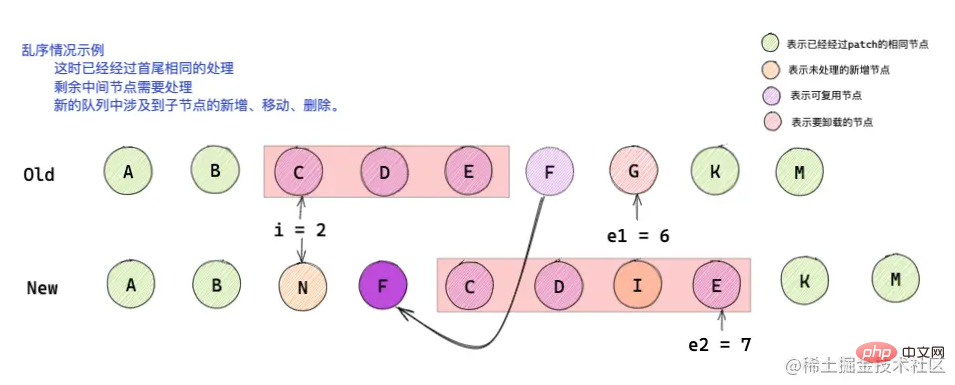
这种情况下较为复杂,但diff的核心逻辑在于通过新旧节点的位置变化构建一个最大递增子序列,最大子序列能保证通过最小的移动或者patch实现节点的复用。
下面一起来看下如何实现的。

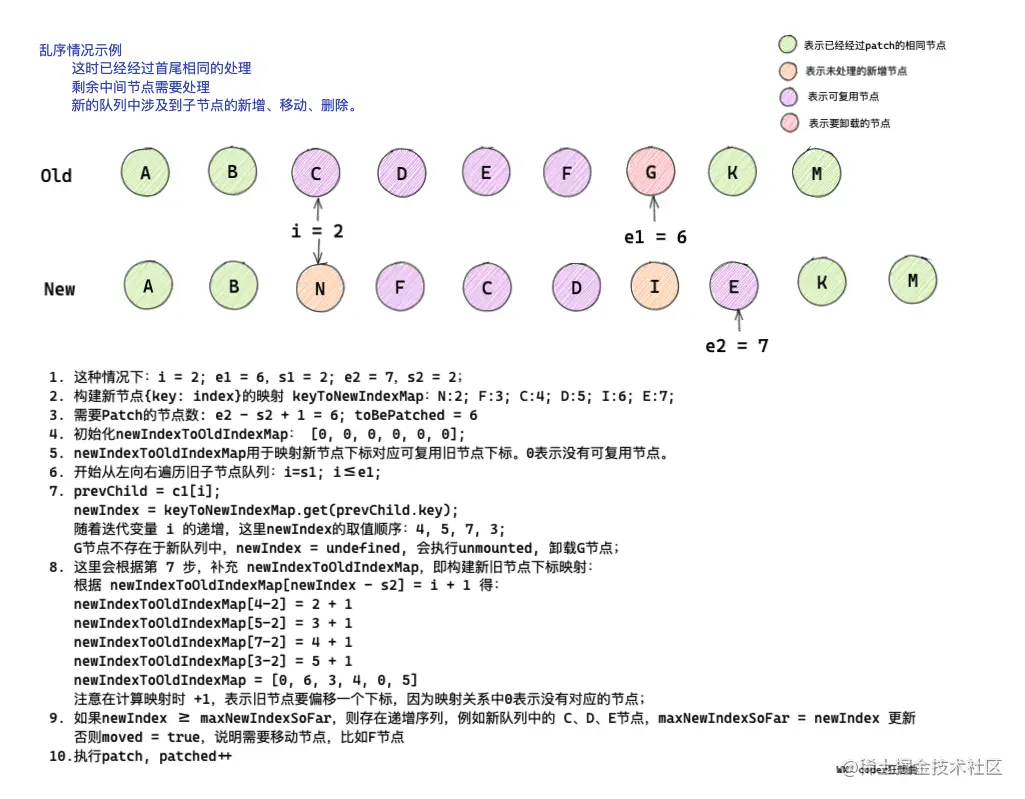
2.5.1 为新子节点构建key:index映射

// 5. 乱序的情况
// [i ... e1 + 1]: a b [c d e] f g
// [i ... e2 + 1]: a b [e d c h] f g
// i = 2, e1 = 4, e2 = 5

const s1 = i // s1 = 2
const s2 = i // s2 = 2

// 5.1 build key:index map for newChildren
// 首先为新的子节点构建在新的子序列中 key:index 的映射
// 通过map 创建的新的子节点
const keyToNewIndexMap = new Map()
// 遍历新的节点,为新节点设置key
// i = 2; i <= 5
for (i = s2; i <= e2; i++) {
  // 获取的是新序列中的子节点
  const nextChild = c2[i];
  if (nextChild.key != null) {
    // nextChild.key 已存在
    // a b [e d c h] f g
    // e:2 d:3 c:4 h:5
    keyToNewIndexMap.set(nextChild.key, i)
  }
}
结合上面的图和代码可以知道:
在经过首尾相同的
patch处理之后,i = 2,e1 = 4,e2 = 5经过遍历之后
keyToNewIndexMap中,新节点的key:index的关系为E : 2、D : 3 、C : 4、H : 5keyToNewIndexMap的作用主要是后面通过遍历旧子序列,确定可复用节点在新的子序列中的位置
2.5.2 从左向右遍历旧子序列,patch匹配的相同类型的节点,移除不存在的节点
经过前面的处理,已经创建了keyToNewIndexMap。
在开始从左向右遍历之前,需要知道几个变量的含义:
// 5.2 loop through old children left to be patched and try to patch
// matching nodes & remove nodes that are no longer present
// 从旧的子节点的左侧开始循环遍历进行patch。
// 并且patch匹配的节点 并移除不存在的节点

// 已经patch的节点个数
let patched = 0
// 需要patch的节点数量
// 以上图为例:e2 = 5; s2 = 2; 知道需要patch的节点个数
// toBePatched = 4
const toBePatched = e2 - s2 + 1
// 用于判断节点是否需要移动
// 当新旧队列中出现可复用节点交叉时,moved = true
let moved = false
// used to track whether any node has moved
// 用于记录节点是否已经移动
let maxNewIndexSoFar = 0

// works as Map<newIndex, oldIndex>
// 作新旧节点的下标映射
// Note that oldIndex is offset by +1
// 注意 旧节点的 index 要向右偏移一个下标

// and oldIndex = 0 is a special value indicating the new node has
// no corresponding old node.
// 并且旧节点Index = 0 是一个特殊的值,用于表示新的节点中没有对应的旧节点

// used for determining longest stable subsequence
// newIndexToOldIndexMap 用于确定最长递增子序列
// 新下标与旧下标的map
const newIndexToOldIndexMap = new Array(toBePatched)
// 将所有的值初始化为0
// [0, 0, 0, 0]
for (i = 0; i < toBePatched; i++) newIndexToOldIndexMap[i] = 0
- 变量
patched用于记录已经patch的节点 - 变量
toBePatched用于记录需要进行patch的节点个数 - 变量
moved用于记录是否有可复用节点发生交叉 -
maxNewIndexSoFar用于记录当旧的子序列中存在没有设置key的子节点,但是该子节点出现于新的子序列中,且可复用,最大下标。 - 变量
newIndexToOldIndexMap用于映射新的子序列中的节点下标 对应于 旧的子序列中的节点的下标 - 并且会将
newIndexToOldIndexMap初始化为一个全0数组,[0, 0, 0, 0]

知道了这些变量的含义之后 我们就可以开始从左向右遍历子序列了。
遍历的时候,需要首先遍历旧子序列,起点是s1,终点是e1。
遍历的过程中会对patched进行累加。
卸载旧节点
如果patched >= toBePatched,说明新子序列中的子节点少于旧子序列中的节点数量。
需要对旧子节点进行卸载。
// 遍历未处理旧序列中子节点
for (i = s1; i <= e1; i++) {
    // 获取旧节点
    // 会逐个获取 c d e
    const prevChild = c1[i]
    // 如果已经patch 的数量 >= 需要进行patch的节点个数

    // patched刚开始为 0
    // patched >= 4
    if (patched >= toBePatched) {
      // all new children have been patched so this can only be a removal
      // 这说明所有的新节点已经被patch 因此可以移除旧的
      unmount(prevChild, parentComponent, parentSuspense, true)
      continue
    }
}如果prevChild.key是存在的,会通过前面我们构建的keyToNewIndexMap,获取prevChild在新子序列中的下标newIndex。
获取newIndex
// 新节点下标
let newIndex
if (prevChild.key != null) {
  // 旧的节点肯定有key,
  // 根据旧节点key  获取相同类型的新的子节点  在 新的队列中对应节点位置
  // 这个时候 因为c d e 是原来的节点 并且有key
  // h 是新增节点 旧节点中没有 获取不到 对应的index 会走else
  // 所以newIndex在开始时会有如下情况
  /**
   * node  newIndex
   *  c       4
   *  d       3
   *  e       2
   * */
  // 这里是可以获取到newIndex的
  newIndex = keyToNewIndexMap.get(prevChild.key)
}以图为例,可以知道,在遍历过程中,节点c、d、e为可复用节点,分别对应新子序列中的2、3、4的位置。
故newIndex可以取到的值为4、3、2。
如果旧节点没有key怎么办?
// key-less node, try to locate a key-less node of the same type
// 如果旧的节点没有key
// 则会查找没有key的 且为相同类型的新节点在 新节点队列中 的位置
// j = 2: j <= 5
for (j = s2; j <= e2; j++) {
  if (
    newIndexToOldIndexMap[j - s2] === 0 &&
    // 判断是否是新旧节点是否相同
    isSameVNodeType(prevChild, c2[j])
  ) {
    // 获取到相同类型节点的下标
    newIndex = j
    break
  }
}如果节点没有key,则同样会取新子序列中,遍历查找没有key且两个新旧类型相同子节点,并以此节点的下标,作为newIndex。
newIndexToOldIndexMap[j - s2] === 0 说明节点没有该节点没有key。
如果还没有获取到newIndex,说明在新子序列中没有存在的与 prevChild 相同的子节点,需要对prevChild进行卸载。
if (newIndex === undefined) {
  // 没有对应的新节点 卸载旧的
  unmount(prevChild, parentComponent, parentSuspense, true)
}否则,开始根据newIndex,构建keyToNewIndexMap,明确新旧节点对应的下标位置。
时刻牢记
newIndex是根据旧节点获取的其在新的子序列中的下标。
// 这里处理获取到newIndex的情况
// 开始整理新节点下标 Index 对于 相同类型旧节点在 旧队列中的映射
// 新节点下标从 s2=2 开始,对应的旧节点下标需要偏移一个下标
// 0 表示当前节点没有对应的旧节点
// 偏移 1个位置 i从 s1 = 2 开始,s2 = 2
// 4 - 2 获取下标 2,新的 c 节点对应旧 c 节点的位置下标 3
// 3 - 2 获取下标 1,新的 d 节点对应旧 d 节点的位置下标 4
// 2 - 2 获取下标 0,新的 e 节点对应旧 e 节点的位置下标 5
// [0, 0, 0, 0] => [5, 4, 3, 0]
// [2,3,4,5] = [5, 4, 3, 0]
newIndexToOldIndexMap[newIndex - s2] = i + 1
// newIndex 会取 4 3 2
/**
 *   newIndex  maxNewIndexSoFar   moved
 *       4            0          false
 *       3            4           true
 *       2
 *
 * */
if (newIndex >= maxNewIndexSoFar) {
  maxNewIndexSoFar = newIndex
} else {
  moved = true
}在构建newIndexToOldIndexMap的同时,会通过判断newIndex、maxNewIndexSoFa的关系,确定节点是否发生移动。
newIndexToOldIndexMap最后遍历结束应该为[5, 4, 3, 0],0说明有旧序列中没有与心序列中对应的节点,并且该节点可能是新增节点。
如果新旧节点在序列中相对位置保持始终不变,则maxNewIndexSoFar会随着newIndex的递增而递增。
意味着节点没有发生交叉。也就不需要移动可复用节点。
否则可复用节点发生了移动,需要对可复用节点进行move。
遍历的最后,会对新旧节点进行patch,并对patched进行累加,记录已经处理过几个节点。
// 进行递归patch
/**
 * old   new
 *  c     c
 *  d     d
 *  e     e
*/
patch(
  prevChild,
  c2[newIndex],
  container,
  null,
  parentComponent,
  parentSuspense,
  isSVG,
  slotScopeIds,
  optimized
)
// 已经patch的
patched++
经过上面的处理,已经完成对旧节点进行了卸载,对相对位置保持没有变化的子节点进行了patch复用。
接下来就是需要移动可复用节点,挂载新子序列中新增节点。
2.5.3 移动可复用节点,挂载新增节点
这里涉及到一块比较核心的代码,也是Vue3 diff效率提升的关键所在。
前面通过newIndexToOldIndexMap,记录了新旧子节点变化前后的下标映射。
这里会通过getSequence方法获取一个最大递增子序列。用于记录相对位置没有发生变化的子节点的下标。
根据此递增子序列,可以实现在移动可复用节点的时候,只移动相对位置前后发生变化的子节点。
做到最小改动。
那什么是最大递增子序列?
- 子序列是由数组派生而来的序列,删除(或不删除)数组中的元素而不改变其余元素的顺序。
- 而递增子序列,是数组派生的子序列,各元素之间保持逐个递增的关系。
- 例如:
- 数组
[3, 6, 2, 7]是数组[0, 3, 1, 6, 2, 2, 7]的最长严格递增子序列。 - 数组
[2, 3, 7, 101]是数组[10 , 9, 2, 5, 3, 7, 101, 18]的最大递增子序列。 - 数组
[0, 1, 2, 3]是数组[0, 1, 0, 3, 2, 3]的最大递增子序列。

已上图为例,在未处理的乱序节点中,存在新增节点N、I、需要卸载的节点G,及可复用节点C、D、E、F。
节点CDE在新旧子序列中相对位置没有变换,如果想要通过最小变动实现节点复用,我们可以将找出F节点变化前后的下标位置,在新的子序列C节点之前插入F节点即可。
最大递增子序列的作用就是通过新旧节点变化前后的映射,创建一个递增数组,这样就可以知道哪些节点在变化前后相对位置没有发生变化,哪些节点需要进行移动。
Vue3中的递增子序列的不同在于,它保存的是可复用节点在 newIndexToOldIndexMap的下标。而并不是newIndexToOldIndexMap中的元素。
接下来我们看下代码部分:
// 5.3 move and mount
// generate longest stable subsequence only when nodes have moved
// 移动节点 挂载节点
// 仅当节点被移动后 生成最长递增子序列
// 经过上面操作后,newIndexToOldIndexMap = [5, 4, 3, 0]
// 得到 increasingNewIndexSequence = [2]
const increasingNewIndexSequence = moved
  ? getSequence(newIndexToOldIndexMap)
  : EMPTY_ARR
// j = 0
j = increasingNewIndexSequence.length - 1
// looping backwards so that we can use last patched node as anchor
// 从后向前遍历 以便于可以用最新的被patch的节点作为锚点
// i = 3
for (i = toBePatched - 1; i >= 0; i--) {
  // 5 4 3 2
  const nextIndex = s2 + i
  // 节点 h  c  d  e
  const nextChild = c2[nextIndex]
  // 获取锚点
  const anchor =
    nextIndex + 1 < l2 ? c2[nextIndex + 1].el : parentAnchor
  // [5, 4, 3, 0] 节点h会被patch,其实是mount
  //  c  d  e 会被移动
  if (newIndexToOldIndexMap[i] === 0) {
    // mount new
    // 挂载新的
    patch(
      null,
      nextChild,
      container,
      anchor,
      ...
    )
  } else if (moved) {
    // move if:
    // There is no stable subsequence (e.g. a reverse)
    // OR current node is not among the stable sequence
    // 如果没有最长递增子序列或者 当前节点不在递增子序列中间
    // 则移动节点
    //
    if (j < 0 || i !== increasingNewIndexSequence[j]) {
      move(nextChild, container, anchor, MoveType.REORDER)
    } else {
      j--
    }
  }
}
从上面的代码可以知道:
- Jujukan peningkatan maksimum yang diperolehi melalui
newIndexToOldIndexMapialah[2] j = 0- Apabila melintasi, rentasi dari kanan ke kiri, supaya titik penambat boleh diperolehi , jika terdapat nod adik beradik yang telah melalui
patch, gunakan nod adik beradik sebagai titik anchor, jika tidak gunakan nod induk sebagai titik anchor -
newIndexToOldIndexMap[i] === 0, menunjukkan bahawa ia adalah baru nod. Anda perlumountnod Dalam kes ini, anda hanya perlu menghantarpatchke parameter pertamanull. Anda boleh tahu bahawah节点akan dilakukan terlebih dahulu.patch Jika tidak, ia akan dinilai sama ada - ialah
moved. Melalui analisis sebelum ini, kita tahu bahawatruetelah bergerak dalam kedudukan semasa perubahan hadapan dan belakang.节点C & 节点E Oleh itu, nod akan dialihkan ke sini Kami tahu bahawa -
jialah pada masa ini, dan0iialah **** pada masa ini ialah2, dani !== increasingNewIndexSequence[j]tidak akan dialihkan, tetapitrueakan dilaksanakan.C节点j--akan dipindahkan kemudian kerana . j <code>D、E节点Pada ketika ini kami telah menyelesaikan analisis pembelajaran algoritma .
Berikut adalah contoh untuk semua orang, yang boleh digabungkan dengan proses analisis artikel ini untuk latihan: Vue3 diff
Gambar 2 & 3: 

)
Melalui analisis pembelajaran di atas, kita boleh mengetahui bahawa algoritma
akan melakukan pemprosesan untuk nod yang sama, dan selepas selesai, ia akan Melekapkan nod baharu dan menyahpasang nod lama. Vue3diffJika situasi urutan lebih rumit, seperti tidak teratur, nod boleh guna semula akan ditemui dahulu, dan jujukan peningkatan maksimum akan dibina melalui pemetaan kedudukan nod boleh guna semula ke patch nod. Untuk meningkatkan kecekapan
mount & move[Cadangan berkaitan: difftutorial vue.js
Atas ialah kandungan terperinci Analisis mendalam algoritma perbezaan dalam Vue3 (penjelasan grafik dan teks terperinci). Untuk maklumat lanjut, sila ikut artikel berkaitan lain di laman web China PHP!
Artikel berkaitan
Lihat lagi- Bagaimanakah vue menyelesaikan masalah silang domain hadapan dalam permintaan axios (contoh terperinci)
- Parsing kod sumber dan lihat bagaimana pengkompil vue menjana fungsi pemaparan!
- Bagaimana untuk membangunkan program kecil menggunakan Taro Vue3? (latihan)
- Cara membuat perpustakaan komponen Vue dari awal dan menerbitkannya ke npm
- Mari kita bincangkan tentang cara vue2.x turn.js mencapai kesan perubahan buku
- Fahami ciri Fragmen, Suspens dan Portal dalam Vue3

