
vuex의 구현 원칙에 대해 자세히 알아보세요.

- 青灯夜游앞으로
- 2023-03-20 18:14:082598검색
인터뷰에서 vuex의 구현 원리에 대한 질문을 받았을 때 어떻게 대답하시나요? 다음 기사는 vuex의 구현 원리에 대한 심층적인 이해를 제공할 것입니다. 도움이 되기를 바랍니다.

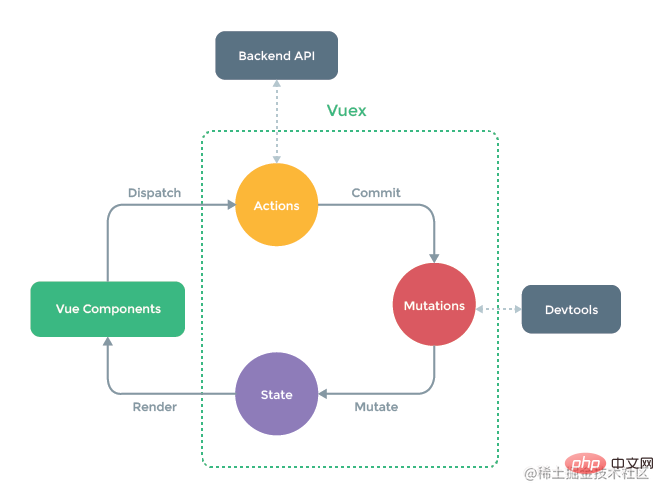
vuex에 대해서는 자세히 다루지 않겠습니다. 간단히 검토해 보겠습니다. 애플리케이션에서 여러 구성 요소 공유 상태가 발생하면 간단한 단방향 데이터가 발생합니다. flow 손상되기 쉽습니다. 첫째, 여러 보기가 동일한 상태에 의존하고, 둘째, 다른 보기의 작업에서는 동일한 상태를 변경해야 합니다. 전자의 방법이 매개 변수 전달을 통해 해결되는 경우 다중 계층 중첩 구성 요소 및 형제 구성 요소에 적합하지 않습니다. 후자의 방법이 상위-하위 구성 요소의 직접 참조 또는 이벤트 변경 및 동기화 상태의 여러 복사본을 사용하여 해결되는 경우 코드 유지 관리에 도움이 되지 않습니다. vuex就不再赘述,简单回顾一下:当应用碰到多个组件共享状态时,简单的单向数据流很容易被破坏:第一,多个视图依赖于同一状态;第二,来自不同视图的行为需要变更同一状态。若解决前者使用传参的方式,则不适用于多层嵌套的组件以及兄弟组件;若解决后者使用父子组件直接引用或事件变更和同步状态的多份拷贝,则不利于代码维护。
所以,最好的办法是:把组件的共享状态抽取出,以一个全局单例模式管理!这也正是vuex背后的基本思想。
所以,vuex的大致框架如下:
class Store {
    constructor() {
        // state
        // getters
        // mutations
        // actions
    }
    // commit
    // dipatch
}
接下来,就写写看。
一、创建vue项目
vue create vue2-vuex//创建vue2项目

yarn add vuex@next --save//安装vuex

yarn serve//启动项目
二、实现原理
1、State
(1)使用
//store.js
// 仓库
import Vue from 'vue'
import Vuex from 'vuex'
import extra from './extra.js'

Vue.use(Vuex) //引入vuex的方式,说明Store需要install方法
export default new Vuex.Store({
    // 仓库数据源
    state: {
        count: 1,
        dowhat: 'addCount'
    },
}
//app.vue
<template>
<div class="testState">
<p>{{mycount}}</p>
<p>{{dowhat}}:{{count}}</p>
</div>
</template>
<script>
export default {
import {
mapState
} from 'vuex'
// 推荐方式
computed: mapState()({
mycount: state => state.count
}),
// 推荐方式的简写方式
computed: {
// 解构的是getters
...mapState(['count', 'dowhat'])
},
}
</script>(2)注意
由于 Vuex 的状态存储是响应式的,从 store 实例中读取状态最简单的方法就是在计算属性 中返回某个状态,这种模式导致组件依赖全局状态单例。在模块化的构建系统中,在每个需要使用 state 的组件中需要频繁地导入,并且在测试组件时需要模拟状态
Vuex 通过 store 选项,提供了一种机制将状态从根组件“注入”到每一个子组件中(需调用 Vue.use(Vuex))
(3)实现
所以除了Store内部的五大属性以外,还需要考虑插件的一个install方法,所以大致框架如下:
class Store {
    constructor() {
        // state
        // getters
        // mutations
        // actions
        //modules
    }
    // commit
    // dipatch
}
let Vuex = {
    Store,
    Install
}
export default Vuex
所以,接下来就可以具体实现了,
class Store {
    constructor(options) {
        // state
        this.state = options.state
    }
}
let install = function(_Vue) {
    _Vue.mixin({
        beforeCreate() { //在组件创建之前自动调用,每个组件都有这个钩子
            if (this.$options && this.$options.store) { //this.$options读取根组件
                this.$store = this.$options.store
            } else {
                this.$store = this.$parent && this.$parent.$store
            }
        }
    })
}然而,上述的state的实现有一个缺点:当改变数据的时候,state的数据不能动态的渲染。所以如何把state里的数据成为响应式成为关键问题?实际上,类似vue里的data,也可以通过这种方式让其成为响应式。那么就得从install方法中传入Vue,所以改变后:
let Vue=null
class Store {
    constructor(options) {
        // state
        this.vm = new _Vue({
          data: {
            state: options.state//data中的数据才是响应式
          }
        })
    }
      get state() {
        return this.vm.state
    }
}
let install = function(_Vue) {//用于Vue.use(plugin)
    Vue=_Vue
    _Vue.mixin({
        onBeforeCreate() { //在组件创建之前自动调用,每个组件都有这个钩子
            if (this.$options && this.$options.store) { //this.$options读取根组件
                this.$store = this.$options.store
            } else {
                this.$store = this.$parent && this.$parent.$store
            }
        }
    })
}
2、getters
(1)使用
//store.js
export default new Vuex.Store({
    // 计算属性
    getters: {
        // 这里的函数不需要调用,可以直接使用,官方默认前面有get
        getCount(state) {//接受 state 作为其第一个参数
            return state.count * 100;
        }
    },
}
(2)注意
有时候我们需要从 store 中的 state 中派生出一些状态(比如增加,删除,过滤等等),Vuex 允许我们在 store 中定义“getter”(可以认为是 store 的计算属性)。就像计算属性一样,getter 的返回值会根据它的依赖被缓存起来,且只有当它的依赖值发生了改变才会被重新计算,Getter 接受 state 作为其第一个参数,getter 在通过方法访问时,每次都会去进行调用,而不会缓存结果
(3)实现
 // getters
    let getters = options.getters || {}
    this.getters = {}
    Object.keys(getters).forEach(getterName => {
      Object.defineProperty(this.getters, getterName, {
        get: () => {
          return getters[getterName](this.state)
        }
      })
    })
3、mutations
(1)使用
//store.js
export default new Vuex.Store({
        // 相当于methods
    mutations: {
        // mutations内部的函数,天生具备一个形参
        add(state, n) {
            state.count += n;
        },
        decrease(state, n) {
            state.count -= n;
        }
    },
}
methods: {
submit() {
console.log('success');
},
// 解构仓库mutations里面的方法,要啥解构啥
...mapMutations(['add', 'decrease']),
// this.$store.commit('add'),
...mapActions(['addAction', 'decreaseAction']),
// this.addAction()调用actions里面的方法
// this.$store.dispatch('add'),
}(2)注意
更改 Vuex 的 store 中的状态的唯一方法是提交 mutation。Vuex 中的 mutation 类似于事件:每个 mutation 都有一个字符串的 事件类型 (type) 和 一个 回调函数 (handler) 。这个回调函数就是进行状态更改的地方,并且它会接受 state 作为第一个参数,不能直接调用一个 mutation handler。这个选项更像是事件注册:“当触发一个类型为 increment 的 mutation 时,调用此函数。”要唤醒一个 mutation handler,你需要以相应的 type 调用 store.commit 方法
可以向 store.commit그래서 가장 좋은 방법은 컴포넌트의 공유 상태를 추출하여 글로벌 싱글톤 모드로 관리하는 것입니다! 이것이 vuex의 기본 아이디어입니다.
【 관련 권장사항: vuejs 비디오 튜토리얼, 웹 프론트엔드 개발]
그래서 vuex의 일반적인 프레임워크는 다음과 같습니다.
   // mutations
    let mutations = options.mutations || {}
    this.mutations = {}
    Object.keys(mutations).forEach(mutationName => {
      this.mutations[mutationName] = (arg) => {//保证多个(第二个)参数的传入
        mutations[mutationName](this.state, arg)
      }
    })

    commit = (method, arg) => {//使用箭头函数改变被调用的this的指向
        // console.log(this);
        this.mutations[method](arg)
  }
다음은 그냥 쓰고 읽으세요. 1. vue 프로젝트 생성
//store.js
export default new Vuex.Store({
    actions: {
        addAction(context) {
            // 在这里调用add方法
            context.commit('add', 10);
        },
        decreaseAction({
            commit
        }) {
            commit('decreaseAction', 5)
        }
    },
}
2. 구현 원칙
1, State
(1)
🎜 // actions
let actions = options.actions || {}
this.actions = {}
Object.keys(actions).forEach(actionName => {
this.actions[actionName] = (arg) => {
actions[actionName](this, arg)
}
})
dispatch=(method, arg) =>{
this.actions[method](arg)
} // actions
let actions = options.actions || {}
this.actions = {}
Object.keys(actions).forEach(actionName => {
this.actions[actionName] = (arg) => {
actions[actionName](this, arg)
}
})
dispatch=(method, arg) =>{
this.actions[method](arg)
}🎜🎜 사용 참고🎜🎜🎜Vuex의 상태 저장소는 반응형이므로 저장소 인스턴스에서 상태를 읽는 가장 쉬운 방법은 계산된 속성에서 특정 상태를 반환하는 것입니다. 이 모드는 Rely 구성 요소로 연결됩니다. 전역 상태 싱글톤. 모듈식 빌드 시스템에서는 상태를 사용해야 하는 각 구성 요소를 자주 가져와야 하며 구성 요소를 테스트할 때 상태를 시뮬레이션해야 합니다. Vuex는 store 옵션을 통해 상태를 저장하는 메커니즘을 제공합니다. . 상태는 루트 구성 요소에서 각 하위 구성 요소로 "주입"됩니다(Vue.use(Vuex) 호출 필요) 🎜🎜🎜(3) 구현🎜🎜🎜그래서 Store 5가지 내부 속성 외에도 플러그인의 install 방법도 고려해야 하므로 일반적인 프레임워크는 다음과 같습니다. 🎜 //store.js
modules: {
extra: extra
}🎜그래서 구체적인 구현은 다음에 할 수 있습니다. 🎜let Vue = null//全局的_Vue
class Store {
constructor (options) {
// state
//this.state = options.state 写法不完美,当改变数据的时候,不能动态的渲染,所以需要把data中的数据做成响应式的
this.vm = new _Vue({
data: {
state: options.state//data中的数据才是响应式
}
})
// getters
let getters = options.getters || {}
this.getters = {}
Object.keys(getters).forEach(getterName => {
Object.defineProperty(this.getters, getterName, {
get: () => {
return getters[getterName](this.state)
}
})
})
// mutations
let mutations = options.mutations || {}
this.mutations = {}
Object.keys(mutations).forEach(mutationName => {
this.mutations[mutationName] = (arg) => {//保证多个(第二个)参数的传入
mutations[mutationName](this.state, arg)
}
})
// actions
let actions = options.actions || {}
this.actions = {}
Object.keys(actions).forEach(actionName => {
this.actions[actionName] = (arg) => {
actions[actionName](this, arg)
}
})
}
dispatch=(method, arg) =>{
this.actions[method](arg)
}
commit = (method, arg) => {
// console.log(this);
this.mutations[method](arg)
}
get state() {
return this.vm.state
}
}
let install = function(_Vue) {
Vue = _Vue
Vue.mixin({
beforeCreate() {//在组件创建之前自动调用,每个组件都有这个钩子
if (this.$options && this.$options.store) { // this.$options读取到根组件
this.$store = this.$options.store
} else { // //如果不是根组件的话,也把$store挂到上面,因为是树状组件
this.$store = this.$parent && this.$parent.$store
}
}
})
}
let Vuex = {
Store,
install
}
export default Vuex🎜그러나 위 상태의 구현에는 단점이 있습니다. 데이터를 변경할 때 상태의 데이터를 동적으로 렌더링할 수 없습니다. 그렇다면 상태의 데이터를 반응형으로 만드는 방법이 핵심 문제가 될까요? 실제로 vue의 data와 유사하게 이러한 방식으로 반응하도록 만들 수도 있습니다. 그런 다음 install 메소드에서 Vue를 전달해야 하므로 변경 후: 🎜rrreee🎜🎜🎜2, getters🎜🎜🎜🎜🎜 (1) 🎜🎜을 사용하세요. rrreee🎜 🎜(2) 참고🎜🎜🎜때때로 저장소의 상태에서 일부 상태를 파생해야 하는 경우(예: 추가, 삭제, 필터링 등), Vuex를 사용하면 저장소에서 "getters"를 정의할 수 있습니다( 매장 자산의 계산으로 간주됩니다). 계산된 속성과 마찬가지로 getter의 반환 값은 종속성에 따라 캐시되며, getter는 상태를 첫 번째 매개 변수로 받아들이고 메서드를 통해 액세스되는 경우에만 다시 계산됩니다. 결과를 캐싱하지 않고 매번 호출됩니다 🎜🎜🎜 (3) 구현 🎜🎜rrreee🎜🎜🎜3, mutations🎜🎜🎜🎜🎜 (1) 🎜🎜rrreeerrreee🎜🎜 사용 (2) 참고 🎜🎜 🎜만 방법 Vuex 스토어에서 상태를 변경하는 것은 돌연변이를 제출하는 것입니다. Vuex의 돌연변이는 이벤트와 유사합니다. 각 돌연변이에는 문자열 🎜이벤트 유형(유형)🎜과 🎜콜백 함수(핸들러)🎜가 있습니다. 이 콜백 함수는 상태 변경이 이루어지는 곳이며 상태를 첫 번째 매개변수로 받아들이고 돌연변이 핸들러를 직접 호출할 수 없습니다. 이 옵션은 이벤트 등록과 유사합니다. "increment 유형의 변형이 트리거되면 이 함수를 호출하세요." 변형 핸들러를 깨우려면 다음과 같이 🎜store.commit🎜 메서드를 호출해야 합니다. 해당 유형 🎜🎜추가 매개변수를 store.commit에 전달할 수 있습니다. 즉, 대부분의 경우 페이로드는 여러 필드를 포함하고 기록할 수 있는 객체여야 합니다. mutation은 더 읽기 쉬워집니다 🎜🎜🎜 (3) 구현 🎜🎜rrreee🎜🎜🎜4, actions 🎜🎜🎜🎜🎜 (1) 🎜🎜rrreee🎜🎜 사용 (2) 참고 🎜🎜- Action 提交的是 mutation,而不是直接变更状态。
- Action 可以包含任意异步操作
- Action 函数接受一个与 store 实例具有相同方法和属性的 context 对象
- Action 通过
store.dispatch方法触发 - Action 通常是异步的,
store.dispatch可以处理被触发的 action 的处理函数返回的 Promise,并且store.dispatch仍旧返回 Promise - 一个
store.dispatch在不同模块中可以触发多个 action 函数。在这种情况下,只有当所有触发函数完成后,返回的 Promise 才会执行
(3)实现
    // actions
    let actions = options.actions || {}
    this.actions = {}
    Object.keys(actions).forEach(actionName => {
      this.actions[actionName] = (arg) => {
        actions[actionName](this, arg)
      }
    })

   dispatch=(method, arg) =>{
    this.actions[method](arg)
}5、modules
(1)使用
    // actions
    let actions = options.actions || {}
    this.actions = {}
    Object.keys(actions).forEach(actionName => {
      this.actions[actionName] = (arg) => {
        actions[actionName](this, arg)
      }
    })

   dispatch=(method, arg) =>{
    this.actions[method](arg)
} //store.js
modules: {
extra: extra
}(2)注意
- 由于使用单一状态树,应用的所有状态会集中到一个比较大的对象。当应用变得非常复杂时,store 对象就有可能变得相当臃肿,Vuex 允许我们将 store 分割成模块(module) 。每个模块拥有自己的 state、mutation、action、getter、甚至是嵌套子模块——从上至下进行同样方式的分割
- 对于模块内部的 mutation 和 getter,接收的第一个参数是模块的局部状态对象
- 对于模块内部的 action,局部状态通过
context.state暴露出来,根节点状态则为context.rootState 对于模块内部的 getter,根节点状态(rootState)会作为第三个参数暴露出来
三、整体代码
let Vue = null//全局的_Vue

class Store {
  constructor (options) {
    // state
    //this.state = options.state 写法不完美,当改变数据的时候,不能动态的渲染,所以需要把data中的数据做成响应式的
    this.vm = new _Vue({
      data: {
        state: options.state//data中的数据才是响应式
      }
    })

    // getters
    let getters = options.getters || {}
    this.getters = {}
    Object.keys(getters).forEach(getterName => {
      Object.defineProperty(this.getters, getterName, {
        get: () => {
          return getters[getterName](this.state)
        }
      })
    })

    // mutations
    let mutations = options.mutations || {}
    this.mutations = {}
    Object.keys(mutations).forEach(mutationName => {
      this.mutations[mutationName] = (arg) => {//保证多个(第二个)参数的传入
        mutations[mutationName](this.state, arg)
      }
    })

    // actions
    let actions = options.actions || {}
    this.actions = {}
    Object.keys(actions).forEach(actionName => {
      this.actions[actionName] = (arg) => {
        actions[actionName](this, arg)
      }
    })

  }

  dispatch=(method, arg) =>{
    this.actions[method](arg)
  }

  commit = (method, arg) => {
    // console.log(this);
    this.mutations[method](arg)
  }

  get state() {
    return this.vm.state
  }

}

let install = function(_Vue) {
  Vue = _Vue
  Vue.mixin({
    beforeCreate() {//在组件创建之前自动调用,每个组件都有这个钩子
      if (this.$options && this.$options.store) {  // this.$options读取到根组件
        this.$store = this.$options.store
      } else { // //如果不是根组件的话,也把$store挂到上面,因为是树状组件
        this.$store = this.$parent && this.$parent.$store
      }
    }
  })
}

let Vuex = {
  Store,
  install
}

export default Vuex위 내용은 vuex의 구현 원칙에 대해 자세히 알아보세요.의 상세 내용입니다. 자세한 내용은 PHP 중국어 웹사이트의 기타 관련 기사를 참조하세요!