CSS를 사용하여 멋진 전환 애니메이션을 쉽게 얻을 수도 있습니다!
- 青灯夜游앞으로
- 2022-08-16 10:54:342888검색
CSS를 사용하면 멋진 전환 애니메이션을 쉽게 얻을 수 있습니다! 최신 CSS @scroll-timeline 사양을 활용하세요. 다음 기사에서는 두 가지 사례를 사용하여 @scroll-timeline을 사용하여 매우 멋진 전환 애니메이션을 구현하는 방법을 살펴보겠습니다. 이것이 모든 사람에게 도움이 되기를 바랍니다.

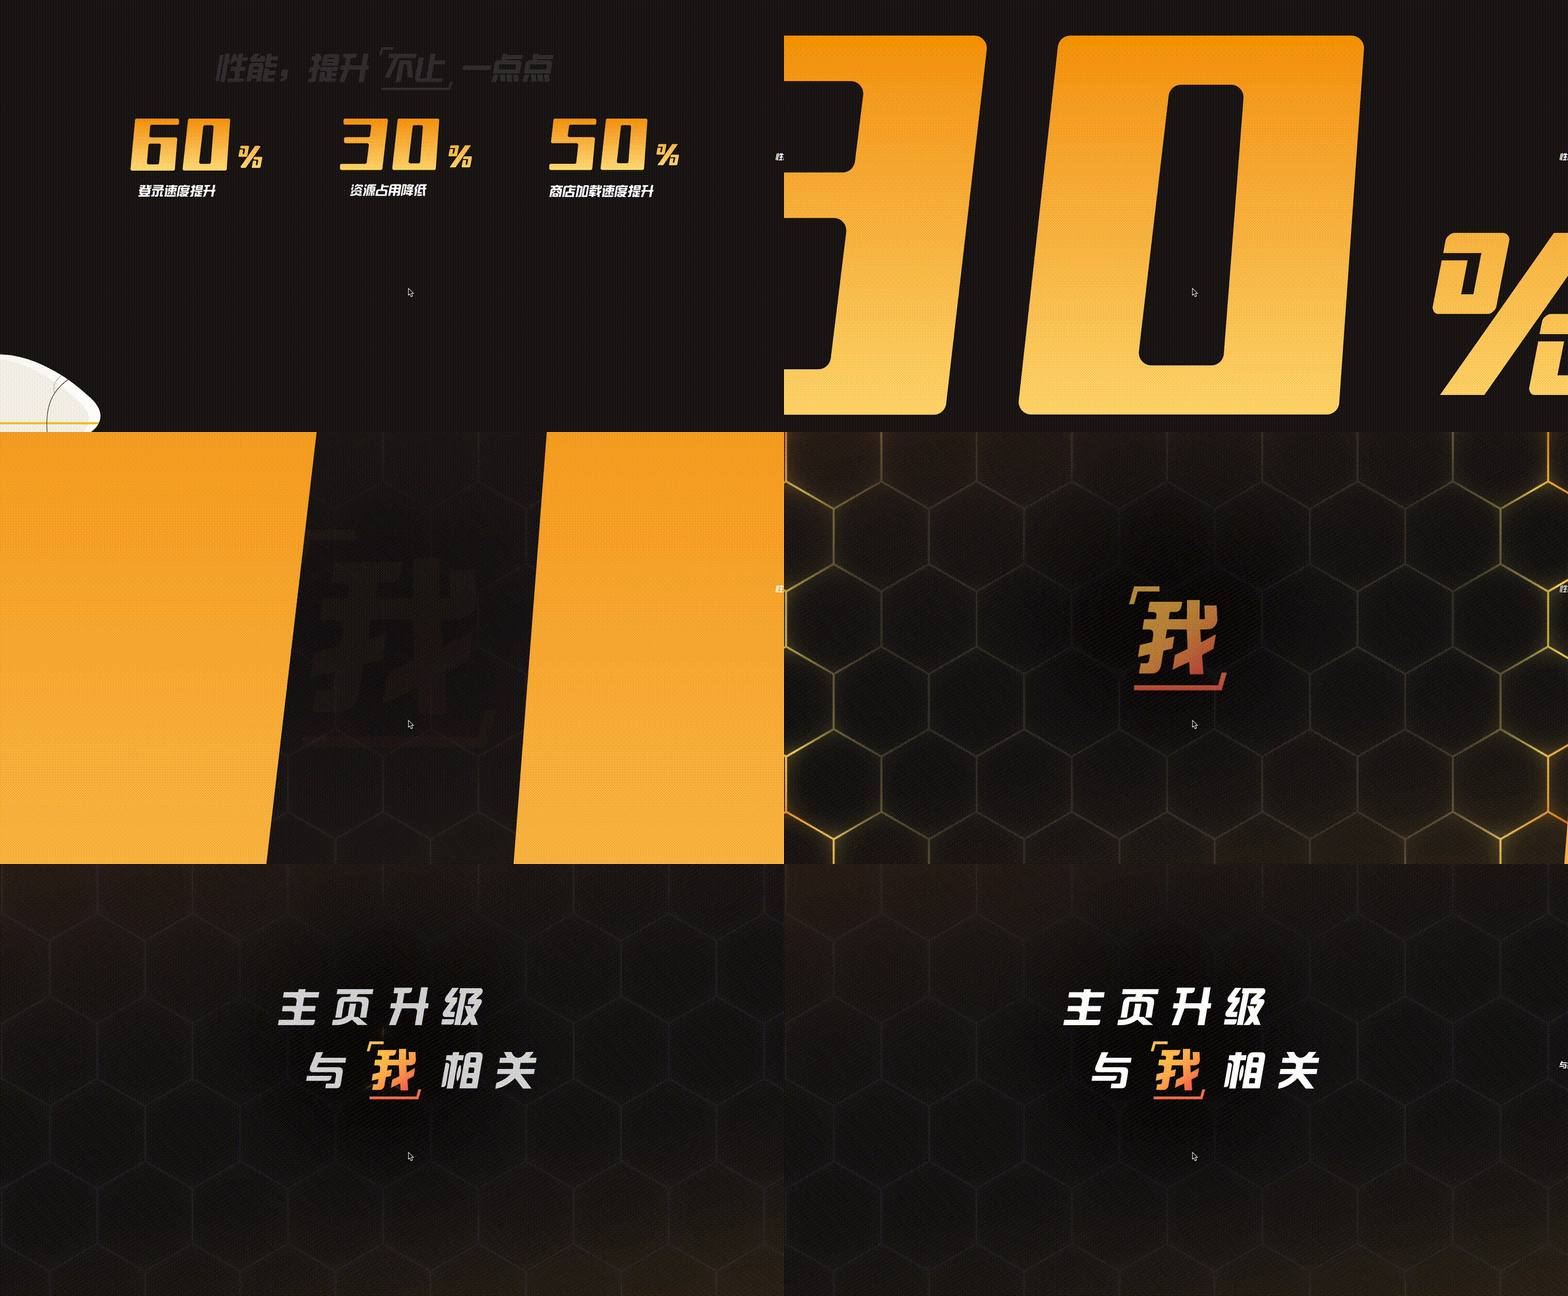
WeGame PC 공식 홈페이지에는 웰메이드 스크롤 기반 애니메이션 효과가 많이 있습니다.
여기서는 모두가 경험할 수 있는 더 흥미로운 전환 애니메이션 두 가지를 간단히 소개합니다. 전환 애니메이션 1:
css 동영상 튜토리얼]
물론 최신 CSS @scroll-timeline 사양인 CSS에 관해서 자세히 배우지 못했다면 제 글을 먼저 읽어보시면 됩니다여기야, 드디어 왔네요 여기 애니메이션 킬러가 옵니다 @scroll-timeline@scroll-timeline
转场动画一
首先,我们来看看这个动画:

核心步骤拆解一下:
处于场景 1,接着借助 WeGame 的 LOGO,LOGO 开始放大
LOGO 放大到一定程度,开始渐隐,LOGO 背后的场景 2 逐渐渐现
LOGO 放大且渐隐消失,场景 2 完全出现
这里,要实现整个动画,有一个非常重要的场景,就是能够利用 LOGO 元素,切割背景,只看到 LOGO 背后的元素,像是得到一张这样的图片:

注意,图片的白色部分,不是白色,而是需要透明,能够透出背后的元素。
当然,我们可以让 UI 切一张这样的图出来,但是毕竟太麻烦了。
假设我们只有一张 LOGO 元素:

我们如何能够借助这个 LOGO,切割背景呢?
借助 mask 及 mask-composite 切割背景
是的,这里我们可以使用 mask。我们来尝试一下:
<div></div>
div {
    background: linear-gradient(-75deg, #715633, #2b2522);
}
假设我们有这样一张背景:

我们使用 LOGO 图作为 MASK,对该背景进行切割:
div {
    background: linear-gradient(-75deg, #715633, #2b2522);
    mask: url(WeGame-LOGO图.png);
    mask-repeat: no-repeat;
    mask-position: center center;
}
我们会得到这样一张图:

Oh No,这与我们想象的刚好相反,我们要的是 LOGO 处透明,背景的其他处保留。
怎么做呢?不要慌,这里可以使用上我们上一篇文章介绍过的 -webkit-mask-composite,还不太了解的可以戳这里看看:高阶切图技巧!基于单张图片的任意颜色转换
我们简单改造一下代码:
div {
    background: linear-gradient(-75deg, #715633, #2b2522);
    mask: url(//wegame.gtimg.com/g.55555-r.c4663/wegame-home/sc01-logo.52fe03c4.svg), linear-gradient(#fff, #fff);
    mask-repeat: no-repeat;
    mask-position: center center;
    -webkit-mask-composite: xor;
}
这样,我们能就顺利的得到了这样一张图形:

当然这里需要注意的是,白色区域并非白色,而是透明的,可以透出背后的内容。
配合 @scroll-timeline
好,如此一来,基于上述的剪切层,再配合 @scroll-timeline
전환 애니메이션 1🎜
🎜먼저 이 애니메이션을 살펴보겠습니다.
🎜 🎜🎜🎜🎜핵심 단계 분해: 🎜
- 🎜장면 1에서는 WeGame 로고의 도움으로 로고가 확대되기 시작합니다🎜 li>
- 🎜로고가 어느 정도 확대되어 페이드 아웃되기 시작하고, 로고 뒤의 2번째 장면이 점차 나타나기 시작합니다🎜
- 🎜로고가 확대되어 페이드 아웃되면서 2번째 장면이 나타납니다 완전히 나타납니다🎜
 🎜🎜주의하세요, 🎜사진의 흰색 부분은 흰색이 아니지만 뒤에 있는 요소가 드러나도록 투명해야 합니다 🎜. 🎜🎜물론 UI에서 이런 그림을 잘라내도록 할 수도 있지만 결국 너무 번거롭습니다. 🎜🎜로고 요소가 하나만 있다고 가정합니다: 🎜🎜
 🎜🎜이 로고를 사용하여 배경을 자르려면 어떻게 해야 하나요? 🎜
🎜마스크와 마스크 합성을 사용하여 배경 자르기🎜
🎜예, 여기서는마스크를 사용할 수 있습니다. 시도해 봅시다: 🎜<div></div><div></div><div></div>
.g-scroll {
    position: relative;
    width: 100vw;
    height: 500vh;
}
.g-wrap {
    position: fixed;
    top: 0;
    left: 0;
    width: 100vw;
    height: 100vh;
    overflow: hidden;
}
.g-container {
    position: absolute;
    top: 0;
    left: 0;
    width: 100vw;
    height: 100vh;
    animation-name: scale;
    animation-duration: 10s;
    animation-timeline: box-move;
}
.g-bg {
    position: fixed;
    width: 100vw;
    height: 100vh;
    background: url(LOGO背后的图层);
}
.g-wegame {
    position: absolute;
    width: 100vw;
    height: 100vh;
    background: linear-gradient(-75deg, #715633, #2b2522);
    mask: url(//wegame.gtimg.com/g.55555-r.c4663/wegame-home/sc01-logo.52fe03c4.svg), linear-gradient(#fff, #fff);
    mask-repeat: no-repeat;
    mask-position: center center;
    -webkit-mask-composite: xor;
}
@scroll-timeline box-move {
    source: selector("#g-scroll");
    orientation: "vertical";
}
@keyframes scale {
    0% {
        transform: scale(1);
    }
    100% {
        transform: scale(60);
    }
}
🎜다음과 같은 배경이 있다고 가정해 보겠습니다: 🎜🎜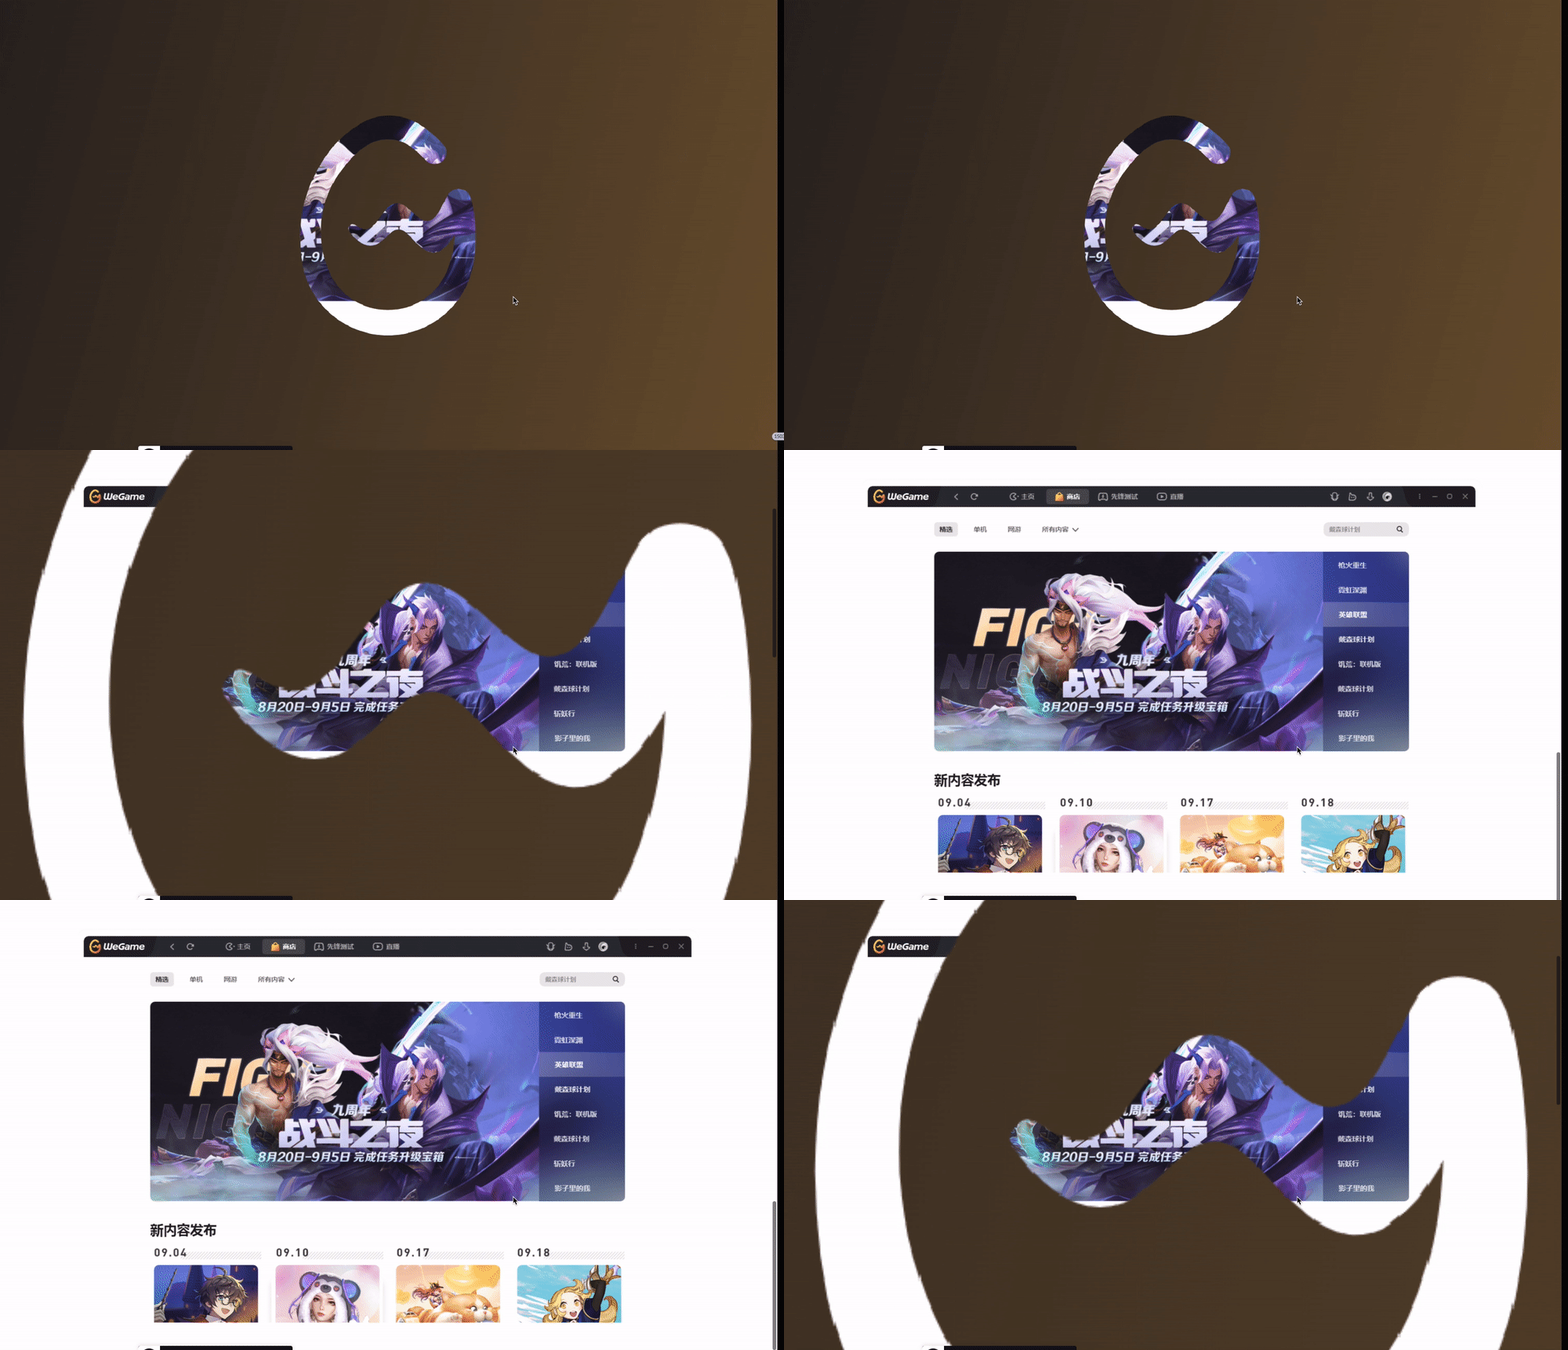 🎜 🎜 배경을 자르기 위해 로고 사진을 마스크로 사용합니다: 🎜
<div></div>🎜다음과 같은 사진을 얻게 됩니다: 🎜🎜<div></div><div></div> <div></div> <div></div>
 🎜🎜아 아니 이건 우리가 상상했던 것과 정반대네요 🎜우리가 원하는 건 로고는 투명하고 나머지 배경은 유지하세요🎜. 🎜🎜어떻게 하나요? 당황하지 마세요. 이전 기사에서 소개한
 -webkit-mask-composite를 사용할 수 있습니다. 이에 대해 잘 모르는 경우 여기를 클릭하여 살펴볼 수 있습니다. 고급 커팅 기술! 단일 이미지를 기반으로 한 모든 색상 변환 🎜🎜🎜 간단히 코드를 변환해 보겠습니다: 🎜.g-scroll {
position: relative;
width: 100vw;
height: 500vh;
}
.g-wrap {
position: fixed;
top: 0;
left: 0;
width: 100vw;
height: 100vh;
overflow: hidden;
}
.g-container {
position: absolute;
top: 0;
left: 0;
width: 100vw;
height: 100vh;
animation-name: scale;
animation-duration: 10s;
animation-timeline: box-move;
}
.g-bg {
position: fixed;
width: 100vw;
height: 100vh;
background: url(//背景图片,场景2);
}
.g-wegame {
position: absolute;
width: 100vw;
height: 100vh;
background: linear-gradient(-75deg, #715633, #2b2522);
mask: url(//WeGame-Logo.png), linear-gradient(#fff, #fff);
mask-repeat: no-repeat;
mask-position: center center;
-webkit-mask-composite: xor;
z-index: 1;
}
.g-mask {
position: aboslute;
width: 100vw;
height: 100vh;
background: linear-gradient(-75deg, #715633, #2b2522);
z-index: 2;
animation-name: reOpacityChange;
animation-duration: 10s;
animation-timeline: box-move;
animation-function-timing: linear;
}
.g-logo {
position: absolute;
background: url(//WeGame-Logo.png);
background-repeat: no-repeat;
background-position: center center;
z-index: 3;
animation-name: reOpacityChange;
animation-duration: 10s;
animation-timeline: box-move;
}
@scroll-timeline box-move {
source: selector("#g-scroll");
orientation: "vertical";
}
@keyframes reOpacityChange {
0%,
50% {
opacity: 1;
}
100% {
opacity: 0;
}
}
@keyframes scale {
0% {
transform: scale(1);
}
100% {
transform: scale(60);
}
}🎜 이렇게 하면 다음과 같은 그래픽을 성공적으로 얻을 수 있습니다: 🎜🎜 🎜🎜물론 여기서 짚고 넘어가야 할 점은 흰색 영역 흰색이 아닌 투명하여 뒤에 있는 내용이 드러납니다. 🎜
🎜@scroll-timeline🎜
🎜 좋습니다. 위의 shearing 레이어를 기반으로@scroll-timeline을 사용하여 가장 기본적인 애니메이션 효과를 시뮬레이션해 보겠습니다. 🎜<div></div><div></div><div></div>
.g-scroll {
position: relative;
width: 100vw;
height: 500vh;
}
.g-wrap {
position: fixed;
top: 0;
left: 0;
width: 100vw;
height: 100vh;
overflow: hidden;
}
.g-container {
position: absolute;
top: 0;
left: 0;
width: 100vw;
height: 100vh;
animation-name: scale;
animation-duration: 10s;
animation-timeline: box-move;
}
.g-bg {
position: fixed;
width: 100vw;
height: 100vh;
background: url(LOGO背后的图层);
}
.g-wegame {
position: absolute;
width: 100vw;
height: 100vh;
background: linear-gradient(-75deg, #715633, #2b2522);
mask: url(//wegame.gtimg.com/g.55555-r.c4663/wegame-home/sc01-logo.52fe03c4.svg), linear-gradient(#fff, #fff);
mask-repeat: no-repeat;
mask-position: center center;
-webkit-mask-composite: xor;
}
@scroll-timeline box-move {
source: selector("#g-scroll");
orientation: "vertical";
}
@keyframes scale {
0% {
transform: scale(1);
}
100% {
transform: scale(60);
}
}
这里,想要看懂上述代码,你必须已经掌握了基本的 CSS @scroll-timeline 语法。其余的内容,简单解释下:
我们在 LOGO 后面的图层,用
.g-bg使用一张图片表示了场景 2#g-scroll用于基于滚动条的滚动,实现滚动动画.g-wegame里面就是上述使用mask和mask-composite实现的图层
好,此时,我们向下滚动动画,就会触发 .g-container 的动画,也就是从 transform: scale(1) 到 transform: scale(60),我们来看看效果:

有点那个意思了。但是,这里还缺少了一些细节。
首先我们需要有一个 LOGO,它的透明度从 1 逐渐渐隐到 0,这个比较简单,加完之后,我们看看效果:
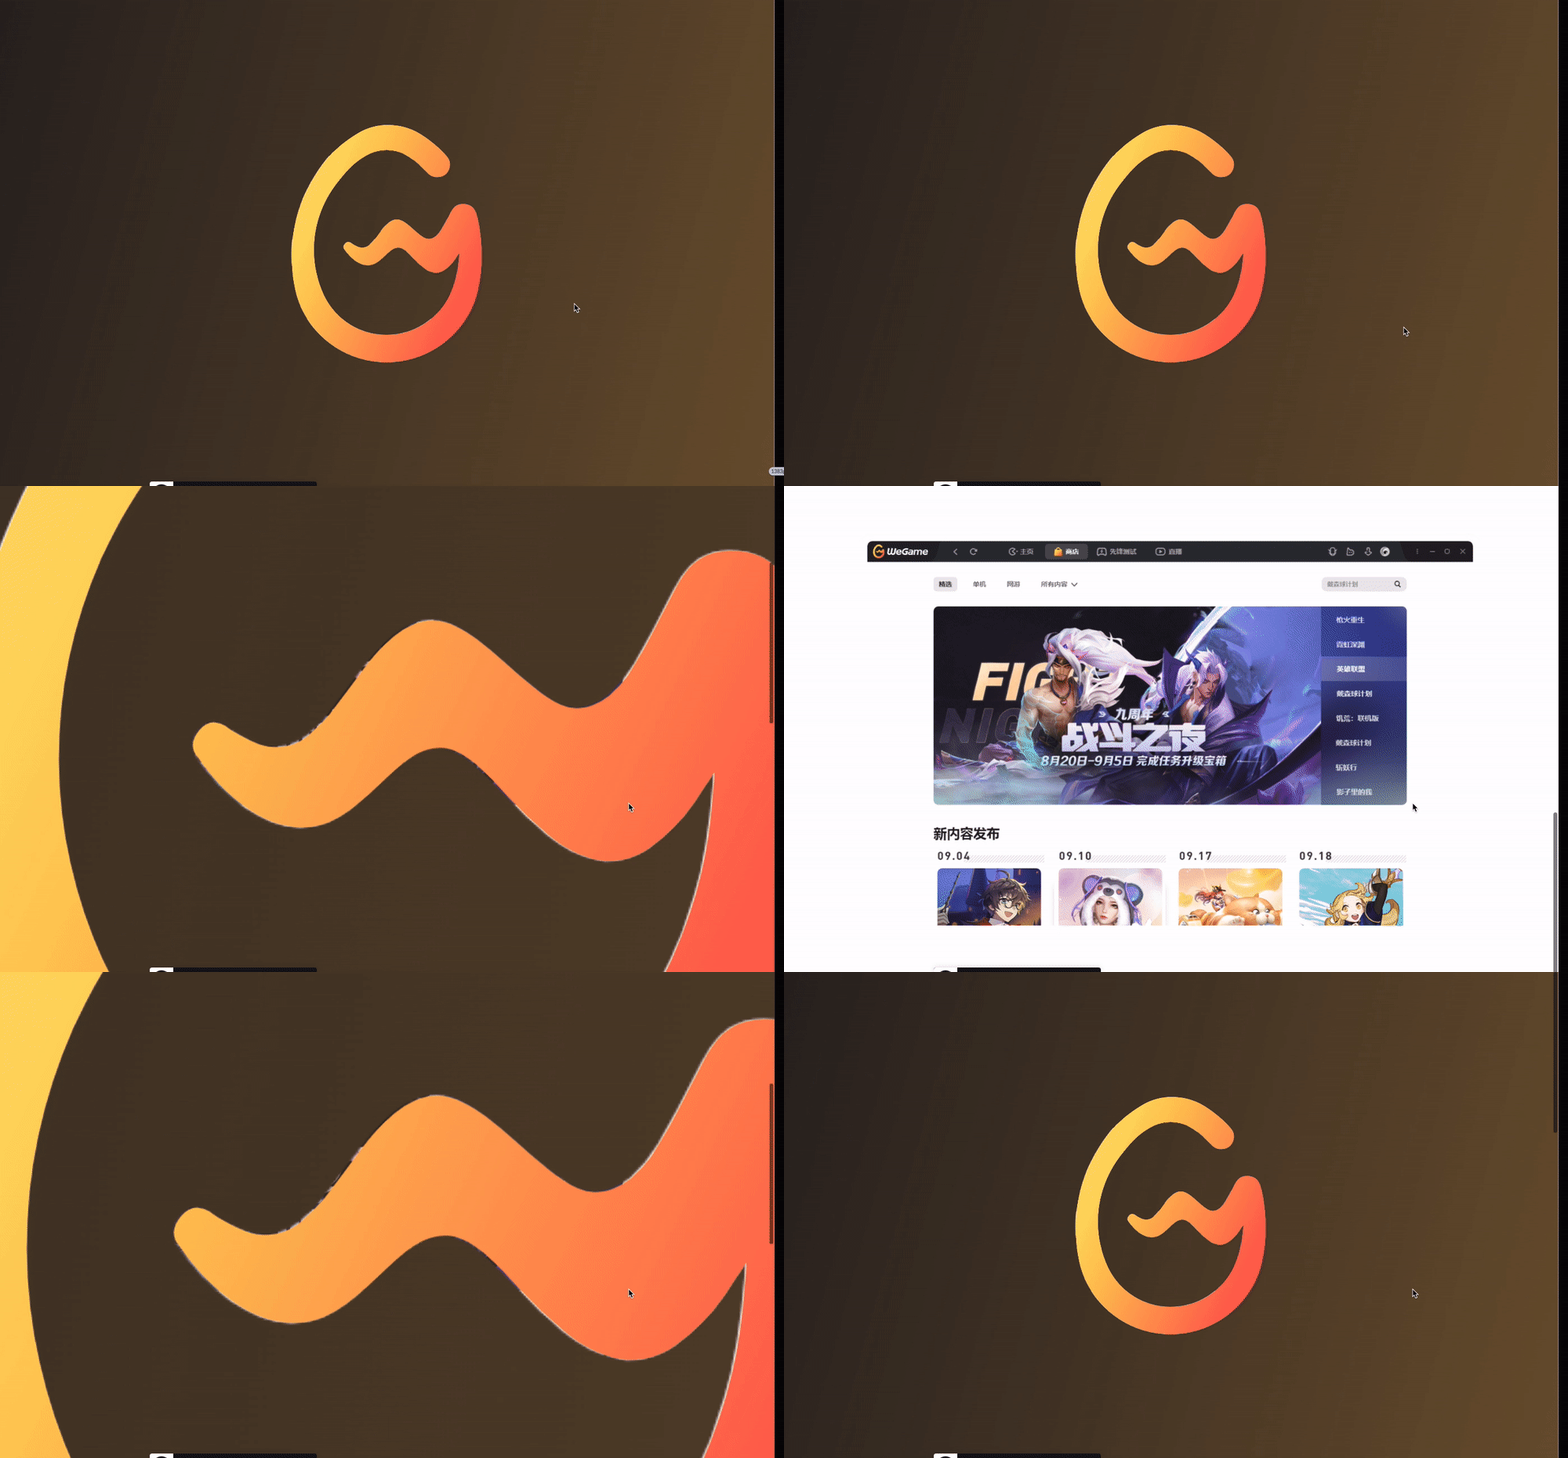
离目标又近了一步,但是,仔细观察原效果,我们还少了一层:

在 LOGO 渐隐的过程中,背后的背景不是直接呈现的,而是有一个渐现的过程。所以,完整而言,在动画过程从,一共会有 4 层:
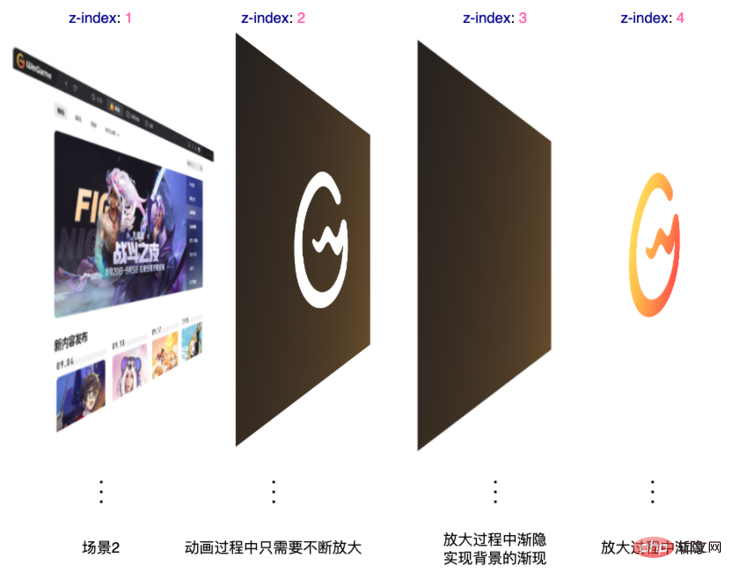
所以,完整的代码,大概是这样的:
<div></div><div></div><div></div> <div></div> <div></div>
.g-scroll {
    position: relative;
    width: 100vw;
    height: 500vh;
}
.g-wrap {
    position: fixed;
    top: 0;
    left: 0;
    width: 100vw;
    height: 100vh;
    overflow: hidden;
}
.g-container {
    position: absolute;
    top: 0;
    left: 0;
    width: 100vw;
    height: 100vh;
    animation-name: scale;
    animation-duration: 10s;
    animation-timeline: box-move;
}
.g-bg {
    position: fixed;
    width: 100vw;
    height: 100vh;
    background: url(//背景图片,场景2);
}
.g-wegame {
    position: absolute;
    width: 100vw;
    height: 100vh;
    background: linear-gradient(-75deg, #715633, #2b2522);
    mask: url(//WeGame-Logo.png), linear-gradient(#fff, #fff);
    mask-repeat: no-repeat;
    mask-position: center center;
    -webkit-mask-composite: xor;
    z-index: 1;
}
.g-mask {
    position: aboslute;
    width: 100vw;
    height: 100vh;
    background: linear-gradient(-75deg, #715633, #2b2522);
    z-index: 2;
    animation-name: reOpacityChange;
    animation-duration: 10s;
    animation-timeline: box-move;
    animation-function-timing: linear;
}
.g-logo {
    position: absolute;
    background: url(//WeGame-Logo.png);
    background-repeat: no-repeat;
    background-position: center center;
    z-index: 3;
    animation-name: reOpacityChange;
    animation-duration: 10s;
    animation-timeline: box-move;
}
@scroll-timeline box-move {
    source: selector("#g-scroll");
    orientation: "vertical";
}
@keyframes reOpacityChange {
    0%,
    50% {
        opacity: 1;
    }
    100% {
        opacity: 0;
    }
}
@keyframes scale {
    0% {
        transform: scale(1);
    }
    100% {
        transform: scale(60);
    }
}
这样,我们就基本能够还原原效果了:
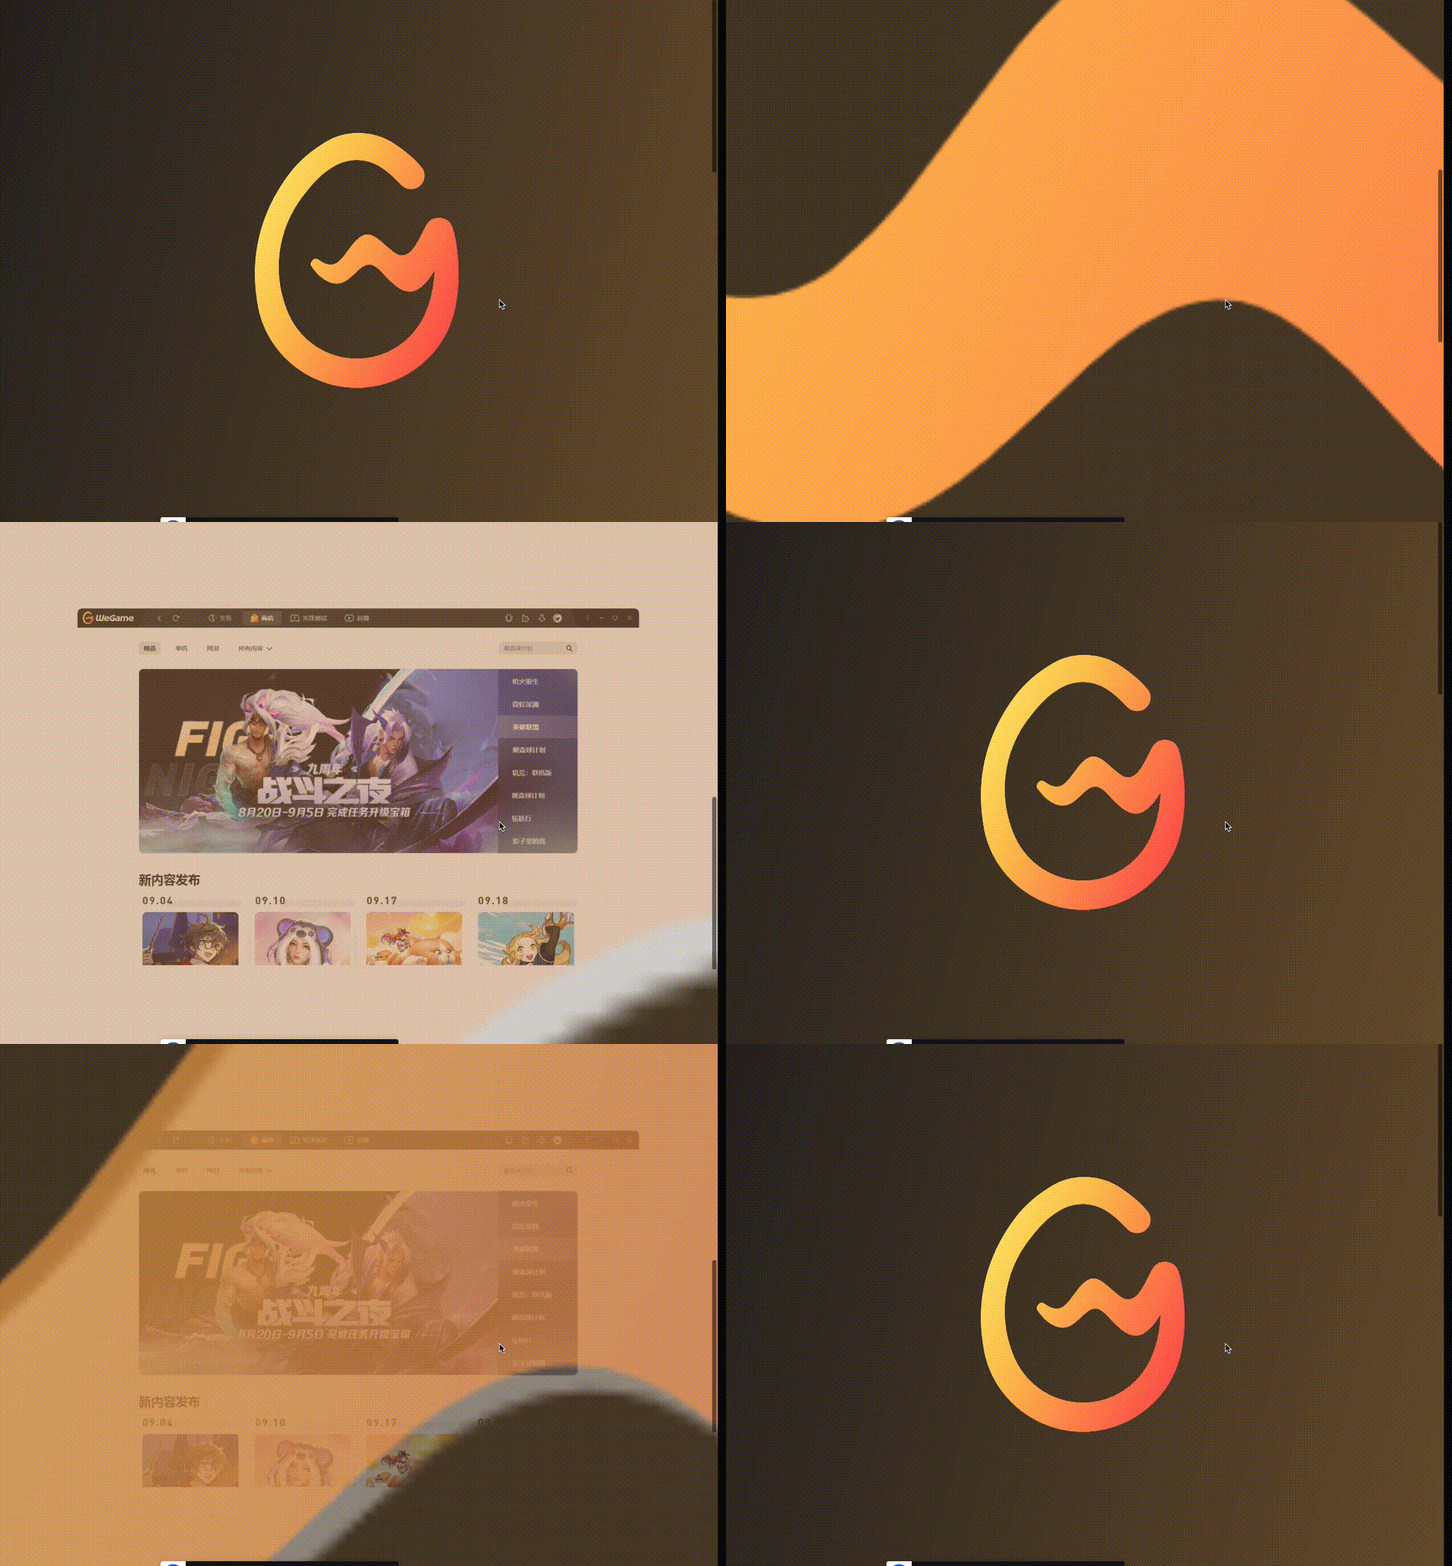
完整的代码,你可以戳这里:CodePen Demo - WeGame Animation Demo
转场动画二
好,搞定了一个,我们继续来看下一个:

这里,我们也简单拆解下动画:
数字放大,逐渐带出场景 2
场景 2 有一个非常酷炫的光影收缩效果
这里的数字放大与第一个转场动画其实非常类似,就不详细讲了。
我们来看看,在场景 2 这里,光影的收缩效果如何实现。
这里看似负责,但是,其实非常的简单。这里,核心在于这两张图片:
图片素材 1:
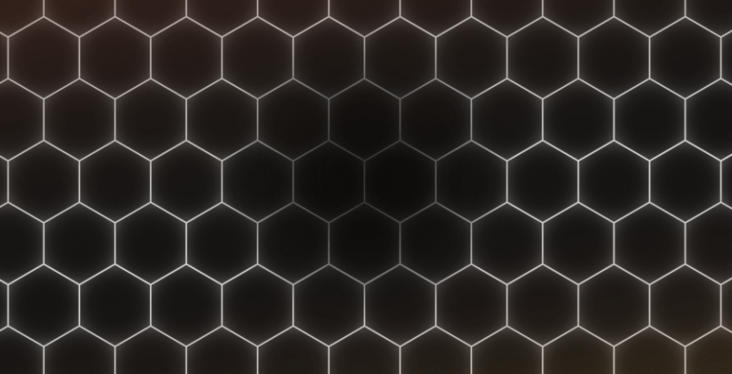
注意,这里最为核心的在于,图片中的白色不是白色,是透明的,可以透出背景的内容。
这样,我们只需要在这张图片的背后,放置另外这样一张图片:

想到了吗?没错,就是让这张图片从一个较大的 transform: scale() 值,变化到一个较小的 transform: scale() 值即可!
什么意思呢?看看这张图你就懂了:
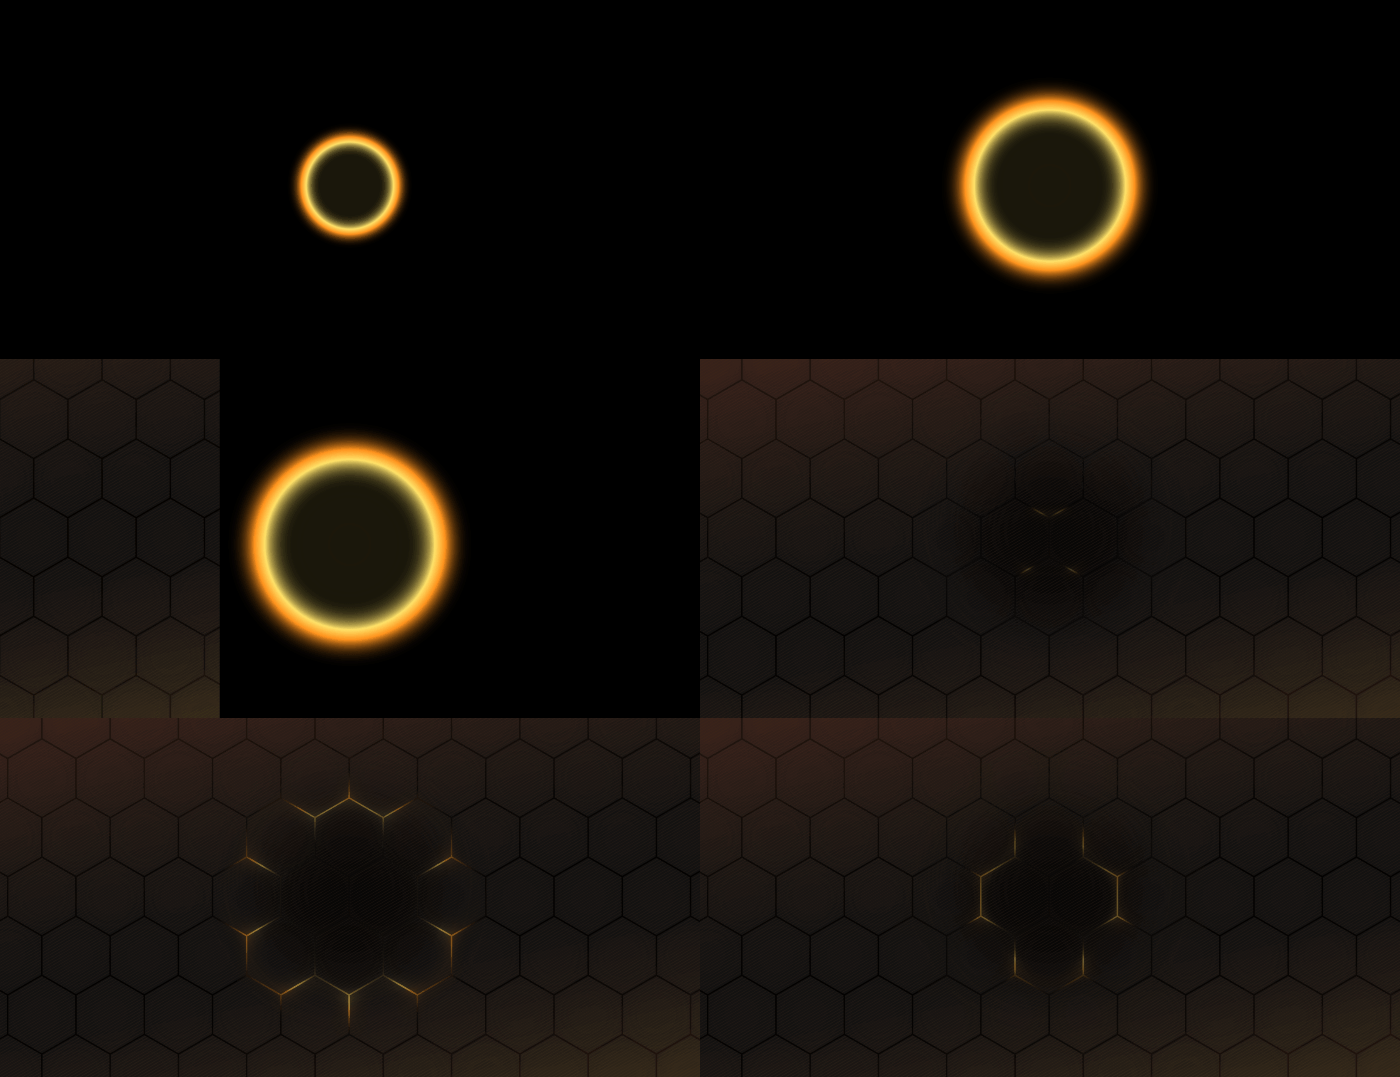
知道了解到这一点,整个动画也就比较简单了。当然,这里我们也同样借助了 CSS @scroll-timeline 完成整个动画:
<div></div><div></div> <div></div>30
.g-scroll {
    position: relative;
    width: 100vw;
    height: 500vh;
}
.g-container {
    position: fixed;
    top: 0;
    left: 0;
    width: 100vw;
    height: 100vh;
    overflow: hidden;
}
.g-bg {
    position: absolute;
    top: 0;
    left: 0;
    width: 100%;
    height: 100%;
    background: url(//蜂巢图片.png);
    z-index: 1;
}
.g-circle {
    position: absolute;
    top: 50%;
    left: 50%;
    transform: translate(-50%, -50%) scale(.5);
    width: 400px;
    height: 400px;
    background: url(//光圈图片.png);
    animation-name: scale;
    animation-duration: 10s;
    animation-timeline: box-move;
}
.g-word {
    position: absolute;
    top: 50%;
    left: 50%;
    transform: translate(-50%, -50%);
    font-size: 12vw;
    z-index: 10;
    color: transparent;
    background: linear-gradient(#f8a011, #ffd973);
    background-clip: text;
    animation-name: scaleWord;
    animation-duration: 10s;
    animation-timeline: box-move;
}
@scroll-timeline box-move {
    source: selector("#g-scroll");
    orientation: "vertical";
}
@keyframes scale {
    0% {
        transform: translate(-50%, -50%) scale(10);
    }
    100% {
        transform: translate(-50%, -50%) scale(.5);
    }
}
@keyframes scaleWord {
    0% {
        transform: translate(-50%, -50%) scale(.5);
    }
    100% {
        transform: translate(calc(-50% - 5000px), -50%) scale(100);
    }
}
整个动画需要看懂,其实还是要有一定的功底的。上效果:
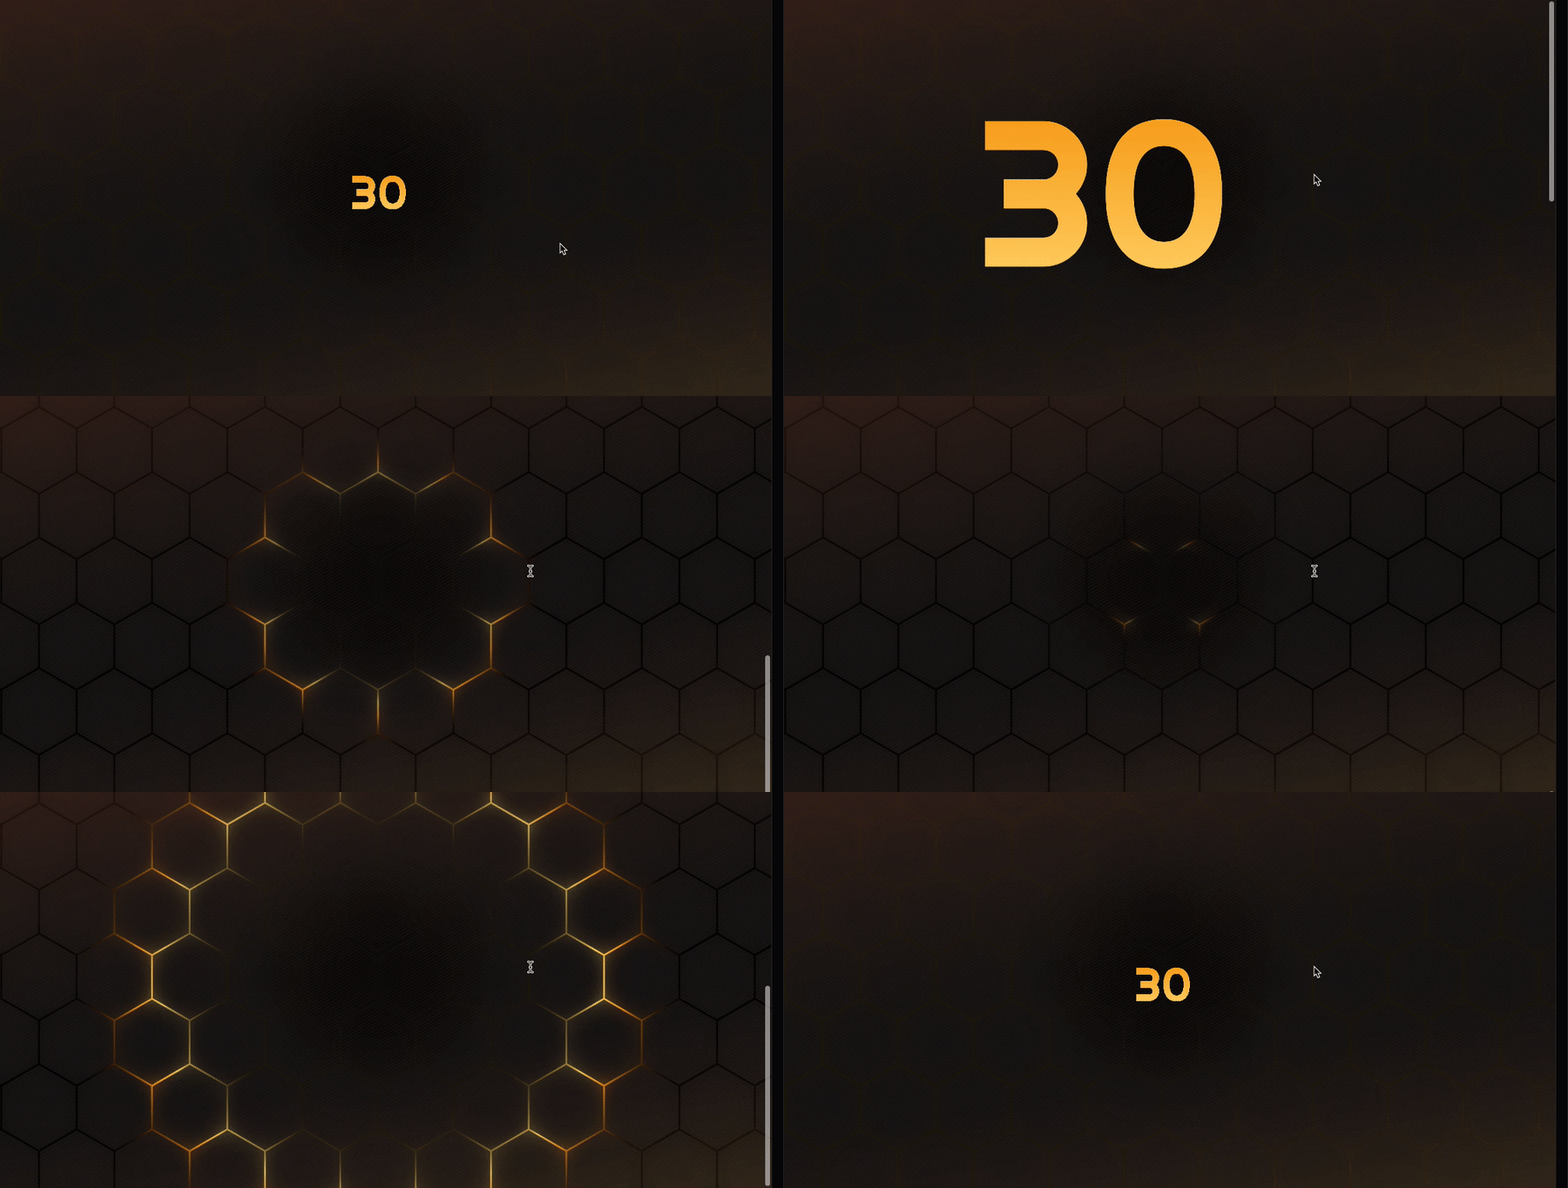
完整的代码,你可以戳这里:CodePen Demo - WeGame Animation Demo
这样,借助强大的 CSS 以及一些有意思的技巧,我们利用纯 CSS 实现了这两个看似非常复杂的转场动画效果,并且,这在之前,是完全不可能使用纯 CSS 实现的。
原文地址:https://segmentfault.com/a/1190000042184211
作者:chokcoco
(학습 영상 공유: 웹 프론트엔드)
위 내용은 CSS를 사용하여 멋진 전환 애니메이션을 쉽게 얻을 수도 있습니다!의 상세 내용입니다. 자세한 내용은 PHP 중국어 웹사이트의 기타 관련 기사를 참조하세요!

