CSS3 의사 요소란 무엇입니까?
- 青灯夜游원래의
- 2022-03-15 15:25:343581검색
css3 의사 요소에는 다음이 포함됩니다. 1. "::after", 지정된 요소 뒤에 일부 내용을 삽입할 수 있음 2. "::before" 3. "::first-letter"; - 라인"; 5. "::선택"; 6. "::자리표시자".

이 튜토리얼의 운영 환경: Windows7 시스템, CSS3&&HTML5 버전, Dell G3 컴퓨터.
Pseudo-element는 선택기 끝에 추가되는 키워드입니다. Pseudo-element를 통해 요소의 ID나 클래스 속성을 사용하지 않고도 선택한 요소의 특정 부분에 대한 스타일을 정의할 수 있습니다. 예를 들어 의사 요소를 통해 단락의 첫 글자 스타일을 설정하거나 요소 앞이나 뒤에 내용을 삽입하는 등의 작업을 할 수 있습니다.
CSS1 및 CSS2에서 의사 요소의 사용은 의사 클래스와 동일하며 콜론 :이 선택기에 연결됩니다. 그러나 CSS3에서는 의사 요소에 대한 단일 콜론 사용이 의사 클래스와 의사 요소를 구별하기 위해 이중 콜론 ::으로 변경되었습니다. 따라서 의사 요소를 사용할 때는 단일 콜론 대신 이중 콜론을 사용하는 것이 좋습니다. :与选择器相连。但在 CSS3 中,将伪元素单冒号的使用方法改为了使用双冒号::,以此来区分伪类和伪元素。因此,建议在使用伪元素时使用双冒号而不是单冒号。
selector::pseudo-element {
    property: value;
}其中,selector 为选择器,pseudo-element 为伪元素的名称,property 为 CSS 中的属性,value
<!DOCTYPE html>
<html>
<head>
<style>
p.one::after {
content:"";
display: inline-block;
width: 50px;
height: 10px;
background: blue;
}
p.two::after {
content:"要插入的内容";
color: red;
font-size: 6px;
}
p.three::after {
content: url('./smiley.gif');
position: relative;
top: 8px;
}
</style>
</head>
<body>
<p class="one">伪元素 ::after</p>
<p class="two">伪元素 ::after</p>
<p class="three">伪元素 ::after</p>
</body>
</html>그 중 selector는 선택자, pseudo-element는 의사 요소의 이름, property는 CSS의 속성, 값은 속성에 해당하는 값입니다. CSS는 다음 표에 표시된 대로 일련의 의사 요소를 제공합니다. | Pseudo-element | Example | 예제 설명 |
|---|---|---|
| ::after | p::after | 각각에서 < ;p> 요소 뒤에 콘텐츠 삽입 |
| ::before | p::before | 각 |
| ::first-letter | p::first-letter | 각 |
| ::first-line | p::first-line | 은 각 |
| ::selection | p::selection | 은 사용자가 선택한 요소의 일부와 일치합니다 |
| ::placeholder | input::placeholder | 은 각 양식 입력 상자의 자리 표시자 속성 |
1. ::after
伪元素 ::after 能够在指定元素的后面插入一些内容,在 ::after 中需要使用 content 属性来定义要追加的内容,而且在 ::after 中必须定义 content 属性才会生效(没有需要插入的内容时可以将 content 属性的值定义为空"")。
下面通过一个示例来演示伪元素 ::after 的使用:
<!DOCTYPE html>
<html>
<head>
<style>
p.one::after {
content:"";
display: inline-block;
width: 50px;
height: 10px;
background: blue;
}
p.two::after {
content:"要插入的内容";
color: red;
font-size: 6px;
}
p.three::after {
content: url('./smiley.gif');
position: relative;
top: 8px;
}
</style>
</head>
<body>
<p class="one">伪元素 ::after</p>
<p class="two">伪元素 ::after</p>
<p class="three">伪元素 ::after</p>
</body>
</html>运行结果如下图所示:
2. ::before
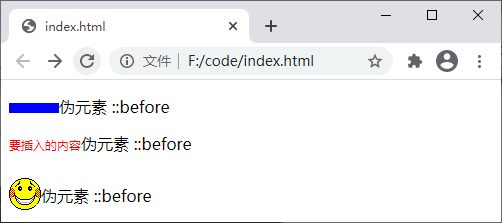
伪元素 ::before 能够在指定元素的前面插入一些内容。与 ::after 相似,::before 中也需要使用 content 属性来定义要追加的内容,而且在 ::before 中必须定义 content 属性才会生效(没有需要插入的内容时可以将 content 属性的值定义为空"")。
下面通过一个示例来演示伪元素 ::before 的使用:
<!DOCTYPE html>
<html>
<head>
<style>
p.one::before {
content:"";
display: inline-block;
width: 50px;
height: 10px;
background: blue;
}
p.two::before {
content:"要插入的内容";
color: red;
font-size: 6px;
}
p.three::before {
content: url('./smiley.gif');
position: relative;
top: 8px;
}
</style>
</head>
<body>
<p class="one">伪元素 ::before</p>
<p class="two">伪元素 ::before</p>
<p class="three">伪元素 ::before</p>
</body>
</html>运行结果如下图所示:

3. ::first-letter
伪元素 ::first-letter 用来设置指定元素中内容第一个字符的样式,通常用来配合 font-size 和 float 属性制作首字下沉效果。需要注意的是,伪元素 ::first-letter 仅可以用于块级元素,行内元素想要使用该伪元素,则需要先将其转换为块级元素。
下面通过示例来演示伪元素 ::first-letter 的使用:
<!DOCTYPE html>
<html>
<head>
    <style>
        p::first-letter{
            font-size: 2em;
            color: blue;
        }
    </style>
</head>
<body>
    <p>伪元素 ::first-letter</p>
</body>
</html>
运行结果如下图所示:

4. ::first-line
伪元素 ::first-line 用来设置指定元素中内容第一行的样式,与 ::first-letter 类似,伪元素 ::first-line 也仅可以用于块级元素,行内元素想要使用该伪元素,则需要先将其转换为块级元素。
下面通过示例来演示伪元素 ::first-line 的使用:
<!DOCTYPE html>
<html>
<head>
    <style>
        p::first-line{
            font-size: 1.5em;
            color: blue;
            font-weight: bold;
        }
    </style>
</head>
<body>
    <p>伪元素 ::first-line 用来设置指定元素中内容第一行的样式,与 ::first-letter 类似,伪元素 ::first-line 也仅可以用于块级元素,行内元素想要使用该伪元素,则需要先将其转换为块级元素。</p>
</body>
</html>
运行结果如下图所示:
5. ::selection
伪元素 ::selection 用来设置对象被选中时的样式,需要注意的是,伪元素 ::selection 中只能定义元素被选中时的 color、background、cursor、outline 以及 text-shadow(IE11 尚不支持定义该属性)等属性。
下面通过示例来演示伪元素 ::selection 的使用:
<!DOCTYPE html>
<html>
<head>
    <style>
        p::selection{
            color: red;
            background-color: #CCC;
        }
    </style>
</head>
<body>
    <p>伪元素 ::selection 用来设置对象被选中时的样式,需要注意的是,伪元素 ::selection 中只能定义元素被选中时的 color、background、cursor、outline 以及 text-shadow(IE11 尚不支持定义该属性)等属性。 </p>
</body>
</html>
运行结果如下图所示:
6. ::placeholder
伪元素 ::placeholder 用来设置表单元素(、
<!DOCTYPE html>
<html>
<head>
    <style>
        input.text::placeholder{
            color: red;
            background-color: #CCC;
        }
    </style>
</head>
<body>
    <input placeholder="请输入一段文本">未使用伪元素 ::placeholder<br>
    <input placeholder="请输入一段文本" class="text">使用伪元素 ::placeholder 的效果
</body>
</html>
运行结果如下图所示:

위 내용은 CSS3 의사 요소란 무엇입니까?의 상세 내용입니다. 자세한 내용은 PHP 중국어 웹사이트의 기타 관련 기사를 참조하세요!


