Android アニメーション コレクションの属性アニメーション - 初見
このセクションの紹介:
このセクションでは、Android アニメーションの 3 番目のタイプのアニメーションであるプロパティ アニメーションについて説明します。 前のセクション 8.4.2 Android アニメーション コレクション トゥイーン アニメーション はフラグメントであることを思い出してください。 トランジション アニメーションを設定するとき、App パッケージと V4 パッケージの Fragment がそれに応じて setCustomAnimations() を呼び出すと述べました。 アニメーションの種類は異なります。v4 パッケージの下にあるものは Animation ですが、アプリ パッケージの下にあるものは
アニメーション一般アニメーションは、前に学習した フレーム アニメーションとトゥイーン アニメーション です。 アニメーターは、このセクションで説明する属性アニメーションです! 属性アニメーションに関しては、偉人である Guo おじさんが 3 つの非常に優れた要約記事を書いています。車輪を再発明する必要はありません。 ただし、ここでは内容のほとんどが次の 3 つの記事を参照しています:
Android 属性アニメーションの完全解析 (前編)、初めての属性アニメーションの基本的な使い方 Android 属性アニメーションの完全解析アニメーション (パート 2)、ValueAnimator、および ObjectAnimator の高度な使用法Android プロパティ アニメーションの完全な分析 (パート 2)、Interpolator と ViewPropertyAnimator の使用法が非常によく書かれていますまたは、この記事を直接スキップして、上記の 3 つの記事をお読みください~
もちろん、私の話を見ていただけるなら大歓迎です。それでは、このセクションを始めましょう~
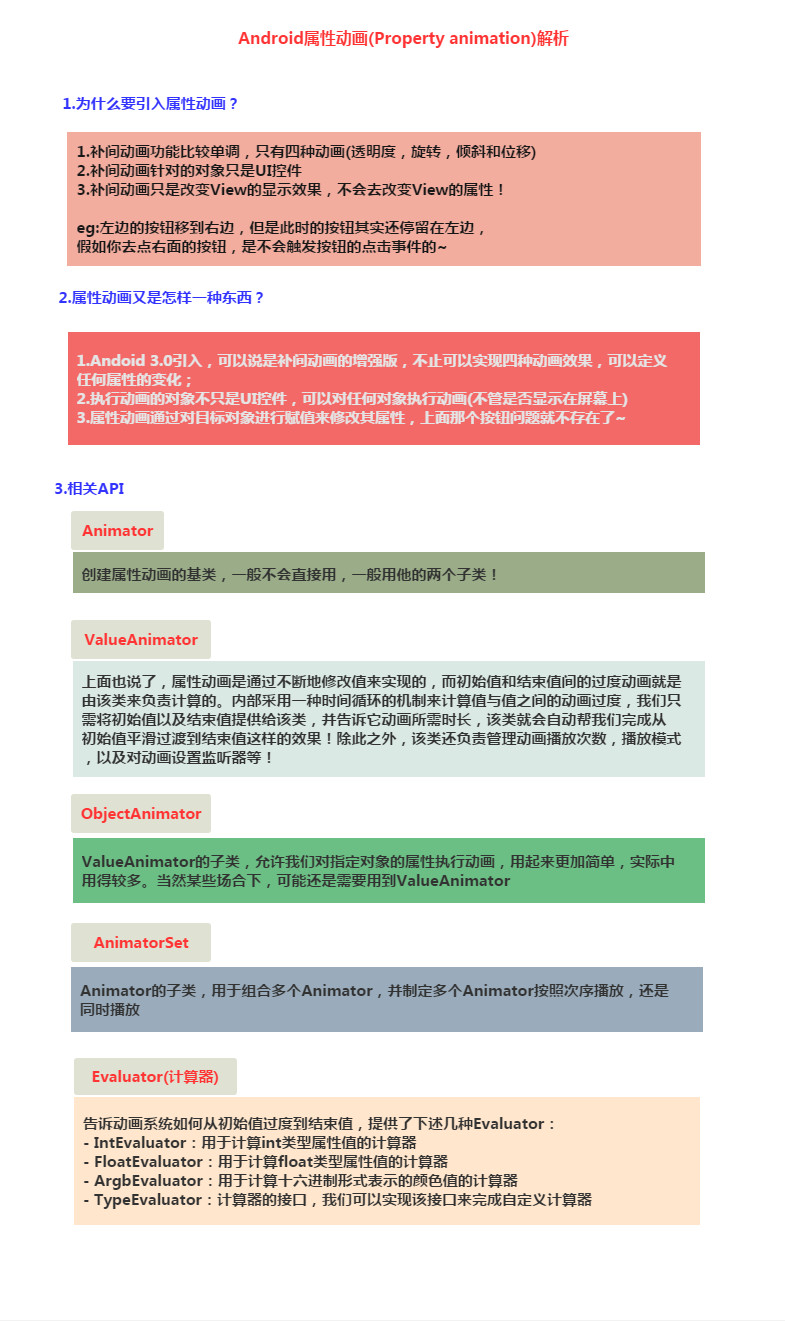
1. 属性アニメーションの概念いいえ、そのまま行ってください。写真を見ると、とても暴力的です~

使用プロセス
:
1. ValueAnimatorの- ofInt
- ()、ofFloat()を呼び出します。 オブジェクトの () 静的メソッドを使用して ValueAnimator インスタンスを作成します 2. インスタンスの setXxx メソッドを呼び出して、アニメーションの継続時間、補間方法、繰り返し回数などを設定します
- 3. インスタンスの addUpdateListener
- を呼び出して AnimatorUpdateListener を追加しますリスナー、リスナーの中 ValueAnimatorで計算された値を取得し、その値を指定したオブジェクトに適用することができます~4. インスタンスの start()
- メソッドを呼び出してアニメーションを開始します! さらに、ofInt と ofFloat の両方に次のようなパラメータがあることがわかります: float/int... 値は複数の値を表します。
:

:レイアウトファイル:
activity_main.xml、非常にシンプル、4つのボタン、1つのImageView 次に、MainActivity.javaに移動し、
まず、ビューの位置を変更するメソッドが必要です。ここでは moveView() を呼び出して、幅と高さだけでなく左と上の開始座標を設定します。 次に、4 つのアニメーション、つまり線形移動、スケーリング、透明度を伴う回転、および円形回転が定義されます。 次に、ボタンを通じて対応するアニメーションをトリガーします~ わかりました。プロセスは非常に簡単です。最初に ValueAnimator オブジェクトを作成し、ValueAnimator.ofInt/ofFloat を呼び出します。
アニメーションの継続時間を取得して設定し、addUpdateListeneradd AnimatorUpdateListener イベントをリッスンし、
次に、パラメーター animation の getAnimatedValue() を使用して現在の値を取得し、この値を保持します。
いわゆるアニメーション効果を形成するためにビューのいくつかのプロパティを変更し、setInterpolator アニメーション レンダリング モードを設定するには、次のようにします。
最後に、start() を呼び出してアニメーションの再生を開始します~ なんと、直線の方程式、円のパラメトリック方程式、正しく理解できるようになってきました。これは高度な数学ではないでしょうか?
科学のクソ野郎は三角関数さえ忘れています... github からの参照例:MoveViewValueAnimator このクラスを使用すると、ObjectAnimator の方が使いやすくなります。あらゆるオブジェクトのあらゆるプロパティを直接 アニメーション化します !そうです、これは View オブジェクトだけでなく、あらゆるオブジェクトです。
オブジェクトに特定の属性値を継続的に割り当て、オブジェクトの属性値の変化に基づいて表示方法を決定します。
出てくる!たとえば、TextView に次のアニメーションを設定します: ObjectAnimator.ofFloat(textview, "alpha", 1f, 0f); ここでは、alpha の値が 1f から 0f まで常に変更され、オブジェクトはインターフェイスを更新します。これにより属性値の変化に応じた表示が行われます。
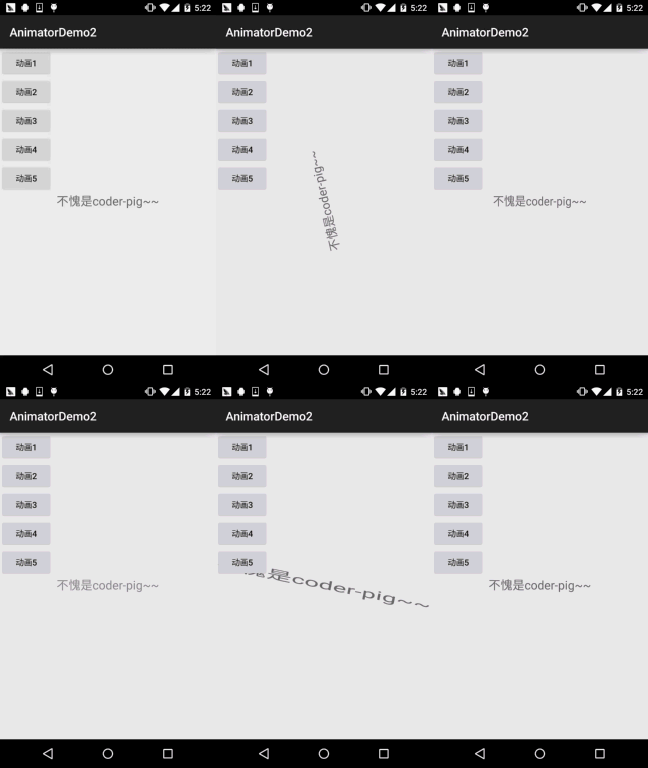
フェードインとフェードアウトの効果を示していますが、TextView クラスには alpha 属性がありません。ObjectAnimator の内部メカニズムは次のとおりです。 レンダリングの実行: コード実装: MainActivity.java 部分に直接進みましょう。実際、それらはすべて似ています~<LinearLayout xmlns:android="http://schemas.android.com/apk/res/android"
android:id="@+id/ly_root"
android:layout_width="match_parent"
android:layout_height="match_parent"
android:orientation="vertical">
<Button
android:id="@+id/btn_one"
android:layout_width="wrap_content"
android:layout_height="wrap_content"
android:text="动画1" />
<Button
android:id="@+id/btn_two"
android:layout_width="wrap_content"
android:layout_height="wrap_content"
android:text="动画2" />
<Button
android:id="@+id/btn_three"
android:layout_width="wrap_content"
android:layout_height="wrap_content"
android:text="动画3" />
<Button
android:id="@+id/btn_four"
android:layout_width="wrap_content"
android:layout_height="wrap_content"
android:text="动画4" />
<ImageView
android:id="@+id/img_babi"
android:layout_width="wrap_content"
android:layout_height="wrap_content"
android:layout_gravity="center"
android:background="@mipmap/img_babi" /></LinearLayout>
public class MainActivity extends AppCompatActivity implements View.OnClickListener {

    private Button btn_one;
    private Button btn_two;
    private Button btn_three;
    private Button btn_four;
    private LinearLayout ly_root;
    private ImageView img_babi;
    private int width;
    private int height;

    @Override
    public void onCreate(Bundle savedInstanceState) {
        super.onCreate(savedInstanceState);
        setContentView(R.layout.activity_main);
        bindViews();
    }

    private void bindViews() {
        ly_root = (LinearLayout) findViewById(R.id.ly_root);
        btn_one = (Button) findViewById(R.id.btn_one);
        btn_two = (Button) findViewById(R.id.btn_two);
        btn_three = (Button) findViewById(R.id.btn_three);
        btn_four = (Button) findViewById(R.id.btn_four);
        img_babi = (ImageView) findViewById(R.id.img_babi);

        btn_one.setOnClickListener(this);
        btn_two.setOnClickListener(this);
        btn_three.setOnClickListener(this);
        btn_four.setOnClickListener(this);
        img_babi.setOnClickListener(this);
    }

    @Override
    public void onClick(View v) {
        switch (v.getId()) {
            case R.id.btn_one:
                lineAnimator();
                break;
            case R.id.btn_two:
                scaleAnimator();
                break;
            case R.id.btn_three:
                raAnimator();
                break;
            case R.id.btn_four:
                circleAnimator();
                break;
            case R.id.img_babi:
                Toast.makeText(MainActivity.this, "不愧是coder-pig~", Toast.LENGTH_SHORT).show();
                break;
        }
    }


    //定义一个修改ImageView位置的方法
    private void moveView(View view, int rawX, int rawY) {
        int left = rawX - img_babi.getWidth() / 2;
        int top = rawY - img_babi.getHeight();
        int width = left + view.getWidth();
        int height = top + view.getHeight();
        view.layout(left, top, width, height);
    }


    //定义属性动画的方法:

    //按轨迹方程来运动
    private void lineAnimator() {
        width = ly_root.getWidth();
        height = ly_root.getHeight();
        ValueAnimator xValue = ValueAnimator.ofInt(height,0,height / 4,height / 2,height / 4 * 3 ,height);
        xValue.setDuration(3000L);
        xValue.addUpdateListener(new ValueAnimator.AnimatorUpdateListener() {
            @Override
            public void onAnimationUpdate(ValueAnimator animation) {
                // 轨迹方程 x = width / 2
                int y = (Integer) animation.getAnimatedValue();
                int x = width / 2;
                moveView(img_babi, x, y);
            }
        });
        xValue.setInterpolator(new LinearInterpolator());
        xValue.start();
    }

    //缩放效果
    private void scaleAnimator(){

        //这里故意用两个是想让大家体会下组合动画怎么用而已~
        final float scale = 0.5f;
        AnimatorSet scaleSet = new AnimatorSet();
        ValueAnimator valueAnimatorSmall = ValueAnimator.ofFloat(1.0f, scale);
        valueAnimatorSmall.setDuration(500);

        ValueAnimator valueAnimatorLarge = ValueAnimator.ofFloat(scale, 1.0f);
        valueAnimatorLarge.setDuration(500);

        valueAnimatorSmall.addUpdateListener(new ValueAnimator.AnimatorUpdateListener() {
            @Override
            public void onAnimationUpdate(ValueAnimator animation) {
                float scale = (Float) animation.getAnimatedValue();
                img_babi.setScaleX(scale);
                img_babi.setScaleY(scale);
            }
        });
        valueAnimatorLarge.addUpdateListener(new ValueAnimator.AnimatorUpdateListener() {
            @Override
            public void onAnimationUpdate(ValueAnimator animation) {
                float scale = (Float) animation.getAnimatedValue();
                img_babi.setScaleX(scale);
                img_babi.setScaleY(scale);
            }
        });

        scaleSet.play(valueAnimatorLarge).after(valueAnimatorSmall);
        scaleSet.start();

        //其实可以一个就搞定的
//        ValueAnimator vValue = ValueAnimator.ofFloat(1.0f, 0.6f, 1.2f, 1.0f, 0.6f, 1.2f, 1.0f);
//        vValue.setDuration(1000L);
//        vValue.addUpdateListener(new ValueAnimator.AnimatorUpdateListener() {
//            @Override
//            public void onAnimationUpdate(ValueAnimator animation) {
//                float scale = (Float) animation.getAnimatedValue();
//                img_babi.setScaleX(scale);
//                img_babi.setScaleY(scale);
//            }
//        });
//        vValue.setInterpolator(new LinearInterpolator());
//        vValue.start();
    }


    //旋转的同时透明度变化
    private void raAnimator(){
        ValueAnimator rValue = ValueAnimator.ofInt(0, 360);
        rValue.setDuration(1000L);
        rValue.addUpdateListener(new ValueAnimator.AnimatorUpdateListener() {
            @Override
            public void onAnimationUpdate(ValueAnimator animation) {
                int rotateValue = (Integer) animation.getAnimatedValue();
                img_babi.setRotation(rotateValue);
                float fractionValue = animation.getAnimatedFraction();
                img_babi.setAlpha(fractionValue);
            }
        });
        rValue.setInterpolator(new DecelerateInterpolator());
        rValue.start();
    }

    //圆形旋转
    protected void circleAnimator() {
        width = ly_root.getWidth();
        height = ly_root.getHeight();
        final int R = width / 4;
        ValueAnimator tValue = ValueAnimator.ofFloat(0,
                (float) (2.0f * Math.PI));
        tValue.setDuration(1000);
        tValue.addUpdateListener(new ValueAnimator.AnimatorUpdateListener() {
            @Override
            public void onAnimationUpdate(ValueAnimator animation) {
                // 圆的参数方程 x = R * sin(t) y = R * cos(t)
                float t = (Float) animation.getAnimatedValue();
                int x = (int) (R * Math.sin(t) + width / 2);
                int y = (int) (R * Math.cos(t) + height / 2);
                moveView(img_babi, x, y);
            }
        });
        tValue.setInterpolator(new DecelerateInterpolator());
        tValue.start();
    }
}
3. ObjectAnimator は使い方が簡単です
属性値を探すのではなく、転送された属性名に対応する get メソッドと set メソッドを探します。 ! 信じられない場合は、TextView のソース コードをチェックして、alpha 属性があるかどうかを確認してください。
さて、ObjectAnimator を使用して 4 種類のトゥイーン アニメーションの効果を実現しましょう~
public class MainActivity extends AppCompatActivity implements View.OnClickListener {
    private Button btn_one;
    private Button btn_two;
    private Button btn_three;
    private Button btn_four;
    private Button btn_five;
    private LinearLayout ly_root;
    private TextView tv_pig;
    private int height;
    private ObjectAnimator animator1;
    private ObjectAnimator animator2;
    private ObjectAnimator animator3;
    private ObjectAnimator animator4;
    private AnimatorSet animSet;

    @Override
    protected void onCreate(Bundle savedInstanceState) {
        super.onCreate(savedInstanceState);
        setContentView(R.layout.activity_main);
        bindViews();
        initAnimator();
    }

    private void bindViews() {
        ly_root = (LinearLayout) findViewById(R.id.ly_root);
        btn_one = (Button) findViewById(R.id.btn_one);
        btn_two = (Button) findViewById(R.id.btn_two);
        btn_three = (Button) findViewById(R.id.btn_three);
        btn_four = (Button) findViewById(R.id.btn_four);
        btn_five = (Button) findViewById(R.id.btn_five);
        tv_pig = (TextView) findViewById(R.id.tv_pig);

        height = ly_root.getHeight();
        btn_one.setOnClickListener(this);
        btn_two.setOnClickListener(this);
        btn_three.setOnClickListener(this);
        btn_four.setOnClickListener(this);
        btn_five.setOnClickListener(this);
        tv_pig.setOnClickListener(this);
    }

    //初始化动画
    private void initAnimator() {
        animator1 = ObjectAnimator.ofFloat(tv_pig, "alpha", 1f, 0f, 1f, 0f, 1f);
        animator2 = ObjectAnimator.ofFloat(tv_pig, "rotation", 0f, 360f, 0f);
        animator3 = ObjectAnimator.ofFloat(tv_pig, "scaleX", 2f, 4f, 1f, 0.5f, 1f);
        animator4 = ObjectAnimator.ofFloat(tv_pig, "translationY", height / 8, -100, height / 2);
    }

    @Override
    public void onClick(View v) {
        switch (v.getId()) {
            case R.id.btn_one:
                animator1.setDuration(3000l);
                animator1.start();
                break;
            case R.id.btn_two:
                animator2.setDuration(3000l);
                animator2.start();
                break;
            case R.id.btn_three:
                animator3.setDuration(3000l);
                animator3.start();
                break;
            case R.id.btn_four:
                animator4.setDuration(3000l);
                animator4.start();
                break;
            case R.id.btn_five:
                //将前面的动画集合到一起~
                animSet = new AnimatorSet();
                animSet.play(animator4).with(animator3).with(animator2).after(animator1);
                animSet.setDuration(5000l);
                animSet.start();
                break;
            case R.id.tv_pig:
                Toast.makeText(MainActivity.this, "不愧是coder-pig~", Toast.LENGTH_SHORT).show();
                break;
        }
    }
}
4.と AnimatorListener上の 2 つから この例では、
AnimatorSet クラスを使用して、アニメーションの組み合わせを全員が体験しました。
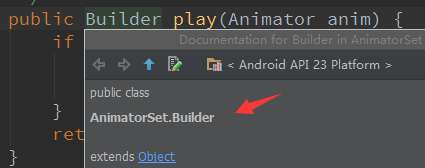
play() メソッドを呼び出し、実行する最初のアニメーションを渡します。この時点で、Builder クラスが返されます。

次に、Builder によって提供される 4 つのメソッドを呼び出すことができます。他のアニメーションを結合するには:
- after(Animator anim) 既存のアニメーションを受信アニメーションに挿入し、その後に実行します
- after(long late) 指定されたミリ秒の遅延後に既存のアニメーションを実行します
- before (Animator anim) 既存のアニメーションを入力アニメーションの前に挿入して実行します
- with(Animator anim) 既存のアニメーションと入力アニメーションを同時に実行します
まあ、非常に簡単ですので、次に説明しましょうアニメーション イベントのモニタリングの場合、上記の ValueAnimator のリスナーは AnimatorUpdateListener です。値のステータスが変化すると、onAnimationUpdate メソッドが呼び出されます。
この種のイベントに加えて、アニメーションの進行状況の監視~ AnimatorListener、addListenerメソッドを呼び出すことができます: リスナーを追加し、次の 4 つのコールバック メソッドをオーバーライドします。
- onAnimationStart(): アニメーションの開始
- onAnimationRepeat(): アニメーションの繰り返し
- onAnimationEnd(): アニメーションの終了
- onAnimationCancel( ) : アニメーションのキャンセル
はい、実際に AnimatorListener を使用する場合は、4 つのメソッドをすべて書き直す必要があります。もちろん、前のジェスチャのセクションと同じです。 Android はアダプター クラス AnimatorListenerAdapter を提供しており、各インターフェースには メソッドはすべて実装されているので、ここにコールバック メソッドを記述するだけです。
5. XML を使用してアニメーションを作成します
XML を使用してアニメーションを作成する Java コードよりも描画に時間がかかる場合がありますが、再利用ははるかに簡単です。 対応する XML タグは次のとおりです: <animator><objectAnimator><set> 関連する属性は次のように説明されます:
- android:ordering: アニメーションの再生順序を指定します: sequencely (順次実行)、一緒に (同時実行)
- android:duration: アニメーションの継続時間
- android:propertyName ="x": x ここで、上の「アルファ」を覚えていますか?アニメーションをロードするオブジェクトで必須 getx および setx のメソッドを定義します。これにより、objectAnimator はオブジェクト内の値を変更します。
- android:valueFrom="1": アニメーション開始の初期値
- android:valueTo="0": アニメーション終了の最終値
- android:valueType="floatType":値を変更するデータ型
使用例は以下の通り:
①0から100まで滑らかに遷移するアニメーション:
<animator xmlns:android="http://schemas.android.com/apk/res/android"
    android:valueFrom="0"
    android:valueTo="100"
    android:valueType="intType"/>
②ビューのアルファ属性を 1 から 0 に変更します:
<objectAnimator xmlns:android="http://schemas.android.com/apk/res/android"
    android:valueFrom="1"
    android:valueTo="0"
    android:valueType="floatType"
    android:propertyName="alpha"/>
③アニメーションの使用デモを設定します:
 <set android:ordering="sequentially" >
    <set>
        <objectAnimator
            android:duration="500"
            android:propertyName="x"
            android:valueTo="400"
            android:valueType="intType" />
        <objectAnimator
            android:duration="500"
            android:propertyName="y"
            android:valueTo="300"
            android:valueType="intType" />
    </set>
    <objectAnimator
        android:duration="500"
        android:propertyName="alpha"
        android:valueTo="1f" /></set>
アニメーション ファイルをロードします:
AnimatorSet set = (AnimatorSet)AnimatorInflater.loadAnimator(mContext,
             R.animator.property_animator);
animator.setTarget(view);
animator.start();
6。サンプル コードをダウンロードします。セクション :
AnimatorDemo1.zip
AnimatorDemo2.zip
このセクションの概要:
さて、このセクションでは、Android での属性アニメーションの基本的な使用法の概要を説明します。理解できたかどうかはわかりません。とありますが、内容は非常にシンプルです。 はい、そして例は非常に興味深いものです。誰もが気に入ってくれると信じています。まあ、それだけです、ありがとう~
記事をありがとうGuo Shen


