Androidアニメーションコレクションのトゥイーンアニメーション
このセクションの紹介:
このセクションでは、Android の 3 つのアニメーションのうちの 2 つ目であるトゥイーン アニメーション (Tween) について説明します。これは、以前に学習したフレーム アニメーションとは異なります。 画像を連続再生することでアニメーション効果をシミュレートします。トゥイーン アニメーション開発者は、Animation Start と Animation End「キー フレーム」を指定するだけで済みます。 アニメーション変化の「中間フレーム」はシステムが計算して完成!さて、このセクションを学び始めましょう~
1. トゥイーンアニメーションとインターポレーターの分類
Andoird がサポートするトゥイーンアニメーション効果は次のとおりです: 5 つまたは 4 つ、5 つ目は前のものです 単なる組み合わせです~
- AlphaAnimation: 透明度グラデーション効果、作成時の開始と終了の透明度、およびアニメーションの継続時間を指定します 時間、透明度範囲 (0,1)、0 は完全に透明、1 は <alpha/> タグに対応します。
- ScaleAnimation: スケールグラデーションエフェクトを作成するときは、開始と終了のスケーリング比率、およびスケーリング基準点を指定する必要があります。 <scale/> タグに対応するアニメーションの長さもあります。
- TranslateAnimation: ディスプレイスメントグラデーション効果。作成時に開始位置と終了位置を指定し、アニメーションの継続時間を指定します。 <translate/> タグに対応する時間を設定するだけです。
- RotateAnimation: 回転グラデーション効果、作成時のアニメーションの開始と終了の回転角度、およびアニメーションを指定します。 <rotate/> ラベル
- AnimationSet に対応する持続時間と回転軸: 組み合わせグラデーションは、<set/> ラベル
に対応します。さまざまなアニメーションの使用法を説明する前に、まず説明する必要があります。 Interpolator
はアニメーションの変化速度を制御するために使用されます。 もちろん、アニメーション レンダラーとして理解することもできます。自分たちで補間します。 インターフェイスでは、アニメーションの変更速度を自分で制御できます。Android には、選択できる 5 つの実装クラスが用意されています。
- LinearInterpolator: アニメーションは一定の速度で変化します
- AccelerateInterpolator: アニメーションの最初は変化速度が遅く、その後加速し始めます
- AccelerateDecelerateInterpolator: 初めは変化速度が遅くなりますアニメーションの終わり、中間 時間加速
- CycleInterpolator: アニメーションは特定の回数ループし、変化速度は正弦曲線に従って変化します。 Math.sin(2 * mCycles * Math.PI * input)
- DecelerateInterpolator: アニメーションの開始時に速度を速く変更し、その後減速し始めます
- AnticipateInterpolator: 逆に、最初にセクションを変更します。反対方向に加速してから再生します
- AnticipateOvershootInterpolator: 逆方向に開始し、特定の値を前方にスローして最終値に戻ります
- BounceInterpolator: ジャンプ、目標値に近づくと値がジャンプします。目標値は 100 で、85、77、70、80、90、100 の場合は
- OvershottInterpolator: リバウンドし、最終的に目標値を超え、その後ゆっくりと目標値に変化します
。そして、これは通常、アニメーション XML ファイルを作成するときに使用します。属性は次のとおりです: android:interpolator, 上記の対応する値は @android:anim/linear_interpolator です。これは実際にはキャメル ケースの命名法が下線に変更されただけです。 AccelerateDecelerateInterpolator は @android:anim/accelerate_decelerate_interpolator に対応します。
2. 各種アニメーションの詳しい説明
ここのandroid:durationはアニメーションの長さで、単位はミリ秒です~
1) AlphaAnimation(透明度グラデーション)
anim_alpha.xml :
<alpha xmlns:android="http://schemas.android.com/apk/res/android"
    android:interpolator="@android:anim/accelerate_decelerate_interpolator"
    android:fromAlpha="1.0"
    android:toAlpha="0.1"
    android:duration="2000"/>
属性の説明:
fromAlpha: 開始透明度
toAlpha: 終了透明度
透明度の範囲は: 0-1、完全透明〜完全不透明
2) ScaleAnimation (スケールグラデーション)
anim_scale.xml:
<scale xmlns:android="http://schemas.android.com/apk/res/android"
    android:interpolator="@android:anim/accelerate_interpolator"
    android:fromXScale="0.2"
    android:toXScale="1.5"
    android:fromYScale="0.2"
    android:toYScale="1.5"
    android:pivotX="50%"
    android:pivotY="50%"
    android:duration="2000"/>
プロパティの説明:
anim_translate. Delta
- fromXScale/fromYScale: X軸/Y軸に沿ったスケーリングの開始スケール
- toXScale /へのエール:allong に沿ったスケーリングの終了比率 中心が中心軸点です
- 3) TranslateAnimation (変位勾配)
: アニメーションの開始位置 X/Y 座標
toXDelta
/toYDelta: X /アニメーション終了位置のY座標
4) RotateAnimation(回転勾配)
- anim_rotate.xml:
<translate xmlns:android="http://schemas.android.com/apk/res/android"
    android:interpolator="@android:anim/accelerate_decelerate_interpolator"
    android:fromXDelta="0"
    android:toXDelta="320"
    android:fromYDelta="0"
    android:toYDelta="0"
    android:duration="2000"/>
プロパティ説明:
- fromDegrees/toDegrees: 回転の開始/終了角度
- repeatCount: 回転の回数。デフォルト値は 0 で、3 などの他の値の場合は 1 回を意味します。 4回転します。 さらに、値が -1 または無限の場合、アニメーションは決して停止しないことを意味します
- repeatMode: 繰り返しモード (デフォルトの restart) を設定します。ただし、repeatCount が 0、無限、または -1 より大きい場合のみです。 効果的です。 reverse に設定することもできます。これは、アニメーションが偶数回表示されると、逆方向に移動することを意味します。
5)AnimationSet (結合されたグラデーション)
は非常に簡単です。前のアニメーションを結合するだけです~
anim_set.xml:
<rotate xmlns:android="http://schemas.android.com/apk/res/android"
    android:interpolator="@android:anim/accelerate_decelerate_interpolator"
    android:fromDegrees="0"
    android:toDegrees="360"
    android:duration="1000"
    android:repeatCount="1"
    android:repeatMode="reverse"/>
3. サンプルを書いて体験してください
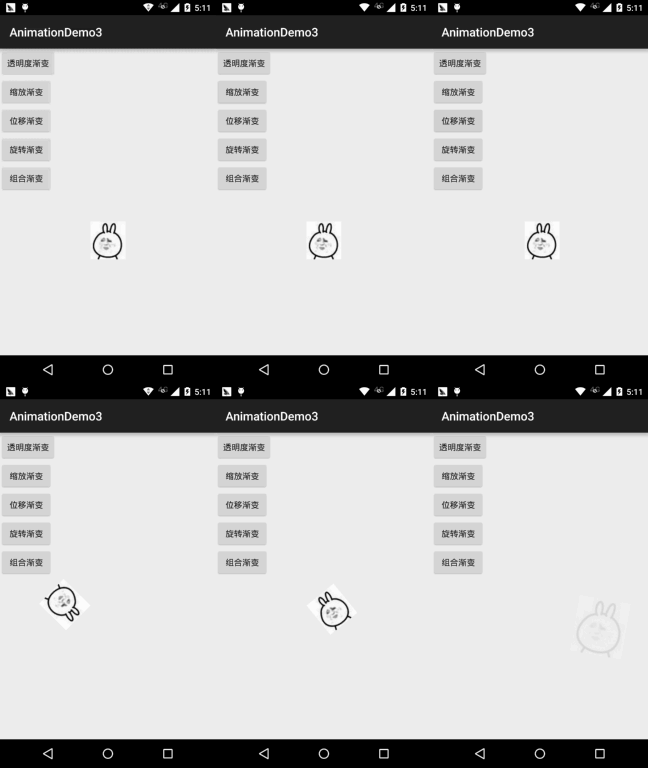
トゥイーン アニメーションとは何かを理解できるように、上で書いたアニメーションを使用して例を書いてみましょう。 単純なレイアウトから始めましょう: activity_main.xml:
<set xmlns:android="http://schemas.android.com/apk/res/android" android:interpolator="@android:anim/decelerate_interpolator" android:shareInterpolator="true" > <scale android:duration="2000" android:fromXScale="0.2" android:fromYScale="0.2" android:pivotX="50%" android:pivotY="50%" android:toXScale="1.5" android:toYScale="1.5" /> <rotate android:duration="1000" android:fromDegrees="0" android:repeatCount="1" android:repeatMode="reverse" android:toDegrees="360" /> <translate android:duration="2000" android:fromXDelta="0" android:fromYDelta="0" android:toXDelta="320" android:toYDelta="0" /> <alpha android:duration="2000" android:fromAlpha="1.0" android:toAlpha="0.1" /> </set>それでは、MainActivity.javaに移動します。これも非常に単純で、AnimationUtils.loadAnimation()を呼び出すだけです。 アニメーションをロードし、View コントロールが startAnimation を呼び出してアニメーションを開始します~
<LinearLayout xmlns:android="http://schemas.android.com/apk/res/android" android:layout_width="match_parent" android:layout_height="match_parent" android:orientation="vertical"> <Button android:id="@+id/btn_alpha" android:layout_width="wrap_content" android:layout_height="wrap_content" android:text="透明度渐变" /> <Button android:id="@+id/btn_scale" android:layout_width="wrap_content" android:layout_height="wrap_content" android:text="缩放渐变" /> <Button android:id="@+id/btn_tran" android:layout_width="wrap_content" android:layout_height="wrap_content" android:text="位移渐变" /> <Button android:id="@+id/btn_rotate" android:layout_width="wrap_content" android:layout_height="wrap_content" android:text="旋转渐变" /> <Button android:id="@+id/btn_set" android:layout_width="wrap_content" android:layout_height="wrap_content" android:text="组合渐变" /> <ImageView android:id="@+id/img_show" android:layout_width="wrap_content" android:layout_height="wrap_content" android:layout_gravity="center" android:layout_marginTop="48dp" android:src="@mipmap/img_face" /> </LinearLayout>レンダリングを実行します:
面白いですね、まだ試さないで、何かを変更したり、アニメーションを自由に組み合わせたりしてください。クールなエフェクトを作りましょう~
4. アニメーションステータスの監視
アニメーションの実行ステータスを監視し、アニメーションオブジェクトの:
アニメーションの実行ステータスの監視を完了する ~
- setAnimationListener(newAnimationListener())メソッドを呼び出して、次の3つのメソッドを書き換えます。 :
- onAnimationStart(): アニメーションの開始
- onAnimtaionRepeat(): アニメーションの繰り返し
- onAnimationEnd(): アニメーションの終了
5動的に設定されます。 View のアニメーション効果最初にAnimationUtils.loadAnimation (アニメーション XML ファイル) を呼び出し、次に View コントロールが startAnimation(anim) を呼び出します。 アニメーションの開始 ~ これは静的読み込みメソッドです。もちろん、アニメーション オブジェクトを直接作成し、Java コードで設定を完了して呼び出すこともできます。 startAnimation はアニメーションをオンにします~
6. フラグメントの遷移アニメーションを設定します ここで注意すべき点は、フラグメントがv4 パッケージ を使用するか、app パッケージ の下のフラグメントを使用するかです。 FragmentTransaction オブジェクトの setTransition(int transit) を呼び出して、Fragment の標準遷移アニメーションを指定できます。transit のオプションの値は次のとおりです:
上記の標準的なプロセスアニメーションはどちらも呼び出すことができますが、違いはカスタム遷移アニメーションにあります
- TRANSIT_NONE: アニメーションなし
- TRANSIT_FRAGMENT_OPEN: フォームのアニメーションを開きます
- TRANSIT_FRAGMENT_CLOSE: フォームを閉じるアニメーション
setCustomAnimations() メソッド!アプリ パッケージ内の
おそらく混乱しているかもしれませんでは、対応するアニメーション タイプをどのようにして知ることができるのでしょうか?実際には、
Fragment: setCustomAnimations(int enter, int exit, int PopEnter, int PopExit) それぞれ追加、削除、スタックへのプッシュ、およびスタックからのポップアウトのためのアニメーション! もう 1 つ注意すべき点は、対応するアニメーション タイプが次のとおりであることです。プロパティ アニメーション (Property)、アニメーション ファイルです。 ルート タグは <objectAnimator>、<valueAnimator> である必要があります。または、最初の 2 つは v4 パッケージの下の 1 つの <set> に入れられます。 v4 パッケージは 2 種類の setCustomAnimations() をサポートしています
もう 1 つの注意点は、対応するアニメーション タイプが次のとおりであることです: トゥイーン アニメーション (Tween)、これは上記のビューと同じです~
v4 パッケージ
onCreateAnimation() メソッドの戻り値:
:
app を探すだけで済みます。 package
:
7. アクティビティのカットシーンの設定
Activty カットシーンの設定は非常に簡単です。呼び出しメソッドは次のとおりです:
(int enterAnim, int exitAnim)overridePendingTransition
使い方は非常に簡単です:
in startActivity(または finish() の後に追加されるパラメータは次のとおりです:
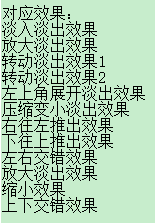
新しいアクティビティが入るときのアニメーション、および 古いアクティビティが終了するときのアニメーション ここでは、誰でも簡単に使用できる、比較的単純で一般的に使用されるカットシーン アニメーションをいくつか示します。 ~
ダウンロードポータル:
アクティビティ共通遷移アニメーション.zip
8. APPに入った後にポップアップするログイン登録ボタンのアニメーション効果の例を書きます:
レンダリングの実行:
コード実装:
最初はレイアウトファイルです:activity_main.xml
:
public class MainActivity extends AppCompatActivity implements View.OnClickListener{ private Button btn_alpha; private Button btn_scale; private Button btn_tran; private Button btn_rotate; private Button btn_set; private ImageView img_show; private Animation animation = null; @Override protected void onCreate(Bundle savedInstanceState) { super.onCreate(savedInstanceState); setContentView(R.layout.activity_main); bindViews(); } private void bindViews() { btn_alpha = (Button) findViewById(R.id.btn_alpha); btn_scale = (Button) findViewById(R.id.btn_scale); btn_tran = (Button) findViewById(R.id.btn_tran); btn_rotate = (Button) findViewById(R.id.btn_rotate); btn_set = (Button) findViewById(R.id.btn_set); img_show = (ImageView) findViewById(R.id.img_show); btn_alpha.setOnClickListener(this); btn_scale.setOnClickListener(this); btn_tran.setOnClickListener(this); btn_rotate.setOnClickListener(this); btn_set.setOnClickListener(this); } @Override public void onClick(View v) { switch (v.getId()){ case R.id.btn_alpha: animation = AnimationUtils.loadAnimation(this, R.anim.anim_alpha); img_show.startAnimation(animation); break; case R.id.btn_scale: animation = AnimationUtils.loadAnimation(this, R.anim.anim_scale); img_show.startAnimation(animation); break; case R.id.btn_tran: animation = AnimationUtils.loadAnimation(this, R.anim.anim_translate); img_show.startAnimation(animation); break; case R.id.btn_rotate: animation = AnimationUtils.loadAnimation(this, R.anim.anim_rotate); img_show.startAnimation(animation); break; case R.id.btn_set: animation = AnimationUtils.loadAnimation(this, R.anim.anim_set); img_show.startAnimation(animation); break; } } }次にMainActivity.java:
  <RelativeLayout xmlns:android="http://schemas.android.com/apk/res/android"
    xmlns:tools="http://schemas.android.com/tools"
    android:layout_width="match_parent"
    android:layout_height="match_parent"
    android:background="#DDE2E3"
    tools:context=".MainActivity">

    <LinearLayout
        android:id="@+id/start_ctrl"
        android:layout_width="match_parent"
        android:layout_height="wrap_content"
        android:layout_alignParentBottom="true"
        android:orientation="vertical"
        android:visibility="gone">

        <Button
            android:id="@+id/start_login"
            android:layout_width="match_parent"
            android:layout_height="wrap_content"
            android:background="#F26968"
            android:gravity="center"
            android:paddingBottom="15dp"
            android:paddingTop="15dp"
            android:text="登陆"
            android:textColor="#FFFFFF"
            android:textSize="18sp" />

        <Button
            android:id="@+id/start_register"
            android:layout_width="match_parent"
            android:layout_height="wrap_content"
            android:background="#323339"
            android:gravity="center"
            android:paddingBottom="15dp"
            android:paddingTop="15dp"
            android:text="注册"
            android:textColor="#FFFFFF"
            android:textSize="18sp" />
    </LinearLayout></RelativeLayout>
コメントは非常に明確なので、ここでは説明しません。TranslateAnimation.RELATIVE_TO_SELF について疑問がある場合は、 スペースの都合上、ここには書きません~
9. このセクションのコードサンプルをダウンロードしてくださいAnimationDemo4.zipこのセクションの概要:
このセクションでは、Android の 2 番目のアニメーション (グラデーション アニメーション) の詳細な説明、4 つのアニメーションの詳細な説明、および アニメーションリスナーの設定、View、Fragment、Activityのアニメーションの設定方法、最後に追記エントリーを書きました アプリの下からログインボタンと登録ボタンをポップアップさせる例は少し長いですが、非常にわかりやすいと思います。 これを読めば皆さんもたくさんのことを得ることができますよ〜!


