RadioButton(ラジオボタン)&Checkbox(チェックボックス)
このセクションの紹介:
実際、これら 2 つのコントロールは、単一選択と複数選択、イベント処理を除き、多くの点で似ています。その他はすべて似ています。 ListView のチェックボックスの位置がずれているという問題もあります。この問題については ListView の章で説明します。 解決しました、それではこのセクションを始めましょう~ このセクションの公式ドキュメント API: RadioButton;このセクションでは、Andoird の基本的な UI コントロールの RadioButton と Checkbox について説明します。 まず、このセクションで説明する内容について説明します。
1. RadioButton と Checkbox の基本的な使用方法
3. クリック効果をカスタマイズする
4.
5. テキストと選択ボックスの間の距離を変更します
1. 基本的な使用法とイベント処理:
1) RadioButton (ラジオ ボタン)
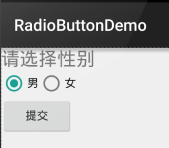
タイトルのラジオ ボタンとして 1 つだけ選択できるため、 RadioButton を RadioGroup ボタン グループに配置して実現します。 ラジオ機能!まず、性別選択の簡単な例である RadioButton の使用方法を理解してください。 さらに、外側の RadioGroup の方向属性を設定してから、RadioButton の配置を垂直または水平に設定できます~
レンダリング:

レイアウト コードは次のとおりです:
xmlns:tools="http://schemas.android.com/tools"
android:id= @+id/LinearLayout1"
android:layout_width="match_parent"
android:layout_height="match_parent"
android:orientation="vertical"
tools:context=".MainActivity" >
<TextView
android:レイアウト幅="wrap_content"
android:layout_height="wrap_content"
android:text="请选择性别"
android:textSize="23dp"
/>
<RadioGroup
android:id="@+id/radioGroup "
android:layout_width="wrap_content"
android:layout_height="wrap_content"
android:orientation="horizontal">
<RadioButton
android:id="@+id /btnMan"
android:layout_width=" Wrap_content"
android:layout_height="wrap_content"
android:text="男"
android:checked="true"/>
<RadioButton
android:id="@+id/btnWoman"
android:layout_width ="wrap_content"
android:layout_height="wrap_content"
android:text="女"/>
</RadioGroup>
<Button
android:id="@+id/b tnポスト」
Android:layout_width = "wrap_content"
android:layout_height = "wrap_content"
android:text = "Submit"/& lt;/linearlayout & gt;值 選択された値を取得します:
最初の は、RadioButton のイベント リスナー setOnCheckChangeListener を設定することです
コード例は次のとおりです:RadioGroup radgroup = (RadioGroup) findViewById(R.id.radioGroup);
// 最初にラジオ ボタンのメソッドを取得します。値 アウト アウト アウト アウト アウト アウト アウト アウト アウト アウト アウト アウト アウト アウト アウト アウト アウト アウト アウト アウト アウト アウト アウト アウト アウト アウト アウト アウト アウト アウト アウト アウト アウト アウト アウト アウト アウト アウト‐ ‐ ‐ ‐ ‐ ‐ ‐ ‐ ‐ ‐ ‐ ‐ ‐ ‐ ‐ ‐ ‐ ‐ void onCheckedChanged (RadioGroup グループ、intcheckedId) { RadioButton radbtn = (RadioButton ) findViewById(checkedId)
use ‐ ‐ ‐ ‐ ‐findViewById(checkedId); ‐ ‐ ‐ Toast.makeText(getApplicationContext(), "ボタン グループの値が変更されました。選択済み" + radbtn.getText(), Toast.LENGTH_LONG).show();レンダリングの実行: 

PS: もう 1 つ覚えておくべきことは、各 RadioButton に ID を追加することです。そうしないと、ラジオ選択機能が有効になります。 ! !
2番目の方法は、他のボタンをクリックして選択したラジオボタンの値を取得することです。もちろん、必要に応じて直接取得することもできます~
サンプルコードは次のとおりです。
Button btnchange = (Button) findViewById(R.id.btnpost);btnchange.setOnClick Listener (new OnClickListener() {
@ Overrideb Public Void Onclick (View v) {
for (int i = 0; I & LT; Radgroup.getChildCount (); I ++) {
Radiobutton = (Radiobutton) Radgroup .getChildat ( i);
If (RD.ISCHECKED ()) {
Toast.makeText(getApplicationContext(), "送信ボタンをクリックして、選択した内容を取得します:" + rd.getText(), Toast.LENGTH_LONG).show();
});
レンダリングの実行:
 コード分析: ここでは、送信ボタンがクリックされるたびに、RadioGroup を走査して、どのボタンが選択されているかを決定します。以下の方法でRadioButtonに関する情報を取得しましょう!
getChildCont
- ( ) は、ボタン グループ内のラジオ ボタンの数を取得します。
getChinldAt
(i): インデックス値に基づいてラジオ ボタンを取得します isChecked
( ):ボタンが選択されているかどうかを判定します2) CheckBox(チェックボックス)
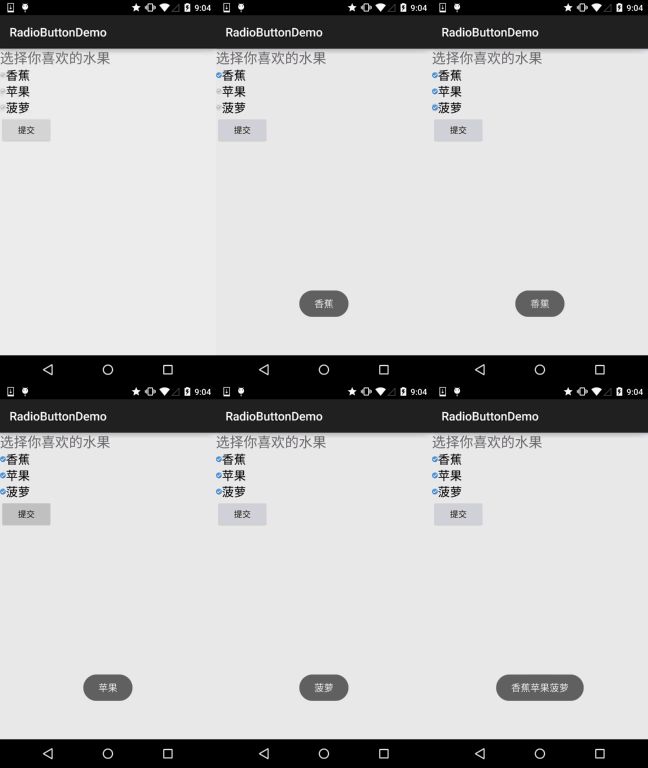
タイトルのチェックボックスと同様に、複数の選択肢を同時に選択することができます 選択された値を取得する方法も、次の2通りあります。 1. 各チェックボックスにイベントを追加します: setOnCheckedChangeListener 2. ボタンを作成し、クリック後に各チェックボックスを判定します: isChecked(); レンダリングの実行:
実装コード:
private CheckBox cb_one;
private CheckBox cb_two;
private CheckBox cb_three;
private Button btn_ send;
@Override
protected void onCreate(Bundle savedInstanceState) {
super.onCreate(savedInstanceState);
setContentView(R.layout.activity_main);
cb_one = (CheckBox) findViewById(R.id.cb_one);
cb_two = (CheckBox) ) findViewById(R.id.cb_two);
cb_three = (CheckBox) findViewById(R.id.cb_three);
btn_send = (ボタン) findViewById(R.id.btn_send);
cb_one.setOnCheckedChangeListener(this);
cb_two.set OnCheckedChangeListener(this);
cb_three.setOnCheckedChangeListener (this);
btn_send.setOnClickListener(this);
}
@Override
public void onCheckedChanged(CompoundButton compoundButton, boolean b) {
if(compoundButton.isChecked ()) Toast.makeText(this,compoundButton.getText( ).toString(),Toast.LENGTH_SHORT).show();
}
@Override
public void onClick(View view) {
String choose = "";
if(cb_one.isChecked())choose + = cb_one .getText().toString() + "";
if(cb_two.isChecked())choose += cb_two.getText().toString() + "";
if(cb_three.isChecked())choose += cb_three .getText().toString() + "";
Toast.makeText(this,choose,Toast.LENGTH_SHORT).show();
}
}
2. カスタマイズされたクリック効果
5.0 以降の RadioButton と Checkbox は、古いバージョンよりも若干見栄えが良くなりました。 それでも気に入らない、または必要ないかもしれないので、自分でエフェクトをクリックする必要があります。実装は非常に簡単です。まずカスタムを記述します。 セレクタリソースは、選択時と非選択時の切り替え画像を設定します~!
実装レンダリングは次のとおりです:

PS: ここでの資料の理由は少し小さいためです...
< セレクター xmlns:android="http://schemas.android.com/apk/res/android">
<item
android:state_enabled="true"
android:state_checked="true"
android:drawable=" @mipmap/ic_checkbox_checked"/>
<item
android:state_enabled="true"
android:state_checked="false"
android:drawable="@mipmap/ic_checkbox_normal" />
< /select or>
それを書いた後、それを設定するには 2 つの方法があります。または、1 つと言えます。見れば分かりますよ〜
①上記のselctorにandroid:button属性を設定します
②スタイルで属性を定義し、まず、次のコードを style に追加します:
rad_btn_selctor</item>
</style> ;
次に、そこにレイアウトします:
3. テキストと選択ボックスの相対位置を変更します
これも非常に簡単に実装できます。以前 TextView を学習したときに使用したdrawableXxxを覚えていますか? 選択ボックスの位置を制御するには、わずか 2 つの手順を実行します。設定:
ステップ 1. android:button="@null"
ステップ 2. android:drawableTop="@android:drawable/btn_radio"
もちろん、drawableXxx を好みのエフェクトに置き換えることもできます。
4. テキストと選択ボックスの間の距離を変更する
場合によっては、テキストと選択ボックスの間の距離を調整して、混雑を軽減することができます。 XML コード コントロール: android:paddingXxx = "xxx" を使用して距離を制御します
2. Java コードでは、paddingLeft を動的に計算する方が若干優れています
サンプル コードは次のとおりです:
ラジオボタンとチェックボックスについては以上です。間違っている点や悪い点、または良い提案がある場合は、ご指摘ください。 とても感謝しています〜ありがとう...


