AlertDialog(ダイアログボックス)の詳細説明
このセクションの概要:
このセクションでは、プロンプト情報を表示する 3 番目のコントロール AlertDialog (ダイアログ ボックス) を引き続き紹介します。これは、プロンプト情報を表示する 3 番目のコントロールでもあります。 Dialogの親クラスです!たとえば、ProgressDialog、TimePickerDialog など、AlertDialog の親クラスは次のとおりです。 さらに、前に学習したトーストや通知とは異なり、AlertDialog を開いたときに直接新規にすることはできません。 AlertDialog のソース コードでは、AlertDialog を作成する場合、構築メソッドが保護されていることがわかります。 このクラスでは静的内部クラス (public static class Builder) を使用し、AlertDialog を呼び出す必要があります。 関連メソッドを使用して AlertDialog をカスタマイズし、最後に show() メソッドを呼び出して AlertDialog ダイアログ ボックスを表示します。 さて、AlertDialog の基本的な使用法を学び、AlertDialog をカスタマイズしましょう。 公式ドキュメント: AlertDialog
1. 基本的な使用プロセス
2. よく使用されるダイアログ ボックスの使用例
- ステップ 1: AlertDialog.Builder オブジェクトを作成します
- ステップ 2: setIcon()set アイコンを呼び出します。 setTitle( ) または setCustomTitle() タイトルを設定します。
- ステップ 3: ダイアログ ボックスのコンテンツを設定します: setMessage() 表示されるコンテンツを指定する方法は他にもあります。
- ステップ 4 を呼び出します。 setPositive/Negative /NeutralButton()設定: OK、キャンセル、ニュートラル ボタン;
- ステップ 5: create() メソッドを呼び出してこのオブジェクトを作成し、次に show() メソッドを呼び出して表示します。ダイアログ ボックス;
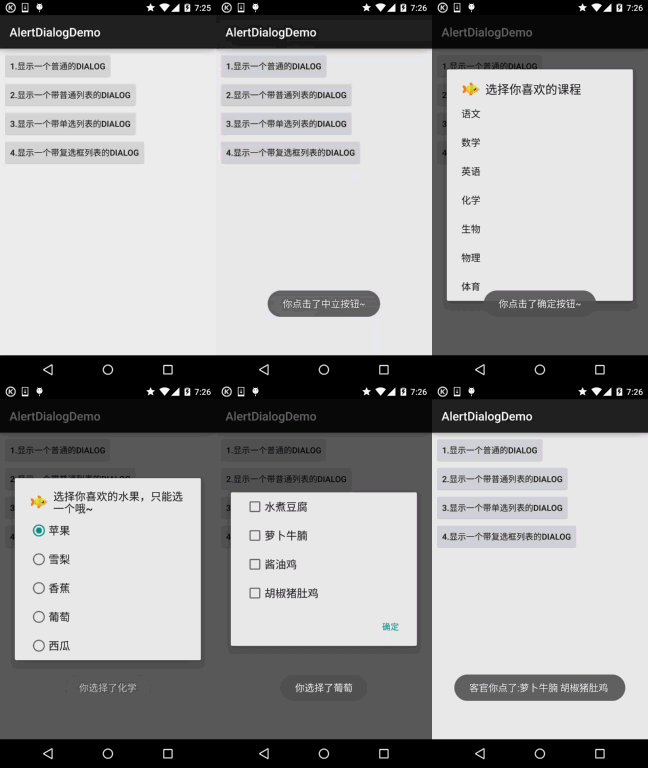
レンダリングの実行:

MainActivity.java
:private Button btn_dialog_one;
private Button btn_dialog_two;
private Button btn_dialog_three;
private Button b tn_dialog_four;
private Context mContext;
private boolean[] checkItems;
private AlertDialog alert = null;
private AlertDialog.Builder builder = null;
@Override
protected void onCreate(Bundle savedInstanceState) {
super.onCreate(savedInstanceState);
setContentView(R.layout.activity_main);
mContext = MainActivity.this ;
bindView();
}
private void bindView() {
btn_dialog_one = (ボタン) findViewById(R.id.btn_dialog_one);
btn_dialog_two = (ボタン) findViewById(R.id.btn_dialog_two);
btn_dialog_three = (ボタン) findViewById(R.id.btn_dialog_three);
btn_dialog_four = (ボタン) findViewById(R.id.btn_dialog_four);
btn_dialog_one.setOnClickListener(this);
btn_dialog_two.setOnClickListener(this);
btn_dialog_three.setOnClickListener(this) );
btn_dialog_four.setOnClickListener(this);
}
@Override
public void onClick(View v) {
switch (v.getId()) {
//普通对话框
case R.id.btn_dialog_one:
alert = null;
builder = new AlertDialog.Builder(mContext);
alert = builder.setIcon(R.mipmap.ic_icon_fish)
.setTitle("システムプロンプト: ")
.setMessage("これは、キャンセル、ニュートラル、OK の 3 つのボタンがある最も一般的なアラートダイアログです")
.setNegativeButton( 「キャンセル」、新しいdialoginterface.onclicklistener()public void onclick(dialoginterface dialog、int){
.show(){
からtoast.makeText、 "ok button〜"、toast.length_short ).show();
}}}) E .setneutralbutton ("ニュートラル", New Dialoginterface.onClickListener () {
@v Public Void Onclick (Dialoginterface Dialog, Int Which) A Toast.maketext (mcontext, "あなたはニュートラル ボタンをクリックします ~", Toast .LENGTH_SHORT);alert.show(); id.btn_dialog_two:
final String[] レッスン = new String[]{"中国語"、"数学"、"化学"、 "物理", "スポーツ"};
alert = null;
builder = new AlertDialog.Builder(mContext);
alert = builder.seticon(r.mipmap.ic_icon_fish)
.settitle( "your fapsional course")
.setitems(lesson、new dialoginterface.onclicklistener()ublic void onclick(dialoginterface dialog、int (getApplicationContext(), "あなたが選択しました" + レッスン[どれ], Toast.LENGTH_SHORT).show();
}
}).create(); // 単一リストダイアログボックス
case R.id.btn_dialog_three:
最終文字列 [] フルーツ = 新しい文字列 [] {"Apple", "Sydney", "Banana", "Grape", "Watermelon"};を使用して を使用して を使用しての out ‐ ‐set ‐ ‐setIcon(R.mipmap.ic_icon_fish) を使用します
.settitle( "好きなフルーツを選択して、1つだけを選択できます〜")
SetsingLechoiceItems(fruits、0、new Dialoginterface.onclickListener(){
public void onclick(dialoginterface dialog、int int).makeText(getApplicatextext( )、「あなたが選択しました」 + 果物[どれ]、Toast.LENGTH_SHORT).show(); alert.show(); 複数選択リストダイアログボックス表 case R.id.btn_dialog_four:
最終文字列 [] メニュー = 新しい文字列[] {"湯豆腐"、"大根ごぼう"、"醤油鶏"、"豚バラ鶏唐辛子"}
//リスト項目のステータスを記録するブール配列を定義します
use using using ブール値 to use ‐ ‐リスト項目のステータスを記録する ialog.Builder(mContext);
alert = builder.setIcon(R.mipmap.ic_icon_fish)
.setMultiChoiceItems(menu, checkItems, new DialogInterface.OnMultiChoiceClickListener() {
@オーバーライド
public void onClick(DialogInterface dialog, int that, boolean isChecked) {
checkItems[that] = isChecked;
}
.setPositiveButton("确定", new DialogInterface.On) ClickListener() {
@Override
public void onClick(DialogInterface dialog, int that) {
文字列 result = "";
for (int i = 0; i < checkItems.length; i++) {
if (checkItems[i]) result += menu[i] + " ";
}
Toast.makeText(getApplicationContext(), "客官你点了:" + result, Toast.LENGTH_SHORT).show();
}
.create ();
alert.show();
break;
}
}
}
レイアウトは 4 つのシンプルなボタンだけですが、ここでは掲載しません。使い方はとても簡単です。Builder オブジェクトを作成するだけです。 関連する設定を行ってから、create() で AlertDialog オブジェクトを生成し、最後に show() メソッドを呼び出して AlertDialog を保存します。 それを見せてください!さらに、注意していれば、ダイアログ ボックスの外側の領域をクリックするとダイアログ ボックスが消え、 この問題を解決するには、ビルダーに setCancelable(false) を設定できます。
3. Builder の setView() を使用して、表示される AlertDialog をカスタマイズします
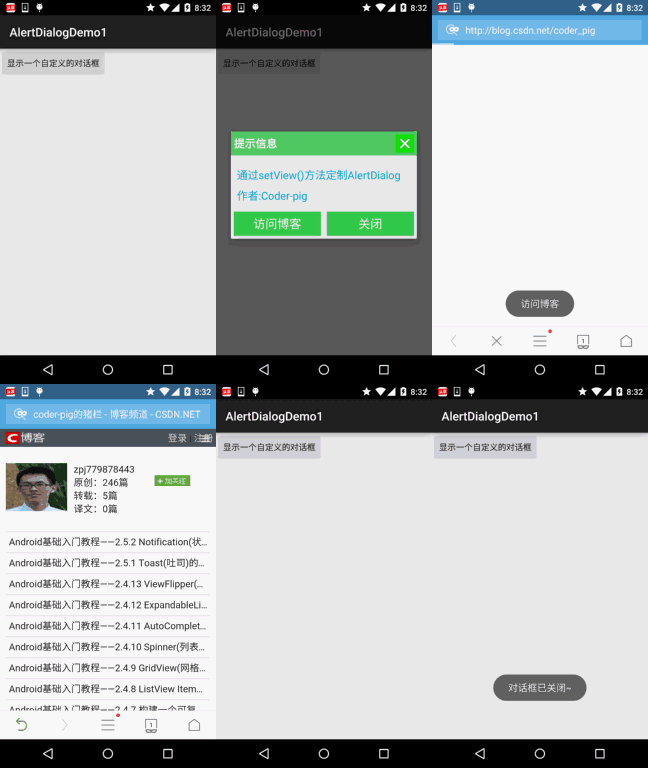
システム ダイアログ ボックスとは異なるレイアウトをカスタマイズし、setView() を呼び出してレイアウトをロードできます。 AlertDialog で、上記の効果を実現しましょう:
レンダリングを実行します :

キーコード :
1 つ目は、2 つの異なるボタンのセレクターの描画可能ファイルです
btn_selctor_ exit.xml :
<selector xmlns:android="http://schemas.android.com/apk/res/android"> ;
<item android:state_pressed="true" android:drawable="@mipmap/iv_icon_exit_pressed"/>
btn_selctor_choose.xml
<?xml バージョン="1.0" エンコーディング="utf-8 "?><セレクター xmlns:android="http://schemas.android.com/apk/res /android">
<item android:state_pressed="true" android:drawable="@mipmap/ bg_btn_pressed"/>次に、カスタマイズされたダイアログ レイアウトが登場します: view_dialog_custom.xml:
<RelativeLayout xmlns:android="http://schemas.android.com/apk/res/android"
android:id ="@+id/RelativeLayout1"
android:layout_width="match_parent"
android:layout_height="match_parent"
android:orientation="vertical">
<RelativeLayout
android:id="@+id/titlelayout "
android:layout_width="match_parent"
android:layout_height="wrap_content"
android:layout_alignParentLeft="true"
android:layout_alignParentTop="true"
android:background="../style/images /android-チュートリアル- alertdialog.html"
android:padding="5dp">
<TextView
android:layout_width="match_parent"
android:layout_height="wrap_content"
android:layout_centerVertical="true"
android:text=" 提案情報"
android:textColor="#ffffff"
android:textSize="18sp"
android:textStyle="bold" />
<Button
android:id="@+id/btn_cancle"
android: layout_width="30dp"
android:layout_height="30dp"
android:layout_alignParentRight="true"
android:background="../style/images/btn_selctor_exit" />
<LinearLayout
android:id="@+id/ly_detail"
android:layout_width="wrap_content"
android:layout_height="wrap_content"
android:layout_alignParentLeft="true"
android:lay out_below="@+id/titlelayout "
android:layout_centerInParent="true"
android:orientation="vertical">
<TextView
android:layout_width="wrap_content"
android:layout_ height="wrap_content"
android:layout_marginLeft="10dp"
android :layout_marginTop="20dp"
android:text="通过setView()方法定制AlertDialog"
android:textColor="#04AEDA"
android:textSize="18sp" />
<TextView
android:layout_width= "wrap_content"
android:layout_height="wrap_content"
android:layout_marginLeft="10dp"
android:layout_marginTop="10dp"
android:text="作者:Coder-pi g"
android:textColor="#04AEDA"
android :textSize="18sp" />
</LinearLayout>
<LinearLayout
android:layout_width="match_parent"
android:layout_height="wrap_content"
android:layout_以下="@+id/ly_detail"
android:layout_marginTop="10dp"
android:orientation="horizontal">
<ボタン
android:id="@+id/btn_blog"
android:layout_width="match_parent"
android:layout_height="40dp"
android:layout_margin="5dp"
android:layout_weight="1"
android:background="../style/images/btn_selctor_choose"
android:text="访问博客"
android:textColor="#ffffff"
android:textSize="20sp" />
<ボタン
android:id="@+id/btn_close"
android:layout_width="match_parent"
android:layout_height="40d p"
android:layout_margin="5dp "
android:layout_weight="1"
android:background="../style/images/btn_selector_choose"
android:text="关闭"
android:textColor="#ffffff"
android:textSize="20sp" / >
</LinearLayout>
</RelativeLayout>
最後にMainActivity.java:
private Button btn_show;
private View view_custom;
private Context mContext;
private AlertDialog alert = null;
private Aler tDialog.Builder builder = null;
@Override
protected void onCreate(Bundle SavedInstanceState) {
super.onCreate(savedInstanceState);
setContentView(R.layout.activity_main);
mContext = MainActivity.this;
btn_show = (ボタン) findViewById (R.id.btn_show);
//初化Builder
builder = new AlertDialog.Builder(mContext);
//追加自定的那个View,同時设置下
final LayoutInflater inflater = MainActivity.this.getLayoutInflater();
view_custom = inflater.inflate(R.layout.view_dialog_custom, null,false);
builder.setView(view_custom);
builder.setCancelable(false);
alert = builder.create();
view_custom.findViewById(R.id.btn_cancle).setOn ClickListener(new View.OnClickListener( ) {
@Override
public void onClick(View v) {
alert.dismiss();
}
});
view_custom.findViewById(R.id.btn_blog).setOnClickListener(new View.OnClickListener() {
@Override
public void onClick(View v) {
Toast.makeText(getApplicationContext(), "访问博客", Toast.LENGTH_SHORT).show();
Uri uri = Uri.parse("http://blog.csdn.net/coder_pig");
Intent インテント= 新しいIntent(Intent.ACTION_VIEW, uri);
startActivity(intent);
alert.dismiss();
}
view _custom.findViewById(R.id.btn_close).setOnClickListener(new View.OnClickListener() {
@Override
public void onClick(View v) {
Toast.makeText(getApplicationContext(), "对话框已关闭~", Toast.LENGTH_SHORT).show ();
alert.dismiss();
}
}) ;
btn_show.setOnClickListener(new View.OnClickListener() {
@Override
public void onClick(View v) {
alert.show();
}
});
}
}
AlertDialogDemo.zip
AlertDialogDemo1.zip
本节小结:


