ホームページ >ウェブフロントエンド >CSSチュートリアル >CSSのマージン属性のオフセットを詳しく解説(コード例)
CSSのマージン属性のオフセットを詳しく解説(コード例)
- 不言オリジナル
- 2018-11-09 13:44:564270ブラウズ
この記事では CSS の margin 属性のオフセットについて紹介します。興味のある方はぜひご覧ください。
早速、本題に入りましょう~
まずは具体的な例を見てみましょう (関連する推奨事項: CSS 学習マニュアル )
以下のコードを入力します: HTML ファイルと CSS ファイル。
MarginCollapsing01.html
<!DOCTYPE html>
<html>
<head>
    <meta charset="utf-8" />
    <title></title>
  <link rel="stylesheet" type="text/css" href="MarginCollapsing01.css" />
  </head>
  <body>
  <div class="BaseCanvas">
    <div class="MarginFrame1">php中文网margin属性的偏移量</div>
    <div class="MarginFrame2">php中文网</div>
  </div>
  </body>
  </html>
MarginCollapsing01.css
.BaseCanvas {
  margin-left: 32px;
  margin-right: 32px;
  margin-top: 32px;
  width: calc(100%-64px);
  height: 320px;
  background-color: #E0E0E0;
  border: solid 1px #202020;
  }
.MarginFrame1 {
  width: 80%;
  background-color: #fff2a9;
  border: solid 1px #ff6a00;
  margin-top: 40px;
  margin-bottom: 40px;
  margin-left: 12px;
  margin-right: 8px;
  }
.MarginFrame2 {
  width: 80%;
  background-color: #9effb5;
  margin-top: 40px;
  margin-bottom: 40px;
  margin-left: 12px;
  margin-right: 8px;
  }
効果は次のとおりです。
MarginFrame1 は、マージンを 40 ピクセルに設定します。 Bottom、MarginFrame2 上マージンを 40 ピクセルに設定します。上部フレームと下部フレームの間の距離は、外側フレームと上部フレームの間の距離と等しいため、エッジあたり 80 ピクセルのエッジは得られず、40 ピクセルの距離しかないことが確認できます。

余白サイズの変更
CSS ファイルを編集し、MarginFrame 1 の下の余白を 60 ピクセルに変更します。
MarginCollapsing01.css
.BaseCanvas {
  margin-left: 32px;
  margin-right: 32px;
  margin-top: 32px;
  width: calc(100%-64px);
  height: 320px;
  background-color: #E0E0E0;
  border: solid 1px #202020;
  }
.MarginFrame1 {
  width: 80%;
  background-color: #fff2a9;
  border: solid 1px #ff6a00;
  margin-top: 40px;
  margin-bottom: 60px;
  margin-left: 12px;
  margin-right: 8px;
  }
.MarginFrame2 {
  width: 80%;
  background-color: #9effb5;
  margin-top: 40px;
  margin-bottom: 40px;
  margin-left: 12px;
  margin-right: 8px;
  }
効果は次のとおりです。上下のフレーム間の距離が広くなっていることがわかります。

float の値を設定します。
コードは次のとおりです。
MarginCollapsing02.html
<!DOCTYPE html>
<html>
<head>
    <meta charset="utf-8" />
    <title></title>
  <link rel="stylesheet" type="text/css" href="MarginCollapsing02.css" />
  </head>
  <body>
  <div class="BaseCanvas">
    <div class="MarginFrame1">框架1</div>
    <div class="MarginFrame2">框架2</div>
    <div class="MarginFrame3">框架3</div>
    <div class="MarginFrame4">框架4</div>
  </div>
  </body>
  </html>
MarginCollapsing02.css
.BaseCanvas {
  margin-left: 32px;
  margin-right: 32px;
  margin-top: 32px;
  width: calc(100%-64px);
  height: 320px;
  background-color: #E0E0E0;
  border: solid 1px #202020;
}
.MarginFrame1 {
  width: 160px;
  float: left;
  background-color: #fff2a9;
  border: solid 1px #ff6a00;
  margin-top: 32px;
  margin-bottom: 48px;
  margin-left: 24px;
  margin-right: 24px;
}
.MarginFrame2 {
  width: 160px;
  float: left;
  background-color: #fff2a9;
  border: solid 1px #ff6a00;
  margin-top: 32px;
  margin-bottom: 48px;
  margin-left: 24px;
  margin-right: 24px;
}
.MarginFrame3 {
  width: 160px;
  float: left;
  background-color: #fff2a9;
  border: solid 1px #ff6a00;
  margin-top: 32px;
  margin-bottom: 48px;
  margin-left: 24px;
  margin-right: 24px;
}
.MarginFrame4 {
  width: 160px;
  float: left;
  background-color: #fff2a9;
  border: solid 1px #ff6a00;
  margin-top: 32px;
  margin-bottom: 48px;
  margin-left: 24px;
  margin-right: 24px;
}
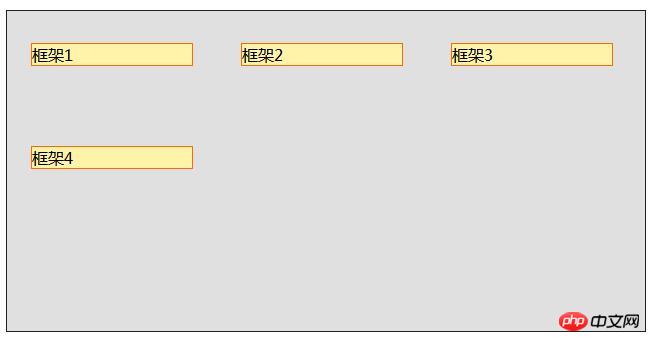
効果は次のとおりです:

この記事はここで終了です。その他の関連コンテンツについては、お支払いください。 php 中国語 Web サイトの CSS ビデオ チュートリアル 列に注目してください。 ! !
以上がCSSのマージン属性のオフセットを詳しく解説(コード例)の詳細内容です。詳細については、PHP 中国語 Web サイトの他の関連記事を参照してください。

