ホームページ >ウェブフロントエンド >CSSチュートリアル >フレックスレイアウトとは何ですか? 15 分で Flex レイアウトを理解する
フレックスレイアウトとは何ですか? 15 分で Flex レイアウトを理解する
- 不言オリジナル
- 2018-09-21 15:10:5719104ブラウズ
Web ページのレイアウトの研究では、フレキシブル (Flex) レイアウトによく遭遇しますが、フレキシブル (Flex) レイアウトとはどのようなものでしょうか?この記事を読んでいただければ、Flex(エラスティック)レイアウトの本当の意味が理解できると思います。
推奨マニュアル: CSSオンラインマニュアル
Flexboxとは何ですか?
Flexbox とは、Flexible Box (注: 「フレキシブル ボックス コンテナ」の意味) の略称で、CSS3 で導入された新しいレイアウト モードです。これにより、要素がさまざまな画面サイズやデバイスで予想どおりに表示されるように、ページ上で要素がどのように配置されるかが決まります。
これは、フレックス コンテナー内の要素を拡張および縮小して利用可能なスペースを最大化できるため、フレックスボックスと呼ばれます。以前のレイアウト方法 (テーブル レイアウトや埋め込みブロック要素を含むフローティング要素など) と比較して、Flexbox はより強力な方法です。
1. 表示順序を並べ替えます。要素の配置を変更する
4. 要素をコンテナに動的にロードする
##ビデオ チュートリアルの推奨事項:
推奨されるフレックス レイアウト ビデオ チュートリアル: 2020 年の最新の 5 つのフレックス フレキシブル レイアウト ビデオ チュートリアル
Flexbox の使用が推奨されない状況はどのような場合ですか?
Flexbox は要素の拡大縮小、整列、並べ替えに最適ですが、次のような状況では Flexbox レイアウトの使用を避ける必要があります。1 全体的なページ レイアウト
2. 古いブラウザを完全にサポートする Web サイトFlexbox をサポートするブラウザ:
##古いブラウザIE 11 以下では、Flexbox がサポートされていないか、部分的にのみサポートされています。通常どおりページを安全にレンダリングしたい場合は、display: inline-block や float と組み合わせた display: table など、他の CSS レイアウト方法にフォールバックする必要があります。ただし、最新のブラウザのみをターゲットにしている場合は、Flexbox を試してみる価値があります。
 用語
用語
Flexbox モデルには、3 つの核となる概念があります。
– フレックス アイテム (Fool's Wharf 注: フレックス サブ要素とも呼ばれます)。レイアウトする必要があります 要素– フレックス アイテムを含むフレックス コンテナ – フレックス アイテムのレイアウト方向を決定する方向 (注: より多くの記事が主軸と呼ばれます)
最良の学習その方法は経験と事例から学ぶことですので、早速始めてみましょう。
レベル 1 — 基本
1) フレックス コンテナを作成しますCSS コード:
.flex-container {display: flex;}コードは次のとおりです:
HTML:<div class="flex-container"> <div class="flex-item">1</div> <div class="flex-item">2</div> </div>CSS:
.flex-container {
display: flex;
}
/* 以下为辅助样式 */
.flex-container{
background-color: #F0f0f0;
}
.flex-container .flex-item{
padding:20px;
background-color: #B1FF84;
}
.flex-container .flex-item:first-child{
background-color: #F5DE25;
}
.flex-container .flex-item:last-child{
background-color: #90D9F7;
}効果
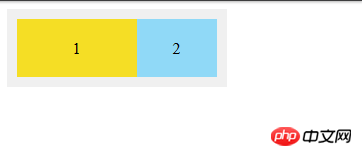
フレックス コンテナを作成するには、要素に display: flex 属性を追加するだけです。デフォルトでは、すべての直接の子要素はフレックス項目とみなされ、左から右の行に配置されます。フレックス項目の合計幅がコンテナより大きい場合、フレックス項目はフレックスコンテナの幅に収まるまで縮小されます。
#2) フレックス項目を列に配置します
.flex-container {display: flex;flex-direction: column;}
コードは次のとおりです:
HTML:<div class="flex-container"> <div class="flex-item">1</div> <div class="flex-item">2</div> </div>CSS:
.flex-container {
display: flex;
flex-direction: column;
}
/* 以下为辅助样式 */
.flex-container{
background-color: #F0f0f0;
}
.flex-container .flex-item{
padding:20px;
background-color: #B1FF84;
}
.flex-container .flex-item:first-child{
background-color: #F5DE25;
}
.flex-container .flex-item:last-child{
background-color: #90D9F7;
}効果は次のとおりです:
フレックス方向 (フレックス コンテナ内): 列はフレックス アイテムを垂直にレイアウトします。
flex-direction: column-reverse または flex-direction: row-reverse を設定することで、フレックス項目を逆の順序で配置することもできます。CSS コード: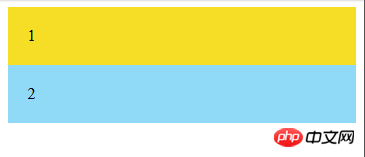
.flex-container {display: flex;flex-direction: column-reverse;}
コードは次のとおりです:
HTML:<div class="flex-container"> <div class="flex-item">1</div> <div class="flex-item">2</div> </div>
CSS :
.flex-container {
display: flex;
flex-direction: column-reverse;
}
/* 以下为辅助样式 */
.flex-container{
background-color: #F0f0f0;
}
.flex-container .flex-item{
padding:20px;
background-color: #B1FF84;
}
.flex-container .flex-item:first-child{
background-color: #F5DE25;
}
.flex-container .flex-item:last-child{
background-color: #90D9F7;
}
効果は次のとおりです:
レベル 2 — 初心者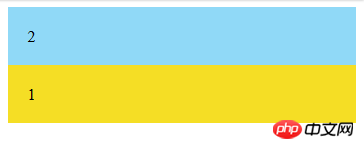
##1) 右揃えのフレックス項目
CSS コード:.flex-container {display: flex;justify-content: flex-end;}すべての Flexbox モデルにはフレックス方向 (主軸) があることを思い出してください。 justify-content は、フレックス項目のフレックス方向の配置位置を指定するために使用されます。上記の例では、justify-content:flex-end は、フレックス アイテムがフレックス コンテナの端に対して水平に整列されることを意味します。そのため、右側に配置されています。
コードは次のとおりです:
HTML:
<div class="flex-container">
<div class="flex-item">1</div>
<div class="flex-item">2</div>
</div>
CSS:
.flex-container {
  display: flex;
  justify-content: flex-end;
}
/* 以下为辅助样式 */
.flex-container{
  background-color: #F0f0f0;
}
.flex-container .flex-item{
  padding:20px;
  background-color: #B1FF84;
}
.flex-container .flex-item:first-child{
  background-color: #F5DE25;
}
.flex-container .flex-item:last-child{
  background-color: #90D9F7;
}
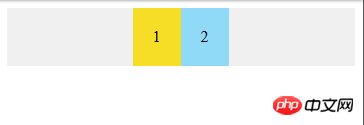
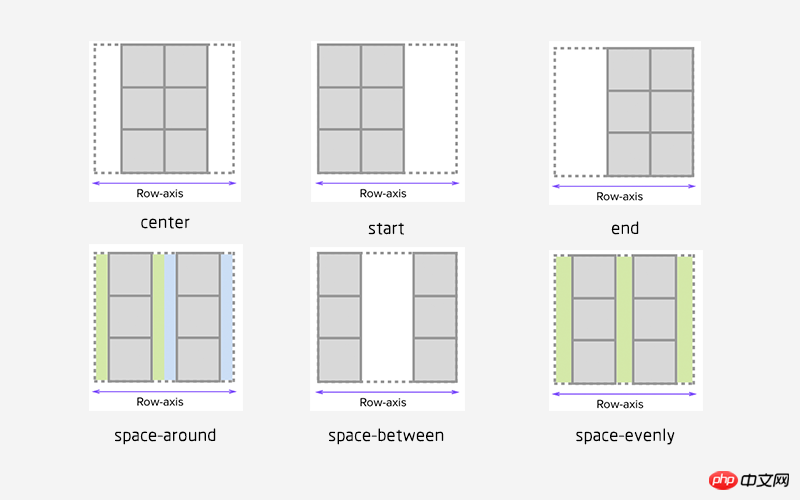
効果は次のとおりです。 : 2)居中对齐的 flex 项 CSS 代码: 代码如下: HTML: CSS: 效果如下: 3)铺开的 flex 项 您可以通过使用以下 justify-content 属性的三个间距值之一来指定容器中 flex 项之间应显示多少空间: space-evenly : flex 容器起始边缘和第一个 flex 项之间的间距和每个相邻 flex 项之间的间距是相等。(愚人码头注:该属性以前很少看到,原因是以前浏览器不支持,chrome 也是 60 版本之后才支持。延伸一下,align-content: space-evenly 也是这个逻辑,建议在 chrome 60 下查看 这个demo 。 ) space-between : 任何两个相邻 flex 项之间的间距是相同的,但不一定等于第一个/最后一个 flex 项与 flex 容器边缘之间的间距;起始边缘和第一个项目之间的间距和末端边缘和最后一个项目之间的间距是相等的。 space-around : flex 容器中的每个 flex 项的每一侧间距都是相等的。请注意,这意味着两个相邻 flex 项之间的空间将是第一个/最后一个 flex 项与其最近边缘之间的空间的两倍。 注:网上找了一张图片能更好的解释 justify-content 属性值的表现,如图: 4)flex 项在交叉轴上的对齐 CSS 代码: 通常,我们想沿着 flex 方向(主轴)排列 flex 项,还可以在垂直于它的方向(交叉轴)上对齐 flex 项。通过设置 justify-content:center和align-items:center,可以使 flex 项水平和垂直放置在 flex 容器的中心。 代码如下: HTML: CSS: 效果如下: 5)对齐某个特定的 flex 项 CSS 代码: 可以在某个特定的 flex 项上使用 align-self CSS 属性,来使该特定的 flex 项与容器中的其他 flex 项进行对齐。 代码如下: HTML: CSS: 效果如下: Level 3 — 中级 1)允许 flex 项多行/列排列 CSS 代码: 默认情况下, flex 项不允许多行/列排列,如果 flex 容器尺寸对于所有 flex 项来说不够大,那么flex 项将被调整大小以适应单行或列排列。 代码如下: HTML: CSS: 效果如下: 2)flex 项反向多行/列排列 CSS 代码: flex-wrap:wrap-reverse 仍然使 flex 项以多行/列排列,但是它们从 flex 容器的末尾开始排列的。 代码如下: HTML: CSS: 效果如下: 3)多行/列排列的 flex 项在交叉轴上的对齐方式 CSS 代码: 默认情况下,当 flex 容器的交叉轴(cross axis)上存在多余空间时,您可以在 flex 容器上设置 align-content,以控制 flex 项在交叉轴(cross axis)上的对齐方式。可能的值是 flex-start,flex-end,center,space-between,space-around ,space-evenly 和 stretch(默认)。 代码如下: HTML: CSS: 效果如下: Level 4 — 高级 1)拉伸 flex 项 CSS 代码: flex-grow 只有在 flex 容器中有剩余空间时才会生效。flex 项的 flex-grow 属性指定该 flex 项相对于其他 flex 项将拉伸多少,以填充 flex 容器。默认值为1。当设置为 0 时,该 flex 项将不会被拉伸去填补剩余空间。在这个例子中,两个项的比例是 1:2,意思是在被拉伸时,第一个 flex 项将占用 1/3,而第二个 flex 项将占据余下的空间。 注:这里特别要注意的是 flex-grow 控制的是 flex 项的拉伸比例,而不是占据 flex 容器的空间比例。 代码如下: HTML: CSS: JS: 效果如下: 2)收缩元素 CSS 代码: flex-shrink 只有在 flex 容器空间不足时才会生效。它指定 flex 项相对于其他 flex 项将缩小多少,以使 flex 项不会溢出 flex 容器。 默认值为 1。当设置为0时,该 flex 项将不会被收缩。在这个例子中,比例是1:2,意思是在收缩时,第一项将收缩 1/3 ,而第二个项目将被收缩 2/3 。 注: flex-shrink 和 flex-grow 正好相反 代码如下: HTML: CSS: JS: 效果如下: 3)设置元素的大小 CSS 代码: 您可以使用 flex-basis 定制 flex 项尺寸来代替元素的初始大小。默认情况下,其值为 flex-basis: auto,这意味该尺寸着从非 Flexbox CSS规则计算的。您还可以将其设置为某个绝对值或相对于 flex 容器百分比的值;例如 flex-basis:200px 和flex-basis:10%。 代码如下: HTML: CSS: 效果如下: 4)将 flex-grow, flex-shrink, 和 flex-basis 放在一起 CSS 代码: flex 是 flex-grow,flex-shrink 和 flex-based 的缩写。在这个例子中,第一个 flex 项设置为flex-grow: 1,flex-shrink: 0,flex-basis: 100px,第二个 flex 项设置为flex-grow: 2,flex-shrink: 0,flex-basis: 10%。 代码如下: HTML: CSS: 效果如下: 分析一下上面的这个例子,由于在 flex 容器(200px)中存在剩余空间 (90px),只有 flex-grow 才能起作用,flew-shrink 被忽略。第一个 flex 项的flex-grow 为 1,第2个 flex 项的flex-grow 为 2,所以第1个 flex 项拉伸 30px,第2个 flex 项拉伸 60px。 相关视频教程:
相关文章推荐:
1.flex多列布局有哪些?flex四种多列布局的介绍
2.弹性盒子布局flex是什么
3.flex布局实现网易云播放器界面的布局
相关视频推荐:
1.CSS视频教程-玉女心经版
.flex-container {display: flex;justify-content: center;}<div class="flex-container">
<div class="flex-item">1</div>
<div class="flex-item">2</div>
</div>
.flex-container {
  display: flex;
  justify-content: center;
}
/* 以下为辅助样式 */
.flex-container{
  background-color: #F0f0f0;
}
.flex-container .flex-item{
  padding:20px;
  background-color: #B1FF84;
}
.flex-container .flex-item:first-child{
  background-color: #F5DE25;
}
.flex-container .flex-item:last-child{
  background-color: #90D9F7;
}
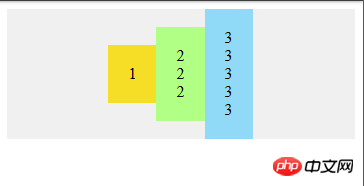
.flex-container {display: flex;justify-content: center;align-items: center;}<div class="flex-container">
<div class="flex-item">1</div>
<div class="flex-item">2 <br />2<br />2</div>
<div class="flex-item">3 <br />3<br /> 3<br /> 3<br /> 3</div>
</div>
.flex-container {
  display: flex;
  justify-content: center;
  align-items: center;
}
/* 以下为辅助样式 */
.flex-container{
  background-color: #F0f0f0;
}
.flex-container .flex-item{
  padding:20px;
  background-color: #B1FF84;
}
.flex-container .flex-item:first-child{
  background-color: #F5DE25;
}
.flex-container .flex-item:last-child{
  background-color: #90D9F7;
}
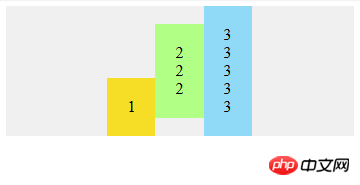
.flex-container {display: flex;align-items: center;}
.flex-bottom {align-self: flex-end;}<div class="flex-container">
<div class="flex-item flex-bottom">1</div>
<div class="flex-item">2 <br />2<br />2</div>
<div class="flex-item">3 <br />3<br /> 3<br /> 3<br /> 3</div>
</div>
.flex-container {
  display: flex;
  justify-content: center;
  align-items: center;
}
.flex-bottom {
  align-self: flex-end;
}
/* 以下为辅助样式 */
.flex-container{
  background-color: #F0f0f0;
}
.flex-container .flex-item{
  padding:20px;
  background-color: #B1FF84;
}
.flex-container .flex-item:first-child{
  background-color: #F5DE25;
}
.flex-container .flex-item:last-child{
  background-color: #90D9F7;
}
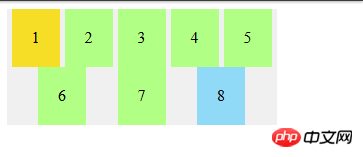
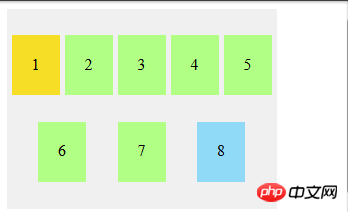
.flex-container {display: flex;flex-wrap: wrap;}
通过添加 flex-wrap: wrap ,可以将溢出容器的 flex 项将被排列到另一行/列中。<div class="flex-container">
<div class="flex-item">1</div>
<div class="flex-item">2</div>
<div class="flex-item">3</div>
<div class="flex-item">4</div>
<div class="flex-item">5</div>
<div class="flex-item">6</div>
<div class="flex-item">7</div>
<div class="flex-item">8</div>
</div>
.flex-container {
  display: flex;
  justify-content: space-evenly;
  flex-wrap: wrap;
}
/* 以下为辅助样式 */
.flex-container{
  width:270px;
  background-color: #F0f0f0;
}
.flex-container .flex-item{
  padding:20px;
  background-color: #B1FF84;
}
.flex-container .flex-item:first-child{
  background-color: #F5DE25;
}
.flex-container .flex-item:last-child{
  background-color: #90D9F7;
}
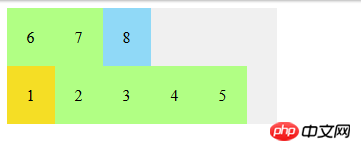
.flex-container {display: flex;flex-wrap: wrap-reverse;}<div class="flex-container">
<div class="flex-item">1</div>
<div class="flex-item">2</div>
<div class="flex-item">3</div>
<div class="flex-item">4</div>
<div class="flex-item">5</div>
<div class="flex-item">6</div>
<div class="flex-item">7</div>
<div class="flex-item">8</div>
</div>
.flex-container {
  display: flex;
  flex-wrap: wrap-reverse;
}
/* 以下为辅助样式 */
.flex-container{
  width:270px;
  background-color: #F0f0f0;
}
.flex-container .flex-item{
  padding:20px;
  background-color: #B1FF84;
}
.flex-container .flex-item:first-child{
  background-color: #F5DE25;
}
.flex-container .flex-item:last-child{
  background-color: #90D9F7;
}
.flex-container {display: flex;flex-wrap: wrap;align-content: flex-start;}<div class="flex-container">
<div class="flex-item">1</div>
<div class="flex-item">2</div>
<div class="flex-item">3</div>
<div class="flex-item">4</div>
<div class="flex-item">5</div>
<div class="flex-item">6</div>
<div class="flex-item">7</div>
<div class="flex-item">8</div>
</div>
.flex-container {
  display: flex;
  flex-wrap: wrap;
  justify-content: space-evenly;
  align-content: space-evenly;
}
/* 以下为辅助样式 */
.flex-container{
  width:270px;
  height:200px;
  background-color: #F0f0f0;
}
.flex-container .flex-item{
  padding:20px;
  height:20px;
  background-color: #B1FF84;
}
.flex-container .flex-item:first-child{
  background-color: #F5DE25;
}
.flex-container .flex-item:last-child{
  background-color: #90D9F7;
}
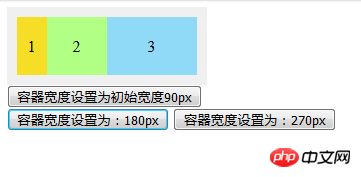
.flex-container {display: flex;}
.flex-item.nth-of-type(1){flex-grow: 1;}
.flex-item.nth-of-type(2) {flex-grow: 2;}<div class="flex-container">
<div class="flex-item flex-item1">1</div>
<div class="flex-item flex-item2">2</div>
<div class="flex-item flex-item3">3</div>
</div>
<button class="w90">容器宽度设置为初始宽度90px</button>
<button class="w180">容器宽度设置为:180px</button>
<button class="w270">容器宽度设置为:270px</button>
.flex-container {
  display: flex;
}
.flex-item1{flex-grow: 0;}
.flex-item2{flex-grow: 1;}
.flex-item3{flex-grow: 2;}
/* 以下为辅助样式 */
.flex-container{
  width:90px;
  padding:10px;
  background-color: #F0f0f0;
}
.flex-container .flex-item{
  padding:20px 0;
  text-align: center;
  width:30px;
  background-color: #B1FF84;
}
.flex-container .flex-item:first-child{
  background-color: #F5DE25;
}
.flex-container .flex-item:last-child{
  background-color: #90D9F7;
}var $flexContainer=$(".flex-container")
$(".w90").on("click",function(){
$flexContainer.width("90px")
})
$(".w180").on("click",function(){
$flexContainer.width("180px")
})
$(".w270").on("click",function(){
$flexContainer.width("270px")
})
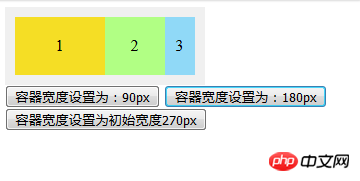
.flex-container {display: flex;}
.flex-item:nth-of-type(1) {flex-shrink: 1;}
.flex-item:nth-of-type(2) {flex-shrink: 2;}<div class="flex-container">
<div class="flex-item flex-item1">1</div>
<div class="flex-item flex-item2">2</div>
<div class="flex-item flex-item3">3</div>
</div>
<button class="w90">容器宽度设置为:90px</button>
<button class="w180">容器宽度设置为:180px</button>
<button class="w270">容器宽度设置为初始宽度270px</button>
.flex-container {
  display: flex;
}
.flex-item1{flex-shrink: 0;}
.flex-item2{flex-shrink: 1;}
.flex-item3{flex-shrink: 2;}
/* 以下为辅助样式 */

.flex-container{
  width:270px;
  padding:10px;
  background-color: #F0f0f0;
}
.flex-container .flex-item{
  padding:20px 0;
  text-align: center;
  width:90px;
  background-color: #B1FF84;
}
.flex-container .flex-item:first-child{
  background-color: #F5DE25;
}
.flex-container .flex-item:last-child{
  background-color: #90D9F7;
}var $flexContainer=$(".flex-container")
$(".w90").on("click",function(){
$flexContainer.width("90px")
})
$(".w180").on("click",function(){
$flexContainer.width("180px")
})
$(".w270").on("click",function(){
$flexContainer.width("270px")
})
.flex-container {display: flex;}
.flex-item.nth-of-type(1) {flex-basis: 200px;}
.flex-item.nth-of-type(2) {flex-basis: 10%;}<div class="flex-container">
<div class="flex-item flex-item1">1</div>
<div class="flex-item flex-item2">2</div>
</div>
.flex-container {
  display: flex;
}
.flex-item1{flex: 1 0 90px;}
.flex-item2{flex: 2 0 10%;}
/* 以下为辅助样式 */
.flex-container{
  width:200px;
  padding:10px;
  background-color: #F0f0f0;
}
.flex-container .flex-item{
  padding:20px 0;
  text-align: center;
  background-color: #B1FF84;
}
.flex-container .flex-item:first-child{
  background-color: #F5DE25;
}
.flex-container .flex-item:last-child{
  background-color: #90D9F7;
}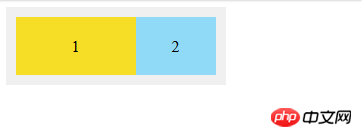
.flex-container {display: flex;}
.flex-item:nth-of-type(1) {flex: 1 0 100px;}
.flex-item:nth-of-type(2) {flex: 2 0 10%;}<div class="flex-container">
<div class="flex-item flex-item1">1</div>
<div class="flex-item flex-item2">2</div>
</div>
.flex-container {
  display: flex;
}
.flex-item1{flex: 1 0 90px;}
.flex-item2{flex: 2 0 10%;}
/* 以下为辅助样式 */
.flex-container{
  width:200px;
  padding:10px;
  background-color: #F0f0f0;
}
.flex-container .flex-item{
  padding:20px 0;
  text-align: center;
  background-color: #B1FF84;
}
.flex-container .flex-item:first-child{
  background-color: #F5DE25;
}
.flex-container .flex-item:last-child{
  background-color: #90D9F7;
}
以上がフレックスレイアウトとは何ですか? 15 分で Flex レイアウトを理解するの詳細内容です。詳細については、PHP 中国語 Web サイトの他の関連記事を参照してください。
関連記事
続きを見る- レスポンシブ レイアウトの CSS3 フレキシブル ボックス フレックス レイアウト モデルの詳細な紹介
- 2017 CSS3 学習者向け必須: フレックス レイアウトのサンプル グラフィック チュートリアル
- 柔軟なレイアウトのためのCSS3を使用する場合のコンテンツの配置方法の詳細な説明
- フレックス レイアウトを使用して複数の行と複数の div を水平方向および垂直方向に中央揃えにする方法
- css flexの伸縮自在なレイアウトについて
- HTML のフレキシブル レイアウト (Flex) の概要 (コード付き)
- CSS Flex レイアウト (伸縮自在なレイアウト) のプロパティは何ですか? CSS Flex レイアウト プロパティの概要

