ホームページ >ウェブフロントエンド >H5 チュートリアル >HTML5 ジェスチャ検出の原理と実装
HTML5 ジェスチャ検出の原理と実装
- 黄舟オリジナル
- 2017-03-04 16:17:463402ブラウズ
前書き ハイブリッド アプリケーションの強化により、HTML5 エンジニアは、デスクトップ エクスペリエンスをモバイルに移植するだけでは満足できなくなり、モバイル ネイティブ アプリケーションの人間味あふれる操作エクスペリエンス、特にネイティブ アプリケーションの固有の利点を切望しています。 。 HTML5 は、すぐに使えるジェスチャ システムを提供しませんが、タッチ イベントの下位レベルの監視を提供します。これに基づいて、独自のジェスチャ ライブラリを作成できます。 ジェスチャー一般的に使用される HTML5 ジェスチャーは、1 点ジェスチャーと 2 点ジェスチャーの 2 つのカテゴリに分類できます。シングルポイント ジェスチャには、タップ、ダブル タップ、ロング タップ、スワイプ、移動が含まれます。 2 点ジェスチャには、ピンチ (ズーム) と回転 (回転) が含まれます。 次に、これらのジェスチャーを検出する JavaScript ライブラリを実装し、このジェスチャー ライブラリを使用してクールなインタラクティブ効果を作成します。

- タッチポイントが 1 つだけのタッチスタートが発生したときにクリック検出を入力します。クリック イベントは 1 本の指のアクションに限定されているためです。
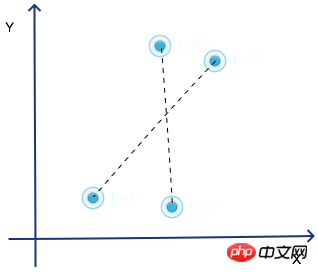
- touchmove イベントが発生しないか、または touchmove が狭い範囲内にあります (以下に示すように)。タッチムーブを狭い範囲に制限するのは、ユーザーの指が画面に触れたときにわずかに動かないという保証がないため、ユーザーにある程度の冗長性を与えるためです。


_getTime() {
return new Date().getTime();
}
_onTouchStart(e) {
//记录touch开始的位置
this.startX = e.touches[0].pageX;
this.startY = e.touches[0].pageY;
if(e.touches.length > 1) {
//多点监测
...
}else {
//记录touch开始的时间
this.startTime = this._getTime();
}
}
_onTouchMove(e) {
...
//记录手指移动的位置
this.moveX = e.touches[0].pageX;
this.moveY = e.touches[0].pageY;
...
}
_onTouchEnd(e) {
let timestamp = this._getTime();
if(this.moveX !== null && Math.abs(this.moveX - this.startX) > 10 ||
this.moveY !== null && Math.abs(this.moveY - this.startY) > 10) {
...
}else {
//手指移动的位移要小于10像素并且手指和屏幕的接触时间要短语500毫秒
if(timestamp - this.startTime < 500) {
this._emitEvent('onTap')
}
}
}ダブルタップ シングルクリックと同様に、ダブルタップイベントでもジェスチャを定量的に分解する必要があります。
- ダブルクリックイベントは指のアクションです。したがって、タッチスタート中に、現時点で画面上に何個の接触点があるかを判断する必要があります。
- ダブルクリック イベントには 2 つの独立したクリック動作が含まれています。理想的には、両方のクリックが画面上の同じ位置に到達する必要があります。ユーザーにある程度の冗長スペースを与えるために、2 回のクリックの座標点間の距離は 10 ピクセル以内に制限されます。

- ダブルクリック イベントは、基本的に 2 回のクイッククリックです。言い換えれば、2 回のクリック間の時間が非常に短いということです。特定のテスト定量化に合格した後、2 回のクリック間の時間間隔を 300 ミリ秒に設定しました。

_onTouchStart(e) {
if(e.touches.length > 1) {
...
} else {
if(this.previousTouchPoint) {
//两次相邻的touchstart之间距离要小于10,同时时间间隔小于300ms
if( Math.abs(this.startX -this.previousTouchPoint.startX) < 10 &&
Math.abs(this.startY - this.previousTouchPoint.startY) < 10 &&
Math.abs(this.startTime - this.previousTouchTime) < 300) {
this._emitEvent('onDoubleTap');
}
}
//保存上一次touchstart的时间和位置信息
this.previousTouchTime = this.startTime;
this.previousTouchPoint = {
startX : this.startX,
startY : this.startY
};
}
}長押し長押しは最も分解しやすいジェスチャーです。これは次のように分解できます。タッチスタートの発生後、長期間にわたってタッチムーブまたはタッチエンドのイベントが発生しない場合、長押しジェスチャがトリガーされます。
- 長押しは指のアクションであり、画面上に接触点が 1 つだけあるかどうかを検出する必要があります。
- 指が空間内を移動すると、長押しイベントはキャンセルされます。
- 指が 800 ミリ秒を超えて画面上に留まると、長押しジェスチャがトリガーされます。
- 指が画面上に留まる時間が 800ms 未満の場合、つまり、タッチスタートが発生してから 800ms 以内にタッチエンドがトリガーされた場合、長押しイベントはキャンセルされます。

_onTouchStart(e) {

  clearTimeout(this.longPressTimeout);

  if(e.touches.length > 1) {

  }else {

    this.longPressTimeout = setTimeout(()=>{

      this._emitEvent('onLongPress');

    });

  }

}

_onTouchMove(e) {

  ...

  clearTimeout(this.longPressTimeout);

  ...

}

_onTouchEnd(e) {

  ...

  clearTimeout(this.longPressTimeout);

  ...

}- ズームは、画面上に 2 つの接触点があるかどうかを検出する必要がある 2 本の指の動作です。
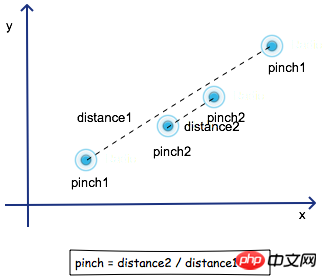
- 以下の図に示すように、スケーリング比率の定量化は、2 つのスケーリング アクション間の距離の比率によって取得されます。

所以缩放的核心是获取两个接触点之间的直线距离。
//勾股定理

_getDistance(xLen,yLen) {
   return Math.sqrt(xLen * xLen + yLen * yLen);
  }
这里的xLen是两个接触点x坐标差的绝对值,yLen相应的就是y坐标差的绝对值。
_onTouchStart(e) {

  if(e.touches.length > 1) {

    let point1 = e.touches[0];

    let point2 = e.touches[1];

    let xLen = Math.abs(point2.pageX - point1.pageX);

    let yLen = Math.abs(point2.pageY - point1.pageY);

    this.touchDistance = this._getDistance(xLen, yLen);

  } else {

    ...

  }

}
在_onTouchStart函数中获取并且保存 touchstart 发生时两个接触点之间的距离。
_onTouchMove(e) {

  if(e.touches.length > 1) {

      let xLen = Math.abs(e.touches[0].pageX - e.touches[1].pageX);

      let yLen = Math.abs(e.touches[1].pageY - e.touches[1].pageY);

      let touchDistance = this._getDistance(xLen,yLen);

      if(this.touchDistance) {

        let pinchScale = touchDistance / this.touchDistance;

          this._emitEvent('onPinch',{scale:pinchScale - this.previousPinchScale});

          this.previousPinchScale = pinchScale;

      }

  }else {

    ...

  }

}
旋转(rotate)
旋转手势需要检测两个比较重要的值,一是旋转的角度,二是旋转的方向(顺时针或逆时针)。
其中旋转角度和方向的计算需要通过向量的计算来获取,本文不再展开。

首先,需要获取向量的旋转方向和角度。
//这两个方法属于向量计算,具体原理请阅读本文最后的参考文献

  _getRotateDirection(vector1,vector2) {

    return vector1.x * vector2.y - vector2.x * vector1.y;

  }

  _getRotateAngle(vector1,vector2) {

    let direction = this._getRotateDirection(vector1,vector2);

    direction = direction > 0 ? -1 : 1;

    let len1 = this._getDistance(vector1.x,vector1.y);

    let len2 = this._getDistance(vector2.x,vector2.y);

    let mr = len1 * len2;

    if(mr === 0) return 0;

    let dot = vector1.x * vector2.x + vector1.y * vector2.y;

    let r = dot / mr;

    if(r > 1) r = 1;

    if(r < -1) r = -1;

    return Math.acos(r) * direction * 180 / Math.PI;

  }
然后,我们在手指发生移动时,调用获取旋转方向和角度的方法。
_onTouchStart(e) {

  ...

  if(e.touches.length > 1) {

    this.touchVector = {

       x: point2.pageX - this.startX,

       y: point2.pageY - this.startY

     };

  }

  ...

}

_onTouchMove(e) {

  ...

  if(this.touchVector) {

        let vector = {

          x: e.touches[1].pageX - e.touches[0].pageX,

          y: e.touches[1].pageY - e.touches[0].pageY

        };

        let angle = this._getRotateAngle(vector,this.touchVector);

        this._emitEvent('onRotate',{

          angle

        });

        this.touchVector.x = vector.x;

        this.touchVector.y = vector.y;

      }

  ...

}
实战
好了,我们的手势系统到这里就完成了。接下来要在实战中检验这套系统是否可靠,做一个简单的图片浏览器,支持图片缩放,旋转,移动,长按。
首先,做好DOM规划,和“之前”一样,我们的事件监听机制并不直接作用在图片上,而是作用在图片的父元素上。

然后,可以开始使用上面的手势检测系统了。
render() {
return (
<Gestures onPinch={this.onPinch} onMove={this.onMove} onRotate={this.onRotate} onDoubleTap={this.onDoubleTap} onLongPress={this.onLongPress}>
<p className="wrapper" >

</p>
</Gestures>
);
}由于我们的手势系统检测的增量,因此不能直接把增量应用在对象上,而是需要把这些增量累加。以旋转为例:
onRotate(event) {

    //对增量进行累加

    this.angle += event.angle

    this.setState({

      angle:this.angle

    });

  }
至此,我们的手势检测就完成了。
以上就是HTML5 手势检测原理和实现的内容,更多相关内容请关注PHP中文网(www.php.cn)!
声明:
この記事の内容はネチズンが自主的に寄稿したものであり、著作権は原著者に帰属します。このサイトは、それに相当する法的責任を負いません。盗作または侵害の疑いのあるコンテンツを見つけた場合は、admin@php.cn までご連絡ください。


