


In this guide, we'll walk you through the steps to adjust the time zone settings in Outlook and add a few different time zones to your calendar. This way, your meetings and appointments will be accurately reflected no matter where you are in the world.
Time zones can be a source of confusion and frustration, especially when managing a busy schedule across different regions. Time area mismatches can lead to missed appointments and communication delays, which might affect your work and your professional relationships. Whether you're a frequent traveler or working with international teams, adjusting the time zone in Outlook is essential to keep your schedule in sync. This step-by-step guide shows how to quickly update your time settings to help you stay on track, regardless of where you are or where your contacts are located.
How to change time zone in Outlook desktop
For the sent times on your emails to be correct and appointments and meetings in the Outlook calendar to accurately reflect your local time, it's crucial that the time region in Outlook matches your current geographic location. This becomes especially vital if you travel a lot and your laptop isn't automatically updating the time.
To change time zone in the classic Outlook desktop app, follow these steps:
- In your Outlook, navigate to the File tab, and select Options.

- In the Outlook Options dialog box, click on Calendar.
- Under the Time zones section, you'll see a drop-down menu. Click on it to select your current location.
- Click OK to save your changes.


Now, all calendar views and items within Outlook will be synchronized to reflect the new settings.
Notes:
- Changing Outlook's time zone will affect your Windows clock and all Windows programs. It is the same as changing the Date & Time settings in the Control Panel.
- When you set a time zone that observes daylight saving time, Outlook makes this adjustment automatically, provided this option is enabled in your system settings.
- Remember, changing the time zone in Outlook will affect how meeting invitations, event reminders, and emails are displayed. Always double-check your settings, especially if you have upcoming appointments or deadlines.
How to set time zone in Outlook on the web
If you've noticed a discrepancy between the times on emails and appointments in Outlook 365 online or Outlook.com compared to the desktop client, it's likely due to the time zone settings not being properly configured during your initial login or defaulting to an incorrect region.
To adjust the time zone in Outlook on the web, perform these steps:
- Log in to your Microsoft 365 account on the web or Outlook.com.
- Click the Settings icon at the top of the window.
- In the Settings menu, navigate to the Calendar section.
- Under Display my calendar in time zone, pick the desired one from the drop-down menu.
- Click the Save button to apply the changes.
- Once you've adjusted the time region, Outlook will ask if you also want to change timezone for your meeting hours. Click Yes, update in the prompt.


Note. Microsoft periodically updates the interface of Outlook on the web, so your version might look slightly different from what is described here. However, the basic steps for changing the time zone are the same.
How to change time zone in new Outlook
In the new Outlook interface, adjusting your time zone is similar to the web version. Carry out these steps to ensure it is correctly configured:
- Click the Settings gear icon in the upper-right corner.
- In the Settings menu, go to Calendar.
- Under Time Zones, use the drop-down menu to select the region that matches your current location.
- Save the changes.

After changing the time zone for your Outlook calendar, remember to update it for meeting hours too. For this, click Yes, update in the corresponding notification.
Apply Microsoft 365 settings to new Outlook
Instead of setting the time zone directly in the new Outlook, you can opt to synchronize Outlook's date and time settings with your global Microsoft 365 settings. Here's how to do this:
- In the new Outlook app, go to Settings > General.
- Under Sync across Microsoft 365, click on the View and manage Microsoft 365 settings link to review your current settings and make any necessary modifications.
- Toggle the Use my Microsoft 365 settings option on.
- A dialog will appear asking you to verify that you want to synchronize the language, date and time settings across Microsoft 365 apps. Click Sync settings to agree.
- Restart Outlook if prompted.


Now, the time zone settings are accurately configured in the new Outlook, so you can see the right time for all your emails, appointments, and calendar events.
How to add multiple time zones to Outlook calendar
Collaborating with international teams often requires keeping track of different time areas. Microsoft Outlook lets you display multiple times in your calendar, providing a clear view of your local time alongside other important business locations or frequent travel destinations.
This feature is very helpful for scheduling your calendar across the globe without changing your entire system's time settings.
Add different time zones in classic Outlook
The latest version of Outlook 365 allows displaying up to three separate time zones in the calendar, while Outlook 2019 and earlier support two.
To add a second time zone to the Outlook calendar, the steps are:
- Go to File > Options > Calendar and scroll down to the Time zones section.
- Check the Show a second time zone option.
- If needed, select the Show a third-time zone check box.
- For convenience, type a label for each one.
- Click OK to save the changes.

Tips:
- To change the positions of the displayed times in the calendar, click the Swap Time Zones button.
- To remove an additional time zone, uncheck the box next to it.
Add multiple time zones in new Outlook and web
To add a few different time zones in the new Outlook and web version, follow these steps:
- Access the time zone settings via Settings > Calendar.
- Click the Add time zone button to introduce a second time zone to your calendar.
- Choose the desired time zone from the dropdown list or search for a city's name.
- Enter a label for each zone for clarity.
- If needed, repeat the process to add more time regions.

Using the same calendar settings, you can easily manage the time regions displayed in the new Outlook calendar:
- To display a certain time zone, tick the Show in calendar box next to it.
- To rearrange the order, use the Move up and Move down arrows.
- To delete a time zone, click the Remove button.
With these settings, you can easily control regional times in the new Outlook and web, so you can comfortably plan and work across various areas.
How to display multiple time zones in Outlook calendar
Once you've set up additional time regions, you might be curious about how to make them visible on your Outlook calendar.
Display several time zones in classic Outlook
By default, the Outlook Calendar usually shows the Month view, which doesn't have time zones. To see the added time zones, switch to the Week, Day, or Schedule view.
- In the Week and Day views, you'll see a vertical time bar to the left of your calendar.
- In the Schedule view, the time zines are displayed horizontally at the top of the calendar.

View different time zones in new Outlook and web
After adding at least one additional time zone, a time bar with your custom labels will appear to the left of your calendars in the Day, Workweek, and Week views. In the Month view, time zones cannot be shown.
To show and hide the additional time zones in your calendar, just do this:
- Click the top of the time bar where your labels are located.
- In the context menu, select Time zones.
- Click the ticked zone you wish to hide or an unticked zone you want to display.

Tip. For quick access to calendar options, use the Calendar settings button on the top toolbar on the View tab.
Adjust for daylight saving time automatically
In earlier versions, it was possible to manage the daylight saving time (DST) adjustment when changing the time zone in Outlook. In the current version of Outlook 365, this option is no longer available within the application itself. However, you can still control this behavior through your system settings. Here's how:
- Click the Start button and select Settings.
- In the left pane, click on Time & language, then choose Date & time.
- Find the Adjust for daylight saving time automatically option and toggle it on if you wish your computer's clock to automatically adjust for DST changes. If you prefer not to use this feature, simply toggle it off.

By adjusting this setting, you ensure that your computer's clock stays accurate, reflecting the changes associated with daylight saving time.
Note. This option is only visible for time zones that observe daylight saving time.
How to stop Outlook from changing time zone automatically
When you're on the move, Outlook might automatically update your time zone, which can be a bit of a hassle if you're trying to stay on a specific schedule. To keep your time settings consistent, here's what you can do to stop Outlook from changing it automatically:
- Open system Settings on your computer.
- Choose Time & language > Date & time.
- Toggle off the Set time zone automatically option.
This will keep your time zone just the way you set it, no matter where your travels take you.

Remember, this change is at the operating system level, so it'll affect all apps, not just Outlook.
Note. If you want to set your time zone automatically, then enable the option mentioned above. To do this, first allow Outlook to access your location. To enable this, navigate to Settings > Privacy & Security, and toggle on the Let apps access your location option.
How to get Outlook on the web to remind you to change time zones
In Outlook on the web, once you set your preferred time zone, it stays the same unless you decide to change it. But if you want a nudge to switch time regions when you travel, here's a quick way to set it up:
- In the Outlook web app, click the Settings gear icon.
- In the Settings menu, select Calendar.
- Turn on the When I travel across time zones, ask me if I want to update my time zone option.
Now, whenever you land in a new location, Outlook will pop up a reminder asking if you'd like to switch to the local time. It's like having a personal assistant looking out for your schedule :)
This option is also available in the new Outlook:

That's how to change time zone in Outlook and set up your calendar to show different times. This way, you'll always know what time it is for everyone, no matter where they are. It's a simple way to stay organized and avoid scheduling conflicts!
以上がOutlookタイムゾーンを変更し、カレンダーに複数回追加するの詳細内容です。詳細については、PHP 中国語 Web サイトの他の関連記事を参照してください。

 Excelの式の中央値 - 実用的な例Apr 11, 2025 pm 12:08 PM
このチュートリアルでは、中央値関数を使用してExcelの数値データの中央値を計算する方法について説明します。 中央傾向の重要な尺度である中央値は、データセットの中央値を識別し、中央の傾向のより堅牢な表現を提供します
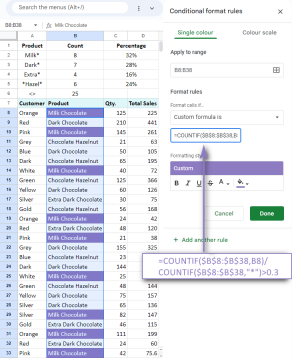 式の例を備えたGoogleスプレッドシートcountif機能Apr 11, 2025 pm 12:03 PM
マスターグーグルシートcountif:包括的なガイド このガイドでは、Googleシートの多用途のCountif機能を調査し、単純なセルカウントを超えてそのアプリケーションを実証しています。 正確な一致や部分的な一致から漢までのさまざまなシナリオをカバーします
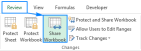 Excel共有ワークブック:複数のユーザーのExcelファイルを共有する方法Apr 11, 2025 am 11:58 AM
このチュートリアルは、さまざまな方法、アクセス制御、競合解決をカバーするExcelワークブックを共有するための包括的なガイドを提供します。 Modern Excelバージョン(2010、2013、2016、およびその後)共同編集を簡素化し、mの必要性を排除します
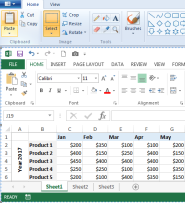 Excelをjpgに変換する方法 - .xlsまたは.xlsxを画像ファイルとして保存しますApr 11, 2025 am 11:31 AM
このチュートリアルでは、.xlsファイルを.jpg画像に変換するためのさまざまな方法を調査し、ビルトインWindowsツールと無料のオンラインコンバーターの両方を網羅しています。 プレゼンテーションを作成したり、スプレッドシートデータを安全に共有したり、ドキュメントを設計したりする必要がありますか?ヨーヨーを変換します
 名前と名前付き範囲:フォーミュラで定義および使用する方法Apr 11, 2025 am 11:13 AM
このチュートリアルは、Excel名の機能を明確にし、セル、範囲、定数、または式の名前を定義する方法を示します。 また、定義された名前の編集、フィルタリング、削除もカバーしています。 Excelの名前は、信じられないほど便利ですが、しばしばOverloです
 標準偏差Excel:関数と式の例Apr 11, 2025 am 11:01 AM
このチュートリアルは、標準偏差と平均の標準誤差の区別を明確にし、標準偏差計算のための最適なExcel関数を導きます。 記述統計では、平均および標準偏差は内在的です
 Excelの平方根:SQRT関数およびその他の方法Apr 11, 2025 am 10:34 AM
このExcelチュートリアルでは、正方形の根とNth Rootsを計算する方法を示しています。 平方根を見つけることは一般的な数学的操作であり、Excelはいくつかの方法を提供します。 Excelの正方形の根を計算する方法: SQRT関数を使用します
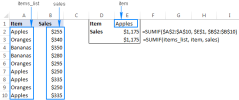
 Googleシートの基本:Googleスプレッドシートでの作業方法を学ぶApr 11, 2025 am 10:23 AM
Googleシートのパワーのロックを解除:初心者向けガイド このチュートリアルでは、MS Excelに代わる強力で多目的な代替品であるGoogleシートの基礎を紹介します。 スプレッドシートを簡単に管理し、重要な機能を活用し、コラボレーションする方法を学ぶ


ホットAIツール

Undresser.AI Undress
リアルなヌード写真を作成する AI 搭載アプリ

AI Clothes Remover
写真から衣服を削除するオンライン AI ツール。

Undress AI Tool
脱衣画像を無料で

Clothoff.io
AI衣類リムーバー

Video Face Swap
完全無料の AI 顔交換ツールを使用して、あらゆるビデオの顔を簡単に交換できます。

人気の記事
ホットツール

メモ帳++7.3.1
使いやすく無料のコードエディター

SublimeText3 Linux 新バージョン
SublimeText3 Linux 最新バージョン

MantisBT
Mantis は、製品の欠陥追跡を支援するために設計された、導入が簡単な Web ベースの欠陥追跡ツールです。 PHP、MySQL、Web サーバーが必要です。デモおよびホスティング サービスをチェックしてください。

SublimeText3 Mac版
神レベルのコード編集ソフト(SublimeText3)

PhpStorm Mac バージョン
最新(2018.2.1)のプロフェッショナル向けPHP統合開発ツール

