


Here's a comprehensive guide on how to create your own email rules in the new Outlook and the web version of Outlook 365.
If you've become accustomed to using rules in classic Outlook to manage your email flow, you'll be pleased to know that the new Outlook also includes this feature. Despite some differences in the setup process and a slightly reduced set of options, you can still create rules to automate the sorting of your emails and keep a tidy inbox.
- New Outlook rules
- Create rule in new Outlook and web
- Set up rule for specific emails
- Manage rules
- Edit rule
- Disable and enable rule
- Remove rule
- Change order of rules
- Run rule manually
- New Outlook rules not working
- Client-side rules are out
- Rules are specific to each account
- Rules for Gmail and Yahoo accounts are not supported
New Outlook rules
Like the classic Outlook desktop app, the new Outlook lets you set up rules to manage your emails, but with a few less options. To grasp the nuances, you need to understand the difference between the server-side and client-side rules, and what you can and can't do with them.
Server-side rules work directly on the server, so they run whether or not Outlook is open on your computer. These are the kind of rules you'll find in Outlook on the web and the new Outlook app, which is pretty much a web client in disguise (a wrapper over the web client). They're great for organizing your emails - flagging the important ones, sorting them into categories, or moving to folders, all done on the server as soon as your emails come in.
But here's the catch: client-side rules, like printing emails or setting reminders, aren't available in the new Outlook or Outlook 365 online. That's because these rules need the Outlook client running on your computer to work. For example, you can't play a sound or print an email if you've logged into your Outlook account from a different computer that doesn't have a printer or speakers. Even if you could, in theory, set up such a rule, it won't work because there won't be any technical way to execute it.
So, while classic Outlook with an Exchange server has both server-side and client-only rules, in the new Outlook only server-side rules are available.

Examples of new Outlook rules:
- Block emails with certain words in new Outlook - filter spam emails by moving messages with certain words to the Junk folder.
- Set an out-of-office reply in new Outlook - notify senders that you are away with an automatic out-of-office reply.
- Forward or redirect mail - automatically forward or redirect all mail that you receive or specific messages only.
How to create a rule for Inbox in new Outlook and web
In the new Outlook and Outlook on the web (also known as Outlook 365 online), rules are applied to incoming messages that you receive.
To create an email rule for your Inbox, this is what you need to do:
- Click the Settings gear icon in the upper-right corner of the Outlook window. Alternatively, you can click Mail > View tab > View Settings.
- In the Settings menu, choose Mail > Rules.
- If you have multiple accounts, select the one for which you want to create a rule from the dropdown list at the top.
- Click on the plus icon to add a new rule.

- In the rules menu that opens, you need to define three essential components: a rule name, conditions, and actions.
-
Name the rule. Enter a shot descriptive name in the first box, for example "Forward messages".
-
Specify conditions. From the dropdown menu next to number 2, choose a condition. You can add more conditions by clicking the Add another condition link. For example, if you want to forward emails sent by a specific person, choose the "From" condition.
-
Define actions. Use the dropdown menu next to number 3 to select an action to apply to emails that meet your conditions. You can also add multiple actions by selecting Add another action. Actions are grouped into three categories:
- Organize: Move, copy, delete, or pin to the top.
- Mark message: as read, junk, with importance or assign a category.
- Route: forward, forward as attachment, or redirect.
For instance, select "Forward to" as an action, and then specify the email address of the recipient.
-
Add exceptions (optional). Outlook email rules can also include exceptions to conditions. Click Add an exception to specify an exception. For example, you may choose not to forward emails containing the word "confidential" in the subject or body.
- If you don't want to execute any more rules for a message after a certain rule is applied, select the Stop processing more rules checkbox. Find more about how this feature works: Stop processing more rules in Outlook.
- If you want to apply the rule to all existing emails meeting the condition, select the Run this rule checkbox. It's important to note that this option is limited to specific Outlook email rule types, such as move to folder, flag, or categorize, and is unavailable for forwarding rules.
- Finally, press Save to save the newly created rule or Discard to cancel any changes.


Done! You've successfully created a rule in the new Outlook, allowing you to manage your email flow according to your specified criteria.
Tip. In Outlook.com, the process of creating an email rule is essentially the same. While slight differences in the option names may exist, they don't hinder the understanding of overall functionality or the rule creation process.
How to make a rule for specific emails in new Outlook and web
The new Outlook also has a convenient feature to swiftly create a rule directly from an existing email, which is particularly useful for managing all messages from a specific sender. Here's how to do it:
- In your Inbox or any other folder, right-click the email for which you want to set up a rule.
- From the context menu, select Rules > Create rule.
- Choose the folder where you want all messages from that sender to be moved and click OK. If you wish to do something else, click More options.
- If you've chosen to create a rule that moves emails to the designated folder, a confirmation message will appear. To immediately apply the rule to all existing messages in the target folder, put a tick in the Run this rule now checkbox. Then, click OK to close the popup dialog, or click View rules to see the full description of the email rule that Outlook has just created for you.
- If you've opted for more options, you'll be directed to the rules menu where the first two settings - rule name and condition – are preconfigured (you are free to modify these as needed). Your task is to specify the action you wish to apply to messages from that specific sender.
- Optionally, add exceptions, and then save the rule.


With these simple steps, you can promptly organize your inbox by creating rules directly from messages.
How to manage rules in new Outlook and web
To change, remove, or rearrange existing rules in new Outlook and Outlook 365 online, open the rule menu (Settings > Mail > Rules). From there, you can perform various actions:
Change the rule
To edit an existing rule, click the pencil icon next to the rule. This will open the Rules Settings menu where you can modify the rule's conditions and behavior.
Temporarily disable / enable rule
To turn off the rule when you don't need it, toggle the switch box to the left of the rule. When you need the rule again, simply toggle it back on.
Delete the rule
To permanently delete the rule, click the trashcan icon.
Change the rules order
In the new Outlook, email rules are applied to incoming messages based on their order in the rules list.
To adjust the order in which rules are executed, use the Up or Down arrows to move a rule up or down in the list.
Run the rule manually
By default, rules trigger on incoming emails after creation. To apply a rule to the messages that are already in your inbox, click the Run button next to the rule.

Rules are not working in new Outlook and web
Having trouble with rules in the new Outlook and web app? There can be various reasons behind it. Sometimes, rules don't work because they’re set up wrong, conflict with other rules, or they're just turned off. But a couple of big reasons stand out in the new Outlook and web version.
Client-side rules are unavailable
In the transition from classic Outlook to the new Outlook or web platform, you'll find out that client-side rules (such as follow-up or print emails) are not supported, as they rely on the Outlook client running on your computer. Since the new Outlook and web version don't use the client, these rules get disabled and show an error message indicating their incompatibility. Unfortunately, there is no workaround to make client-side rules function in the new Outlook or web app.

Email rules are specific to each account
If you've got more than one account, you need to set up rules for each one separately. You can check which account you're setting rules for in the top right corner of the Settings menu.

Rules cannot be created for Gmail and Yahoo accounts
In the new Outlook, you can't make rules for Gmail or Yahoo accounts because Outlook's rules are designed to work with emails hosted on Microsoft's servers, while external email services like Gmail or Yahoo have a different infrastructure and their own set of rules and filters.

While these are the primary issues affecting rules in the new Outlook and web, there might be other reasons why your rules don't work. For further troubleshooting, please check out Why rules are not working in Outlook: reasons and fixes.
And there you have it – a straightforward guide to setting up and fine-tuning your own rules in both the new Outlook and Outlook 365 Online. Feel free to play around with different criteria and actions to find the perfect combination that works for you. A bit of experimentation and adjustment here and there, and you'll be navigating your inbox like a pro, leaving more time for the things you love instead of sorting emails.
以上が新しいOutlookとWebで電子メールルールを作成する方法の詳細内容です。詳細については、PHP 中国語 Web サイトの他の関連記事を参照してください。

 Excelの式の中央値 - 実用的な例Apr 11, 2025 pm 12:08 PM
このチュートリアルでは、中央値関数を使用してExcelの数値データの中央値を計算する方法について説明します。 中央傾向の重要な尺度である中央値は、データセットの中央値を識別し、中央の傾向のより堅牢な表現を提供します
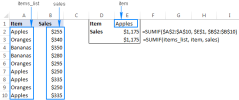
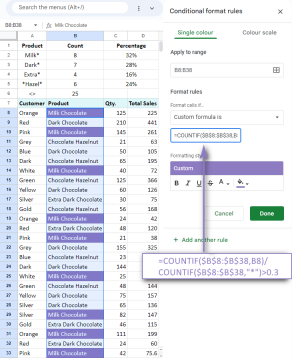 式の例を備えたGoogleスプレッドシートcountif機能Apr 11, 2025 pm 12:03 PM
マスターグーグルシートcountif:包括的なガイド このガイドでは、Googleシートの多用途のCountif機能を調査し、単純なセルカウントを超えてそのアプリケーションを実証しています。 正確な一致や部分的な一致から漢までのさまざまなシナリオをカバーします
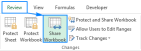 Excel共有ワークブック:複数のユーザーのExcelファイルを共有する方法Apr 11, 2025 am 11:58 AM
このチュートリアルは、さまざまな方法、アクセス制御、競合解決をカバーするExcelワークブックを共有するための包括的なガイドを提供します。 Modern Excelバージョン(2010、2013、2016、およびその後)共同編集を簡素化し、mの必要性を排除します
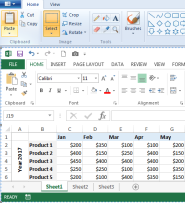 Excelをjpgに変換する方法 - .xlsまたは.xlsxを画像ファイルとして保存しますApr 11, 2025 am 11:31 AM
このチュートリアルでは、.xlsファイルを.jpg画像に変換するためのさまざまな方法を調査し、ビルトインWindowsツールと無料のオンラインコンバーターの両方を網羅しています。 プレゼンテーションを作成したり、スプレッドシートデータを安全に共有したり、ドキュメントを設計したりする必要がありますか?ヨーヨーを変換します
 名前と名前付き範囲:フォーミュラで定義および使用する方法Apr 11, 2025 am 11:13 AM
このチュートリアルは、Excel名の機能を明確にし、セル、範囲、定数、または式の名前を定義する方法を示します。 また、定義された名前の編集、フィルタリング、削除もカバーしています。 Excelの名前は、信じられないほど便利ですが、しばしばOverloです
 標準偏差Excel:関数と式の例Apr 11, 2025 am 11:01 AM
このチュートリアルは、標準偏差と平均の標準誤差の区別を明確にし、標準偏差計算のための最適なExcel関数を導きます。 記述統計では、平均および標準偏差は内在的です
 Excelの平方根:SQRT関数およびその他の方法Apr 11, 2025 am 10:34 AM
このExcelチュートリアルでは、正方形の根とNth Rootsを計算する方法を示しています。 平方根を見つけることは一般的な数学的操作であり、Excelはいくつかの方法を提供します。 Excelの正方形の根を計算する方法: SQRT関数を使用します
 Googleシートの基本:Googleスプレッドシートでの作業方法を学ぶApr 11, 2025 am 10:23 AM
Googleシートのパワーのロックを解除:初心者向けガイド このチュートリアルでは、MS Excelに代わる強力で多目的な代替品であるGoogleシートの基礎を紹介します。 スプレッドシートを簡単に管理し、重要な機能を活用し、コラボレーションする方法を学ぶ


ホットAIツール

Undresser.AI Undress
リアルなヌード写真を作成する AI 搭載アプリ

AI Clothes Remover
写真から衣服を削除するオンライン AI ツール。

Undress AI Tool
脱衣画像を無料で

Clothoff.io
AI衣類リムーバー

Video Face Swap
完全無料の AI 顔交換ツールを使用して、あらゆるビデオの顔を簡単に交換できます。

人気の記事
ホットツール

SublimeText3 Linux 新バージョン
SublimeText3 Linux 最新バージョン

メモ帳++7.3.1
使いやすく無料のコードエディター

MantisBT
Mantis は、製品の欠陥追跡を支援するために設計された、導入が簡単な Web ベースの欠陥追跡ツールです。 PHP、MySQL、Web サーバーが必要です。デモおよびホスティング サービスをチェックしてください。

SublimeText3 中国語版
中国語版、とても使いやすい

ドリームウィーバー CS6
ビジュアル Web 開発ツール
ホットトピック
 7814
7814 15164614140252130025123629