Animation d'attributs de la collection d'animations Android - Premier aperçu
Introduction à cette section :
Cette section apporte le troisième type d'animation dans l'animation Android : Animation de propriété. Rappelez-vous dans la section précédente 8.4.2 Collection d'animations Android entre animations est Fragment Lors de la définition de l'animation de transition, j'ai mentionné que le Fragment sous le package App et le package V4 appelle setCustomAnimations() en conséquence. Les types d'animation sont différents. Celui du package v4 est Animation, tandis que celui du package de l'application est Animateur ; 🎜> est Nous avons appris l'
animation frame et l'animation interpolationplus tôt ! Animateur est l'attribut animation dont nous parlerons dans cette section ! Concernant l'animation d'attributs, Oncle Guo a écrit trois très bons articles de synthèse. Ils sont très bien écrits. Il n'est pas nécessaire de réinventer la roue. Mais revenons-en ici. La plupart du contenu fait référence aux trois articles suivants :
Analyse complète de l'animation d'attributs Android (Partie 1), première compréhension de l'utilisation de base de l'animation d'attributs
L'écriture est très bonne, ou vous pouvez sauter cet article directement et lire les trois articles ci-dessus~Bien sûr, si vous êtes prêt à lire mon babillage , vous êtes également les bienvenus. D'accord, commençons cette section Parlons du contenu~
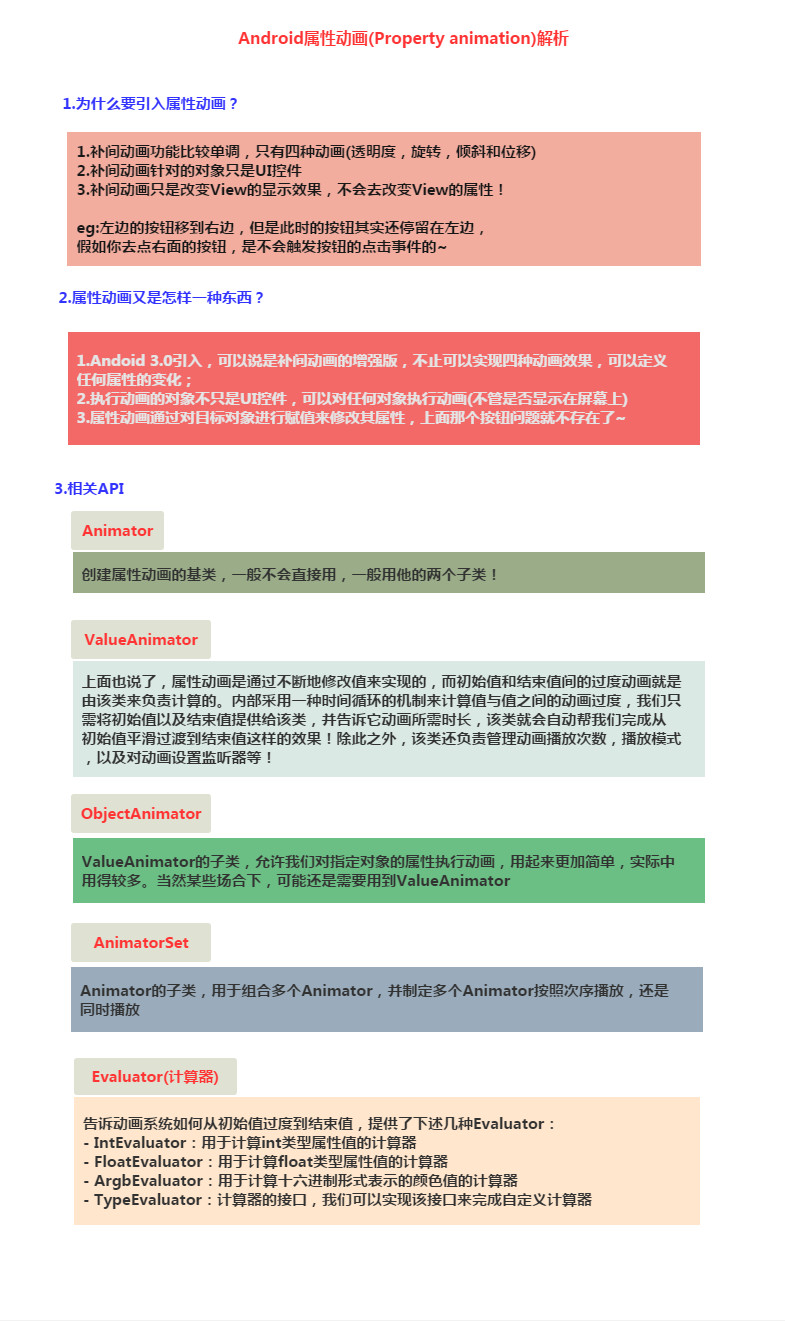
1 Le concept d'animation d'attributs est ennuyeuxPas de BB, juste. téléchargez la photo, c'est tellement violent~
2 Utilisation simple de ValueAnimator
Processus d'utilisation
:
1. Appelez la méthode statique ofInt
() ,- ofFloat
- () ou ofObject() de ValueAnimator pour créer une instance de ValueAnimator 2. Appelez la méthode setXxx de l'instance pour définir la durée de l'animation, la méthode d'interpolation, le nombre de répétitions, etc.3 Appelez le addUpdateListener
- de l'instance pour ajouter le . AnimatorUpdateListener
- écouteur dans l'écouteur Vous pouvez obtenir la valeur calculée par ValueAnimator, et vous pouvez appliquer la valeur à l'objet spécifié~4 Appelez la méthode start() de l'instance pour démarrer l'animation ! De plus, nous pouvons voir que ofInt et ofFloat ont tous deux les paramètres suivants : float/int... les valeurs représentent plusieurs valeurs !
- Exemple d'utilisation :
Implémentation du code :
:
Fichier de mise en page :activity_main.xml, très simple, quatre boutons, un ImageView
<LinearLayout xmlns:android="http://schemas.android.com/apk/res/android"
    android:id="@+id/ly_root"
    android:layout_width="match_parent"
    android:layout_height="match_parent"
    android:orientation="vertical">

    <Button
        android:id="@+id/btn_one"
        android:layout_width="wrap_content"
        android:layout_height="wrap_content"
        android:text="动画1" />

    <Button
        android:id="@+id/btn_two"
        android:layout_width="wrap_content"
        android:layout_height="wrap_content"
        android:text="动画2" />

    <Button
        android:id="@+id/btn_three"
        android:layout_width="wrap_content"
        android:layout_height="wrap_content"
        android:text="动画3" />

    <Button
        android:id="@+id/btn_four"
        android:layout_width="wrap_content"
        android:layout_height="wrap_content"
        android:text="动画4" />

    <ImageView
        android:id="@+id/img_babi"
        android:layout_width="wrap_content"
        android:layout_height="wrap_content"
        android:layout_gravity="center"
        android:background="@mipmap/img_babi" /></LinearLayout>
Ensuite, allez sur MainActivity.java, Tout d'abord, nous avons besoin d'une méthode pour modifier la position de la vue. Ici, nous appelons moveView() pour définir les coordonnées de départ de la gauche et du haut ainsi que la largeur et la hauteur !
Ensuite quatre animations sont définies, à savoir : mouvement linéaire, mise à l'échelle, rotation avec transparence, et rotation circulaire !
Ensuite, déclenchez l'animation correspondante via le bouton~
public class MainActivity extends AppCompatActivity implements View.OnClickListener {

    private Button btn_one;
    private Button btn_two;
    private Button btn_three;
    private Button btn_four;
    private LinearLayout ly_root;
    private ImageView img_babi;
    private int width;
    private int height;

    @Override
    public void onCreate(Bundle savedInstanceState) {
        super.onCreate(savedInstanceState);
        setContentView(R.layout.activity_main);
        bindViews();
    }

    private void bindViews() {
        ly_root = (LinearLayout) findViewById(R.id.ly_root);
        btn_one = (Button) findViewById(R.id.btn_one);
        btn_two = (Button) findViewById(R.id.btn_two);
        btn_three = (Button) findViewById(R.id.btn_three);
        btn_four = (Button) findViewById(R.id.btn_four);
        img_babi = (ImageView) findViewById(R.id.img_babi);

        btn_one.setOnClickListener(this);
        btn_two.setOnClickListener(this);
        btn_three.setOnClickListener(this);
        btn_four.setOnClickListener(this);
        img_babi.setOnClickListener(this);
    }

    @Override
    public void onClick(View v) {
        switch (v.getId()) {
            case R.id.btn_one:
                lineAnimator();
                break;
            case R.id.btn_two:
                scaleAnimator();
                break;
            case R.id.btn_three:
                raAnimator();
                break;
            case R.id.btn_four:
                circleAnimator();
                break;
            case R.id.img_babi:
                Toast.makeText(MainActivity.this, "不愧是coder-pig~", Toast.LENGTH_SHORT).show();
                break;
        }
    }


    //定义一个修改ImageView位置的方法
    private void moveView(View view, int rawX, int rawY) {
        int left = rawX - img_babi.getWidth() / 2;
        int top = rawY - img_babi.getHeight();
        int width = left + view.getWidth();
        int height = top + view.getHeight();
        view.layout(left, top, width, height);
    }


    //定义属性动画的方法:

    //按轨迹方程来运动
    private void lineAnimator() {
        width = ly_root.getWidth();
        height = ly_root.getHeight();
        ValueAnimator xValue = ValueAnimator.ofInt(height,0,height / 4,height / 2,height / 4 * 3 ,height);
        xValue.setDuration(3000L);
        xValue.addUpdateListener(new ValueAnimator.AnimatorUpdateListener() {
            @Override
            public void onAnimationUpdate(ValueAnimator animation) {
                // 轨迹方程 x = width / 2
                int y = (Integer) animation.getAnimatedValue();
                int x = width / 2;
                moveView(img_babi, x, y);
            }
        });
        xValue.setInterpolator(new LinearInterpolator());
        xValue.start();
    }

    //缩放效果
    private void scaleAnimator(){

        //这里故意用两个是想让大家体会下组合动画怎么用而已~
        final float scale = 0.5f;
        AnimatorSet scaleSet = new AnimatorSet();
        ValueAnimator valueAnimatorSmall = ValueAnimator.ofFloat(1.0f, scale);
        valueAnimatorSmall.setDuration(500);

        ValueAnimator valueAnimatorLarge = ValueAnimator.ofFloat(scale, 1.0f);
        valueAnimatorLarge.setDuration(500);

        valueAnimatorSmall.addUpdateListener(new ValueAnimator.AnimatorUpdateListener() {
            @Override
            public void onAnimationUpdate(ValueAnimator animation) {
                float scale = (Float) animation.getAnimatedValue();
                img_babi.setScaleX(scale);
                img_babi.setScaleY(scale);
            }
        });
        valueAnimatorLarge.addUpdateListener(new ValueAnimator.AnimatorUpdateListener() {
            @Override
            public void onAnimationUpdate(ValueAnimator animation) {
                float scale = (Float) animation.getAnimatedValue();
                img_babi.setScaleX(scale);
                img_babi.setScaleY(scale);
            }
        });

        scaleSet.play(valueAnimatorLarge).after(valueAnimatorSmall);
        scaleSet.start();

        //其实可以一个就搞定的
//        ValueAnimator vValue = ValueAnimator.ofFloat(1.0f, 0.6f, 1.2f, 1.0f, 0.6f, 1.2f, 1.0f);
//        vValue.setDuration(1000L);
//        vValue.addUpdateListener(new ValueAnimator.AnimatorUpdateListener() {
//            @Override
//            public void onAnimationUpdate(ValueAnimator animation) {
//                float scale = (Float) animation.getAnimatedValue();
//                img_babi.setScaleX(scale);
//                img_babi.setScaleY(scale);
//            }
//        });
//        vValue.setInterpolator(new LinearInterpolator());
//        vValue.start();
    }


    //旋转的同时透明度变化
    private void raAnimator(){
        ValueAnimator rValue = ValueAnimator.ofInt(0, 360);
        rValue.setDuration(1000L);
        rValue.addUpdateListener(new ValueAnimator.AnimatorUpdateListener() {
            @Override
            public void onAnimationUpdate(ValueAnimator animation) {
                int rotateValue = (Integer) animation.getAnimatedValue();
                img_babi.setRotation(rotateValue);
                float fractionValue = animation.getAnimatedFraction();
                img_babi.setAlpha(fractionValue);
            }
        });
        rValue.setInterpolator(new DecelerateInterpolator());
        rValue.start();
    }

    //圆形旋转
    protected void circleAnimator() {
        width = ly_root.getWidth();
        height = ly_root.getHeight();
        final int R = width / 4;
        ValueAnimator tValue = ValueAnimator.ofFloat(0,
                (float) (2.0f * Math.PI));
        tValue.setDuration(1000);
        tValue.addUpdateListener(new ValueAnimator.AnimatorUpdateListener() {
            @Override
            public void onAnimationUpdate(ValueAnimator animation) {
                // 圆的参数方程 x = R * sin(t) y = R * cos(t)
                float t = (Float) animation.getAnimatedValue();
                int x = (int) (R * Math.sin(t) + width / 2);
                int y = (int) (R * Math.cos(t) + height / 2);
                moveView(img_babi, x, y);
            }
        });
        tValue.setInterpolator(new DecelerateInterpolator());
        tValue.start();
    }
}
D'accord, le processus est très simple. Créez d'abord l'objet ValueAnimator et appelez ValueAnimator.ofInt/ofFloat. Obtenez, puis définissez la durée de l'animation, addUpdateListener ajoutez AnimatorUpdateListener écouteur d'événement, Ensuite, utilisez le paramètre animation getAnimatedValue() pour obtenir la valeur actuelle, et nous pourrons ensuite conserver cette valeur Pour modifier certaines propriétés de la vue pour former ce que l'on appelle l'effet d'animation, puis définir le mode de rendu de l'animation setInterpolator, Enfin, start() est appelé pour démarrer la lecture de l'animation~
Putain de merde, l'équation d'une ligne droite et l'équation paramétrique d'un cercle commencent à me rendre carré, n'est-ce pas quelque chose de haut niveau. ?
Le salaud scientifique a même oublié les fonctions trigonométriques...
L'exemple vient de github :MoveViewValueAnimator
3. 🎜>
Comparé à ValueAnimator, ObjectAnimator est plus facile à utiliser. Grâce à cette classe, nous pouvonsdirectement animer n'importe quel attribut de n'importe quel objet ! C'est vrai, il s'agit de n'importe quel objet, pas seulement des objets View.
Attribuez en permanence une certaine valeur d'attribut à l'objet, puis décidez comment l'afficher en fonction de la modification de la valeur d'attribut de l'objet.
sortir! Par exemple, définissez l'animation suivante pour TextView : ObjectAnimator.ofFloat(textview, "alpha", 1f, 0f);Ici, la valeur de alpha est constamment modifiée, de 1f à 0f, et puis l'objet change en fonction des changements de valeur d'attribut pour actualiser l'affichage de l'interface, ainsi
Montre l'effet du fondu entrant et sortant, mais il n'y a pas d'attribut alpha dans la classe TextView. Le mécanisme interne d'ObjectAnimator est le suivant :
Recherchez les méthodes get et set correspondant aux noms d'attribut transférés~, au lieu de rechercher le. valeur d'attribut ! Si vous n'y croyez pas, vous pouvez vérifier le code source de TextView pour voir s'il y a un attribut alpha !
D'accord, utilisons ObjectAnimator pour obtenir les effets de quatre types d'animation interpolée ~
Exécutez les rendus :

Implémentation du code : La mise en page
utilise directement la mise en page ci-dessus, ajoute un bouton et remplace ImageView par un TextView. Le code ne sera pas publié ici. Accédez directement à la partieMainActivity.java du code. En fait, elles sont toutes similaires~
public class MainActivity extends AppCompatActivity implements View.OnClickListener {
    private Button btn_one;
    private Button btn_two;
    private Button btn_three;
    private Button btn_four;
    private Button btn_five;
    private LinearLayout ly_root;
    private TextView tv_pig;
    private int height;
    private ObjectAnimator animator1;
    private ObjectAnimator animator2;
    private ObjectAnimator animator3;
    private ObjectAnimator animator4;
    private AnimatorSet animSet;

    @Override
    protected void onCreate(Bundle savedInstanceState) {
        super.onCreate(savedInstanceState);
        setContentView(R.layout.activity_main);
        bindViews();
        initAnimator();
    }

    private void bindViews() {
        ly_root = (LinearLayout) findViewById(R.id.ly_root);
        btn_one = (Button) findViewById(R.id.btn_one);
        btn_two = (Button) findViewById(R.id.btn_two);
        btn_three = (Button) findViewById(R.id.btn_three);
        btn_four = (Button) findViewById(R.id.btn_four);
        btn_five = (Button) findViewById(R.id.btn_five);
        tv_pig = (TextView) findViewById(R.id.tv_pig);

        height = ly_root.getHeight();
        btn_one.setOnClickListener(this);
        btn_two.setOnClickListener(this);
        btn_three.setOnClickListener(this);
        btn_four.setOnClickListener(this);
        btn_five.setOnClickListener(this);
        tv_pig.setOnClickListener(this);
    }

    //初始化动画
    private void initAnimator() {
        animator1 = ObjectAnimator.ofFloat(tv_pig, "alpha", 1f, 0f, 1f, 0f, 1f);
        animator2 = ObjectAnimator.ofFloat(tv_pig, "rotation", 0f, 360f, 0f);
        animator3 = ObjectAnimator.ofFloat(tv_pig, "scaleX", 2f, 4f, 1f, 0.5f, 1f);
        animator4 = ObjectAnimator.ofFloat(tv_pig, "translationY", height / 8, -100, height / 2);
    }

    @Override
    public void onClick(View v) {
        switch (v.getId()) {
            case R.id.btn_one:
                animator1.setDuration(3000l);
                animator1.start();
                break;
            case R.id.btn_two:
                animator2.setDuration(3000l);
                animator2.start();
                break;
            case R.id.btn_three:
                animator3.setDuration(3000l);
                animator3.start();
                break;
            case R.id.btn_four:
                animator4.setDuration(3000l);
                animator4.start();
                break;
            case R.id.btn_five:
                //将前面的动画集合到一起~
                animSet = new AnimatorSet();
                animSet.play(animator4).with(animator3).with(animator2).after(animator1);
                animSet.setDuration(5000l);
                animSet.start();
                break;
            case R.id.tv_pig:
                Toast.makeText(MainActivity.this, "不愧是coder-pig~", Toast.LENGTH_SHORT).show();
                break;
        }
    }
}
est également très simple à utiliser. Nous parlerons des animations combinées mentionnées ci-dessus. 4. Animation combinée et AnimatorListenerÀ partir des deux exemples ci-dessus, nous avons expérimenté une animation combinée, en utilisant la classe
AnimatorSet !
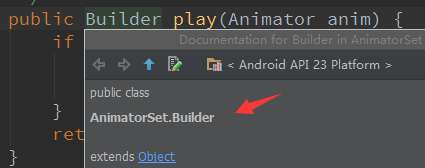
Nous appelons la méthode play(), puis passons la première animation pour commencer l'exécution. À ce moment-là, elle nous renverra une classe Builder :

. Suivant Nous pouvons appeler les quatre méthodes fournies par Builder pour combiner d'autres animations :
- après(Animator anim) Insérez l'animation existante dans l'animation entrante et exécutez-la
- après(long délai) Retarder l'animation existante pendant les millisecondes spécifiées avant de l'exécuter
- avant(Animateur anim) Insérer l'animation existante dans l'animation passée Exécuter avant l'animation entrante
- avec(Animator anim) Exécuter l'animation existante et l'animation entrante en même temps
Bon c'est très simple, ensuite parlons-en à propos de la surveillance des événements d'animation. L'écouteur de notre ValueAnimator ci-dessus est AnimatorUpdateListener Lorsque l'état de la valeur change, la méthode onAnimationUpdate sera rappelée !
En plus de ce genre d'événement, il existe : le suivi de la progression de l'animation ~ AnimatorListener, on peut appeler la méthode addListener Ajoutez un écouteur, puis remplacez les quatre méthodes de rappel suivantes :
- onAnimationStart() : l'animation démarre
- onAnimationRepeat() : Exécution répétée de l'animation
- onAnimationEnd() : L'animation se termine
- onAnimationCancel() : Animation annulée
Oui, si vous utilisez vraiment AnimatorListener, vous devez réécrire les quatre méthodes. Bien sûr, c'est la même chose que la section gestuelle précédente. Android nous a fourni une classe d'adaptateur : AnimatorListenerAdapter, dans laquelle chaque interface a été Les méthodes sont toutes implémentées, nous pouvons donc simplement écrire une méthode de rappel ici !
5. Utilisez XML pour écrire des animations
Utilisez XML pour écrire des animations Cela peut prendre un peu plus de temps à dessiner que le code Java, mais il est beaucoup plus facile à réutiliser ! Les balises XML correspondantes sont : <animator><objectAnimator><set> Les attributs pertinents sont expliqués comme suit :
- android:ordering : Spécifiez l'ordre de lecture des animations : séquentiellement (exécution séquentielle), ensemble (exécution simultanée)
- android:duration : La durée de l'animation
- android:propertyName="x": x ici, vous vous souvenez de l'"alpha" ci-dessus ? Obligatoire dans l'objet qui charge l'animation Définissez les méthodes getx et setx, c'est ainsi que objectAnimator modifie la valeur dans l'objet !
- android:valueFrom="1": La valeur initiale du début de l'animation
- android:valueTo="0": La valeur finale de la fin de l'animation Value
- android:valueType="floatType": Changer le type de données de la valeur
Les exemples d'utilisation sont les suivants
Les exemples d'utilisation sont les suivants:
<🎜 >①<🎜>Animation de transition en douceur de 0 à 100<🎜>:<🎜><animator xmlns:android="http://schemas.android.com/apk/res/android" android:valueFrom="0" android:valueTo="100" android:valueType="intType"/>
②Changer l'attribut alpha d'une vue de 1 à 0:
<objectAnimator xmlns:android="http://schemas.android.com/apk/res/android"
    android:valueFrom="1"
    android:valueTo="0"
    android:valueType="floatType"
    android:propertyName="alpha"/>
③définir la démonstration d'utilisation de l'animation:
 <set android:ordering="sequentially" >
    <set>
        <objectAnimator
            android:duration="500"
            android:propertyName="x"
            android:valueTo="400"
            android:valueType="intType" />
        <objectAnimator
            android:duration="500"
            android:propertyName="y"
            android:valueTo="300"
            android:valueType="intType" />
    </set>
    <objectAnimator
        android:duration="500"
        android:propertyName="alpha"
        android:valueTo="1f" /></set>
Chargez notre fichier d'animation :
AnimatorSet set = (AnimatorSet)AnimatorInflater.loadAnimator(mContext,
             R.animator.property_animator);
animator.setTarget(view);
animator.start();
6. Téléchargez l'exemple de code dans cette section :
AnimatorDemo1.zip
AnimatorDemo2.zip
Résumé de cette section :
D'accord, cette section vous donnera une brève introduction à l'utilisation de base de l'animation d'attributs dans Android. Je ne sais pas si vous l'avez comprise. , mais le contenu est relativement simple. Oui, et les exemples sont assez intéressants, je pense que vous les aimerez, eh bien, c'est tout, merci~
MerciGuo Shen pour son article~


