Utilisation de base de Toast
Introduction à cette section :
Bon, j'ai enfin fini d'apprendre quelques contrôles liés à la classe Adapter Bien sûr, en plus de ceux expliqués, il y en a bien d'autres. Je n'expliquerai pas lentement les contrôles associés. Si nécessaire, vous pouvez consulter la documentation par vous-même pour voir l'utilisation associée. Ce que cette section apporte est : Un contrôle utilisé par Android pour demander des informations - Toast ! Toast est une boîte de message très pratique qui apparaîtra dans Une boîte de message s'affiche sur l'écran sans aucun bouton, et elle ne disparaîtra pas automatiquement après un certain temps après avoir reçu le focus ! Très couramment utilisé ! Dans cette section, nous apprendrons comment utiliser Toast !
1. Appelez directement la méthode makeText() de la classe Toast pour créer
C'est le formulaire le plus couramment utilisé ! Par exemple, cliquez sur un bouton, puis un Toast apparaît. Utilisation : Toast.makeText(MainActivity.this, "Prompt content", Toast.LENGTH_LONG).show();Le premier est le contexte. objet! Pour deux, c'est le contenu affiché ! Le troisième est l'heure affichée, il n'en existe que deux types : LONG et SHORT prendra effet, même si vous définissez d'autres valeurs, ces deux-là seront finalement appelées !
De plus, Toast est très couramment utilisé. Nous pouvons extraire ces parties communes et les écrire dans une méthode ! Lorsque vous avez besoin d'afficher Toast, vous pouvez appeler directement cette méthode pour afficher Toast, ce qui est bien plus pratique ! Un exemple est le suivant :
{
Toast toast = Toast.makeText(global_context, str, showTime ravity .CENTER_VERTICAL|Gravity); .CENTER_HORIZONTAL , 0, 0); //Définir la position d'affichage
TextView v = (TextView) toast.getView().findViewById(android.R.id.message);
v.setTextColor( Color.YELLOW ); //Définir la couleur de la police
toast.show();
}
Avec la méthode extraite ci-dessus, nous avons constaté que nous pouvons appeler setGravity pour définir la position de l'affichage Toast et obtenir Obtenez le texte affiché via findViewById(android.R.id.message), puis définissez la couleur, la taille, etc. ! C'est la deuxième façon de personnaliser Toast grâce à la méthode de construction !
2. Personnalisez le Toast grâce à la méthode de construction :
Le texte et la position d'affichage sont personnalisés ci-dessus. deux Exemple simple :
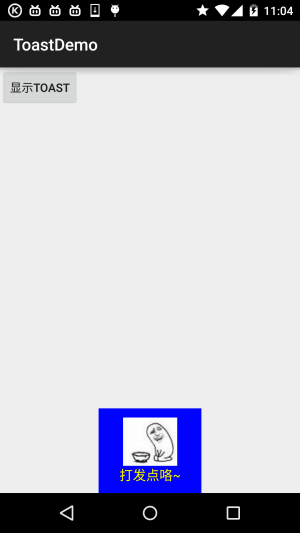
1. Définir un Toast avec une image
Rendu :

Code clé :
{
Toast toast = Toast.makeText(mContext, str, showTime);
toast .setGravity(Gravity.CENTER_HORIZONTAL|Gravity.BOTTOM, 0, 0); //Définir la position d'affichage
LinearLayout layout = (LinearLayout) toast.getView();
layout.setBackgroundColor(Color.BLUE); 🎜> ImageView image = new ImageView(this);
image.setImageResource(R.mipmap.ic_icon_qitao);
layout.addView(image, 0);
TextView v = (TextView) toast.getView ( ).findViewById(android.R.id.message);
v.setTextColor(Color.YELLOW); //Définir la couleur de la police
toast.show();
}
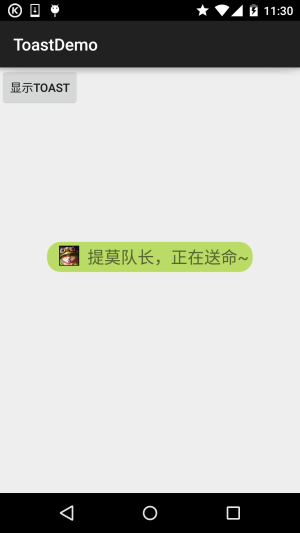
2. Toast est entièrement personnalisable
Si ce qui précède ne vous satisfait pas, vous pouvez alors rédiger vous-même une mise en page Toast puis l'afficher ; Mais nous ne pouvons toujours pas contrôler le temps !
Exécution des rendus :

Code clé :
{
LayoutInflater inflater = getLayoutInflater();
View view = inflater.inflate(R.layout.view_toast_custom,
(ViewGroup) findViewById( R .id.lly_toast));
ImageView img_logo = (ImageView) view.findViewById(R.id.img_logo);
TextView tv_msg = (TextView) view.findViewById(R.id.tv_msg);
tv_msg.setText(str);
Toast toast = new Toast(mContext);
toast.setGravity(Gravity.CENTER, 0, 0);
toast.setDuration(Toast.LENGTH_LONG);
toast.setView(view);
toast.show();
}
Il existe également une disposition Toast personnalisée et un arrière-plan arrondi :
Arrière-plan arrondi : bg_toast.xml :
<shape xmlns:android="http://schemas.android.com/apk/res/android">
<!-- Définir un couleur de fond transparent --->
<solid android:color="#BADB66" />
<!--Définir une bordure noire -->
<AVC
android :width="1px"
android:color="#FFFFFF" />
<!-- Définir le rayon des quatre coins arrondis -->
<corners
android :bottomLeftRadius="50px"
android:bottomRightRadius="50px"
android:topLeftRadius="50px"
android:topRightRadius="50px" />
<!- - Définir les côtés distance, agrandissez l'espace --->
<padding
android:bottom="5dp"
android:left="5dp"
android:right="5dp"
android :top="5dp" />
</shape>
布局文件:view_toast_custom.xml:
<LinearLayout xmlns:android="http://schemas.android.com/apk/res/android"
android:id="@+id/lly_toast"
android:layout_width="match_parent"
android : layout_height="match_parent"
android:background="../style/images/bg_toast"
android:orientation="horizontal">
<ImageView
android:id= "@+id/img_logo"
android:layout_width="24dp"
android:layout_height="24dp"
android:layout_marginLeft="10dp"
android:src="@mipmap/ iv_lol_icon1" />
<TextView
android:id="@+id/tv_msg"
android:layout_width="match_parent"
android:layout_height="wrap_content"
androïde :layout_marginLeft="10dp"
android:textSize="20sp" />
</LinearLayout>
非常简单,嘿嘿~
3.示例代码下载
ToastDemo.zip
本节小结:
好的,本节给大家讲解了Toast的基本使用, Toast,非常简单,大家可以在实际开发中对自己的Toast进行定制~


