
Maison >Applet WeChat >Développement de mini-programmes >Introduction aux pop-ups modaux personnalisés des mini-programmes WeChat
Introduction aux pop-ups modaux personnalisés des mini-programmes WeChat

- 不言original
- 2018-06-26 16:45:563508parcourir
Cet article présente principalement en détail la fenêtre contextuelle modale personnalisée du mini-programme WeChat. Elle a une certaine valeur de référence. Les amis intéressés peuvent s'y référer
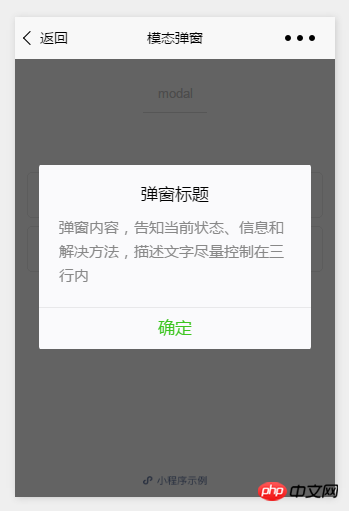
Tout d'abord, jetez un œil à la disposition officielle. La fenêtre contextuelle modale est pour votre référence. Le contenu spécifique est le suivant :
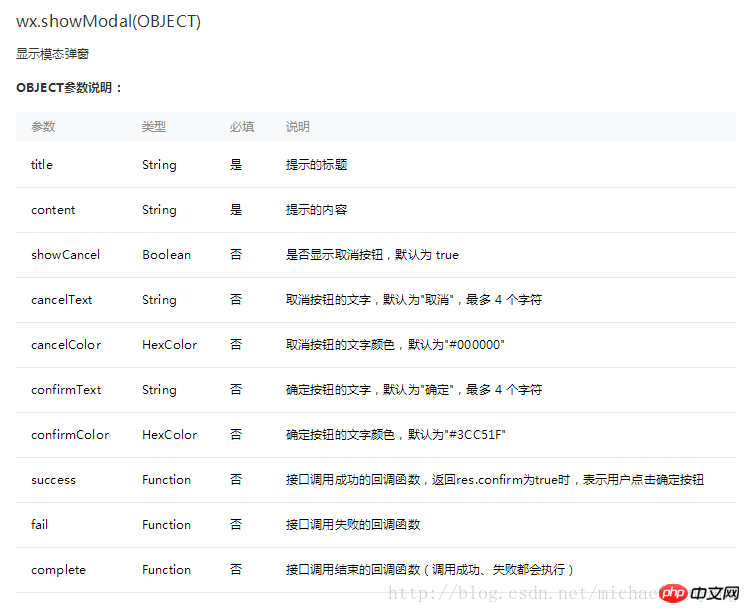
L'API est la suivante :
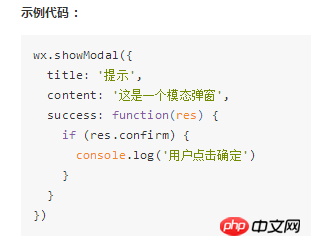
Exemple :
Une fenêtre contextuelle modale comme celle-ci ne peut, au mieux, servir que de alerte pour fournir des informations.
Cependant, il ne peut pas être utilisé pour gérer des services de fenêtres contextuelles complexes, donc Michael en a écrit une personnalisée, en utilisant un style d'écriture de type natif
wxml :
<!--button-->
<view class="btn" bindtap="powerDrawer" data-statu="open">button</view>

<!--mask-->
<view class="drawer_screen" bindtap="powerDrawer" data-statu="close" wx:if="{{showModalStatus}}"></view>
<!--content-->
<!--使用animation属性指定需要执行的动画-->
<view animation="{{animationData}}" class="drawer_box" wx:if="{{showModalStatus}}">

 <!--drawer content-->
 <view class="drawer_title">弹窗标题</view>
 <view class="drawer_content">
 <view class="top grid">
 <label class="title col-0">标题</label>
 <input class="input_base input_h30 col-1" name="rName" value="可自行定义内容"></input>
 </view>
 <view class="top grid">
 <label class="title col-0">标题</label>
 <input class="input_base input_h30 col-1" name="mobile" value="110"></input>
 </view>
 <view class="top grid">
 <label class="title col-0">标题</label>
 <input class="input_base input_h30 col-1" name="phone" value="拒绝伸手党"></input>
 </view>
 <view class="top grid">
 <label class="title col-0">标题</label>
 <input class="input_base input_h30 col-1" name="Email" value="仅供学习使用"></input>
 </view>
 <view class="top bottom grid">
 <label class="title col-0">备注</label>
 <input class="input_base input_h30 col-1" name="bz"></input>
 </view>
 </view>
 <view class="btn_ok" bindtap="powerDrawer" data-statu="close">确定</view>
</view>
wxss:
/*button*/
.btn {
 width: 80%;
 padding: 20rpx 0;
 border-radius: 10rpx;
 text-align: center;
 margin: 40rpx 10%;
 background: #000;
 color: #fff;
}

/*mask*/
.drawer_screen {
 width: 100%;
 height: 100%;
 position: fixed;
 top: 0;
 left: 0;
 z-index: 1000;
 background: #000;
 opacity: 0.5;
 overflow: hidden;
}

/*content*/
.drawer_box {
 width: 650rpx;
 overflow: hidden;
 position: fixed;
 top: 50%;
 left: 0;
 z-index: 1001;
 background: #FAFAFA;
 margin: -150px 50rpx 0 50rpx;
 border-radius: 3px;
}

.drawer_title{
 padding:15px;
 font: 20px "microsoft yahei";
 text-align: center;
}
.drawer_content {
 height: 210px;
 overflow-y: scroll; /*超出父盒子高度可滚动*/
}

.btn_ok{
 padding: 10px;
 font: 20px "microsoft yahei";
 text-align: center;
 border-top: 1px solid #E8E8EA;
 color: #3CC51F;
}

.top{
 padding-top:8px;
}
.bottom {
 padding-bottom:8px;
}
.title {
 height: 30px;
 line-height: 30px;
 width: 160rpx;
 text-align: center;
 display: inline-block;
 font: 300 28rpx/30px "microsoft yahei";
}

.input_base {
 border: 2rpx solid #ccc;
 padding-left: 10rpx;
 margin-right: 50rpx;
}
.input_h30{
 height: 30px;
 line-height: 30px;
}
.input_h60{
 height: 60px;
}
.input_view{
 font: 12px "microsoft yahei";
 background: #fff;
 color:#000;
 line-height: 30px;
}

input {
 font: 12px "microsoft yahei";
 background: #fff;
 color:#000 ;
}
radio{
 margin-right: 20px;
}
.grid { display: -webkit-box; display: box; }
.col-0 {-webkit-box-flex:0;box-flex:0;}
.col-1 {-webkit-box-flex:1;box-flex:1;}
.fl { float: left;}
.fr { float: right;}
js:
Page({
 data: {
 showModalStatus: false
 },
 powerDrawer: function (e) {
 var currentStatu = e.currentTarget.dataset.statu;
 this.util(currentStatu)
 },
 util: function(currentStatu){
 /* 动画部分 */
 // 第1步:创建动画实例
 var animation = wx.createAnimation({
 duration: 200, //动画时长
 timingFunction: "linear", //线性
 delay: 0 //0则不延迟
 });

 // 第2步:这个动画实例赋给当前的动画实例
 this.animation = animation;

 // 第3步:执行第一组动画
 animation.opacity(0).rotateX(-100).step();

 // 第4步:导出动画对象赋给数据对象储存
 this.setData({
 animationData: animation.export()
 })

 // 第5步:设置定时器到指定时候后,执行第二组动画
 setTimeout(function () {
 // 执行第二组动画
 animation.opacity(1).rotateX(0).step();
 // 给数据对象储存的第一组动画,更替为执行完第二组动画的动画对象
 this.setData({
 animationData: animation
 })

 //关闭
 if (currentStatu == "close") {
 this.setData(
  {
  showModalStatus: false
  }
 );
 }
 }.bind(this), 200)

 // 显示
 if (currentStatu == "open") {
 this.setData(
 {
  showModalStatus: true
 }
 );
 }
 }

})
Exécuter :
Ce qui précède est l'intégralité du contenu de cet article, j'espère qu'il sera utile à l'étude de chacun, plus Veuillez prêter attention au site Web PHP chinois pour le contenu connexe !
Recommandations associées :
Comment personnaliser la mise en œuvre de Toast dans le mini-programme WeChat
Introduction au composant vidéo dans WeChat mini programme
Ce qui précède est le contenu détaillé de. pour plus d'informations, suivez d'autres articles connexes sur le site Web de PHP en chinois!
Articles Liés
Voir plus- WeChat Mini Program Exercices simples de mise en page, de logique et de style
- Explication détaillée et exemples de l'applet WeChat wx.request (méthode d'appel d'interface)
- Programme WeChat Mini - Explication détaillée de la connexion WeChat, du paiement WeChat et des modèles de messages
- Applet WeChat (compte d'application) exemple d'application simple et explication détaillée de l'exemple
- Explication détaillée de l'applet WeChat pour la boucle