Maison >interface Web >Tutoriel H5 >H5 réalise un Rubik's cube rotatif tridimensionnel
H5 réalise un Rubik's cube rotatif tridimensionnel
- php中世界最好的语言original
- 2018-03-26 13:21:515206parcourir
Cette fois, je vais vous apporter H5 pour réaliser le Rubik's Cube rotatif en trois dimensions. Quelles sont les précautions pour H5 pour réaliser le Rubik's Cube rotatif en trois dimensions. Ce qui suit est un cas pratique, allons-y. jetez un oeil.
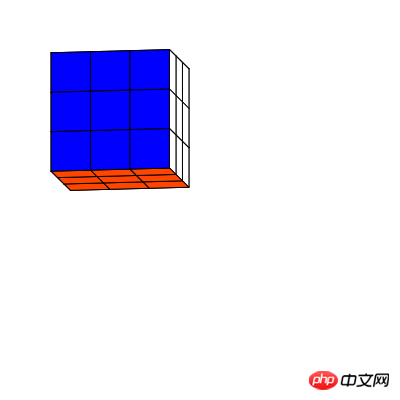
Ce qui suit est l'écran d'aperçu.

Processus de production
Vous devez d'abord télécharger Html5 Bibliothèque open source lufylegend-1.4.0
Le Rubik's Cube est divisé en 6 faces, chaque face est composée de 9 petits rectangles. Maintenant j'encapsule chaque petit rectangle comme une classe,
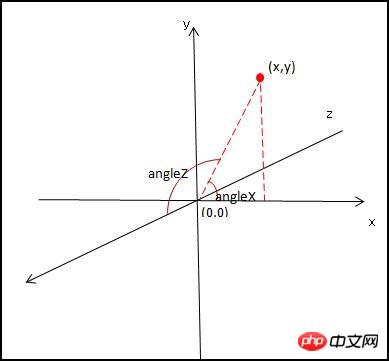
Parce que ce que nous construisons maintenant est un Rubik's Cube 3D, pour dessiner chaque petit rectangle, il faut connaître les 4 points fixes du petit rectangle, et ces 4 points fixes se transformeront en fonction de l'angle de rotation de l'espace, donc en afin de calculer ces 4 Pour les coordonnées en virgule fixe, vous devez connaître l'angle de rotation du Rubik's Cube autour de l'axe x et de l'axe z. Donc, créez une classe de rectangle comme suitfunction Rect(pointA,pointB,pointC,pointD,angleX,angleZ,color){
base(this,LSprite,[]);
this.pointZ=[(pointA[0]+pointB[0]+pointC[0]+pointD[0])/4,(pointA[1]+pointB[1]+pointC[1]+pointD[1])/4,(pointA[2]+pointB[2]+pointC[2]+pointD[2])/4];
this.z = this.pointZ[2];
this.pointA=pointA,this.pointB=pointB,this.pointC=pointC,this.pointD=pointD,this.angleX=angleX,this.angleZ=angleZ,this.color=color;
}
Rect.prototype.setAngle = function(a,b){
this.angleX = a;
this.angleZ = b;
this.z=this.getPoint(this.pointZ)[2];
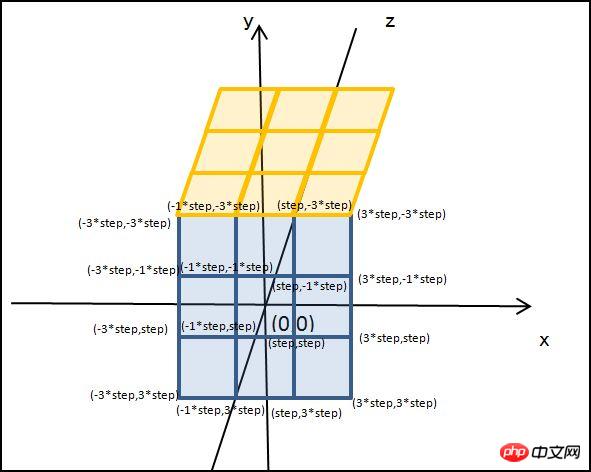
};pointA, pointB, pointC, pointD sont les quatre sommets du petit rectangle, angleX, angleZ sont les angles de rotation du x -axis et z-axis respectivement, la couleur est la couleur du petit rectangle. Le Rubik's Cube est divisé en 6 faces. Regardons d'abord la face avant Si le centre du cube est utilisé comme centre du système de coordonnées 3D, alors les coordonnées correspondant à chaque point fixe. des 9 petits rectangles sont comme indiqué dans la figure ci-dessous

for(var x=0;x<3;x++){
    for(var y=0;y<3;y++){
        z = 3;
        var rect = new Rect([-3*step + x*2*step,-3*step + y*2*step,-3*step + z*2*step],[-step + x*2*step,-3*step + y*2*step,-3*step + z*2*step],[-step + x*2*step,-step + y*2*step,-3*step + z*2*step],[-3*step + x*2*step,-step + y*2*step,-3*step + z*2*step],0,0,"#FF0000");
        backLayer.addChild(rect);
    }
}
où backLayer est une classe LSprite et le pas est la moitié de la longueur d'un petit rectangle, de la même manière, vous pouvez également obtenir les cinq autres faces. Six faces ont été établies. Avant de dessiner ces six faces, il faut d'abord calculer les coordonnées de chaque point fixe en fonction de l'angle de rotation <🎜. >  D'après l'image ci-dessus, utilisez la formule suivante pour obtenir les coordonnées à virgule fixe transformées
Rect.prototype.getPoint = function(p){
    var u2,v2,w2,u=p[0],v=p[1],w=p[2];
    u2 = u * Math.cos(this.angleX) - v * Math.sin(this.angleX);
    v2 = u * Math.sin(this.angleX) + v * Math.cos(this.angleX);
    w2 = w;
    u = u2; v = v2; w = w2;
    u2 = u;
    v2 = v * Math.cos(this.angleZ) - w * Math.sin(this.angleZ);
    w2 = v * Math.sin(this.angleZ) + w * Math.cos(this.angleZ);
    u = u2; v = v2; w = w2;
    return [u2,v2,w2];
};
Le drawVertices est une méthode de la classe LGraphics de la bibliothèque lufylegend.js, qui peut dessiner un polygone basé sur les coordonnées à virgule fixe entrantes
Rect.prototype.draw = function(layer){
    this.graphics.clear();
    this.graphics.drawVertices(1,"#000000",[this.getPoint(this.pointA),this.getPoint(this.pointB),this.getPoint(this.pointC),this.getPoint(this.pointD)],true,this.color);
};tableau. Enfin, le code complet est donné. Il y a très peu de code et un total de 91 lignes de code JS.
1. index.html
<!DOCTYPE html>
<html>
<head>
<meta charset="UTF-8">
<title>3D魔方</title>
</head>
<body>
<p id="mylegend">loading……</p>
<script type="text/javascript" src="../lufylegend-1.4.0.min.js"></script>
<script type="text/javascript" src="./Main.js"></script>
<script type="text/javascript" src="./Rect.js"></script>
</body>
</html>
2. >Trois, Main.js
function Rect(pointA,pointB,pointC,pointD,angleX,angleZ,color){
    base(this,LSprite,[]);
    this.pointZ=[(pointA[0]+pointB[0]+pointC[0]+pointD[0])/4,(pointA[1]+pointB[1]+pointC[1]+pointD[1])/4,(pointA[2]+pointB[2]+pointC[2]+pointD[2])/4];
    this.z = this.pointZ[2];
    this.pointA=pointA,this.pointB=pointB,this.pointC=pointC,this.pointD=pointD,this.angleX=angleX,this.angleZ=angleZ,this.color=color;
}
Rect.prototype.draw = function(layer){
    this.graphics.clear();
    this.graphics.drawVertices(1,"#000000",[this.getPoint(this.pointA),this.getPoint(this.pointB),this.getPoint(this.pointC),this.getPoint(this.pointD)],true,this.color);
};
Rect.prototype.setAngle = function(a,b){
    this.angleX = a;
    this.angleZ = b;
    this.z=this.getPoint(this.pointZ)[2];
};
Rect.prototype.getPoint = function(p){
    var u2,v2,w2,u=p[0],v=p[1],w=p[2];
    u2 = u * Math.cos(this.angleX) - v * Math.sin(this.angleX);
    v2 = u * Math.sin(this.angleX) + v * Math.cos(this.angleX);
    w2 = w;
    u = u2; v = v2; w = w2;
    u2 = u;
    v2 = v * Math.cos(this.angleZ) - w * Math.sin(this.angleZ);
    w2 = v * Math.sin(this.angleZ) + w * Math.cos(this.angleZ);
    u = u2; v = v2; w = w2;
    return [u2,v2,w2];
};
Je pense que vous maîtrisez la méthode après avoir lu le cas dans cet article. Pour en savoir plus. des choses passionnantes, veuillez faire attention à php Autres articles connexes sur le site chinois ! Lecture recommandée :
init(50,"mylegend",400,400,main);
var a = 0,b=0,backLayer,step = 20,key = null;
function main(){
    backLayer = new LSprite();
    addChild(backLayer);
    backLayer.x = 120,backLayer.y = 120;
    //后
    for(var x=0;x<3;x++){
        for(var y=0;y<3;y++){
            z = 0;
            var rect = new Rect([-3*step + x*2*step,-3*step + y*2*step,-3*step + z*2*step],[-step + x*2*step,-3*step + y*2*step,-3*step + z*2*step],[-step + x*2*step,-step + y*2*step,-3*step + z*2*step],[-3*step + x*2*step,-step + y*2*step,-3*step + z*2*step],0,0,"#FF4500");
            backLayer.addChild(rect);
        }
    }
    //前
    for(var x=0;x<3;x++){
        for(var y=0;y<3;y++){
            z = 3;
            var rect = new Rect([-3*step + x*2*step,-3*step + y*2*step,-3*step + z*2*step],[-step + x*2*step,-3*step + y*2*step,-3*step + z*2*step],[-step + x*2*step,-step + y*2*step,-3*step + z*2*step],[-3*step + x*2*step,-step + y*2*step,-3*step + z*2*step],0,0,"#FF0000");
            backLayer.addChild(rect);
        }
    }
    //上
    for(var x=0;x<3;x++){
        for(var z=0;z<3;z++){
            y = 0;
            var rect = new Rect([-3*step + x*2*step,-3*step + y*2*step,-3*step + z*2*step],[-step + x*2*step,-3*step + y*2*step,-3*step + z*2*step],[-step + x*2*step,-3*step + y*2*step,-step + z*2*step],[-3*step + x*2*step,-3*step + y*2*step,-step + z*2*step],0,0,"#FFFFFF");
            backLayer.addChild(rect);
        }
    }
    //下
    for(var x=0;x<3;x++){
        for(var z=0;z<3;z++){
            y = 3;
            var rect = new Rect([-3*step + x*2*step,-3*step + y*2*step,-3*step + z*2*step],[-step + x*2*step,-3*step + y*2*step,-3*step + z*2*step],[-step + x*2*step,-3*step + y*2*step,-step + z*2*step],[-3*step + x*2*step,-3*step + y*2*step,-step + z*2*step],0,0,"#FFFF00");
            backLayer.addChild(rect);
        }
    }
    //左
    for(var y=0;y<3;y++){
        for(var z=0;z<3;z++){
            x = 0;
            var rect = new Rect([-3*step + x*2*step,-3*step + y*2*step,-3*step + z*2*step],[-3*step + x*2*step,-3*step + y*2*step,-step + z*2*step],[-3*step + x*2*step,-step + y*2*step,-step + z*2*step],[-3*step + x*2*step,-step + y*2*step,-3*step + z*2*step],0,0,"#008000");
            backLayer.addChild(rect);
        }
    }
    //右
    for(var y=0;y<3;y++){
        for(var z=0;z<3;z++){
            x = 3;
            var rect = new Rect([-3*step + x*2*step,-3*step + y*2*step,-3*step + z*2*step],[-3*step + x*2*step,-3*step + y*2*step,-step + z*2*step],[-3*step + x*2*step,-step + y*2*step,-step + z*2*step],[-3*step + x*2*step,-step + y*2*step,-3*step + z*2*step],0,0,"#0000FF");
            backLayer.addChild(rect);
        }
    }
    backLayer.addEventListener(LEvent.ENTER_FRAME,onframe);
}
function onframe(){
    a += 0.1 , b += 0.1;
    backLayer.childList = backLayer.childList.sort(function(a,b){return a.z - b.z;});
    for(key in backLayer.childList){
        backLayer.childList[key].setAngle(a,b);
        backLayer.childList[key].draw(backLayer);
   }
}
spring mvc+localResizeIMG implémente la compression et le téléchargement d'images H5
Explication détaillée de l'utilisation des toiles API de dessin
Ce qui précède est le contenu détaillé de. pour plus d'informations, suivez d'autres articles connexes sur le site Web de PHP en chinois!
Articles Liés
Voir plus- Le plug-in de défilement plein écran AlloyTouch crée une page H5 fluide en 30 secondes
- Combat réel HTML5 et analyse des événements tactiles (touchstart, touchmove et touchend)
- Explication détaillée des exemples de dessin d'images dans le canevas HTML5 9
- Expressions régulières et nouveaux éléments HTML5
- Comment combiner NodeJS et HTML5 pour glisser-déposer plusieurs fichiers à télécharger sur le serveur

