


本教程主要是利用画笔来制作绚丽的光影效果,制作的时候画笔的设计比较重要。很多特殊的效果都可以用画笔来制作,把做好的图形再配上图层样式,效果更加生动逼真。
最终效果 
1、按Ctrl+N新建一个文件,设置参数如下图。  #p# 2、打开“素材1”,如下图所示。使用移动工具将其移至当前图像中,覆盖当前画布,得到“图层1”。
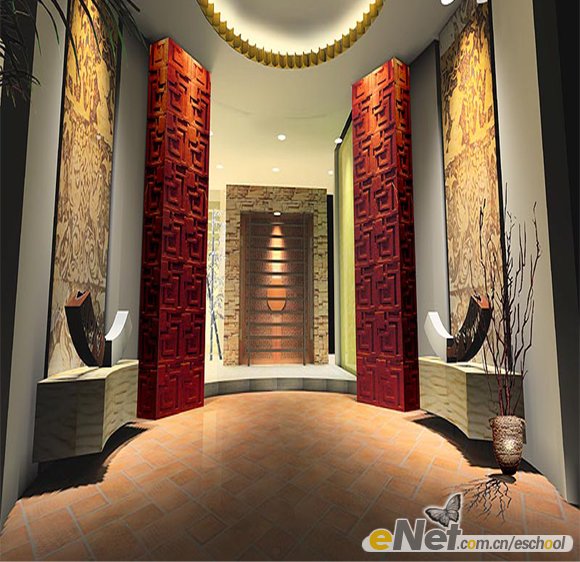
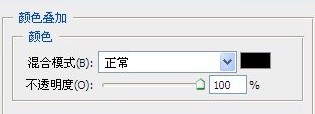
单击添加图层样式按钮,在弹出的菜单中选择“颜色叠加”命令,并如图设置参数。 
得到如下图所示效果。  #p# 3、单击创建新的填充或调整图层,在弹出的菜单中选择“色相/饱和度”命令,并且在弹出的对话框中设置如下图里调板所示参数,按确定确认。
按Ctrl+Alt+G组合键应用“创建剪贴蒙版”命令,得到如图所示效果,同时得到图层“色相/饱和度1”。 
4、设置前景色的颜色值为#ff6000,然后选择钢笔工具,在工具选项栏上选择形状图层按钮,在当前画布中绘制矩形条得到“形状1”,如图所示 。  #p# 5、按Ctrl+Alt+T组合键调出自由变换并复制控制框,移动中心点至如下图所示图形的底部,以改变变换中心,拖动变换控制框顺时针选注32.7度,按回车确认变换操作。
按Alt+Ctrl+Shift+G组合键9次连续执行再次变换并复制操作,得到如图所示效果。 
6、按Ctrl+T组合键调出自由变换控制框,按住Shift键想变换框外部拖动控制句柄,以等比放大图像,按回车键确认变换操作,直至得到如图所示效果。  #p# 7、在“形状1”图层名称上单击鼠标右键,在弹出的菜单中选择“转换为智能对象”命令,从而将其转换成为智能对象图层。选择“滤镜”“模糊”“高斯模糊”命令,在弹出的对话框中设置“半径”数值为9.7,得到如图所示效果。
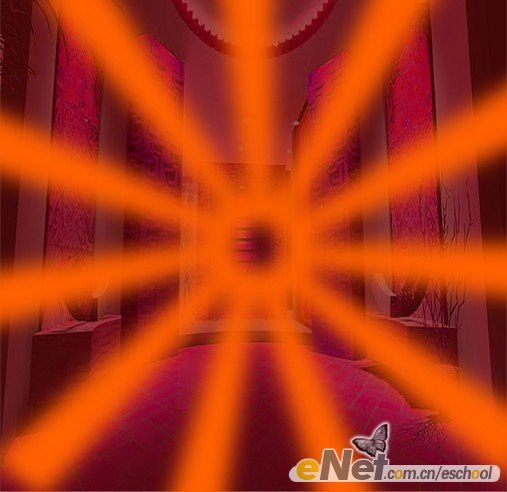
设置其“不透明度”为31%,得到如图所示效果。 
8、新建一个图层得到“图层2”,并设置前景色的颜色值#ffd200,然后选择画笔工具,在其工具选项栏中设置适当的画笔大小及不透明度,在发射线左侧进行竖向涂抹,直至得到如图所示效果。 
设置其“不透明度”为28%,得到如图所示效果。  #p# 9、设置颜色为#ff6600,使用上一步同样的方法,在发射线右侧进行竖向涂抹,并设置其“不透明度”为25%,得到如图所示效果。然后选择“图层1”至“图层3”之间的所有图层,然后按Ctrl+G合并一个组,改名为“底色”。
10、打开“素材2”,如图所示。 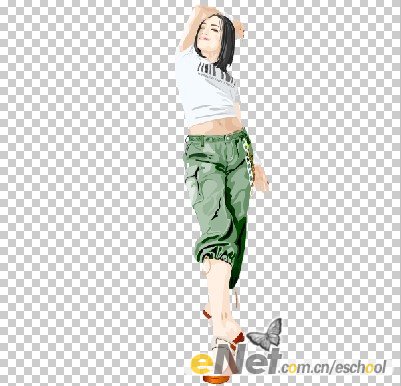
用移动工具将其移动到当前画布的中心位置,结合自由变换控制框,调整图像大小, 得到“图层4”。  #p# 接着添加“颜色叠加”和“外发光”图层样式。
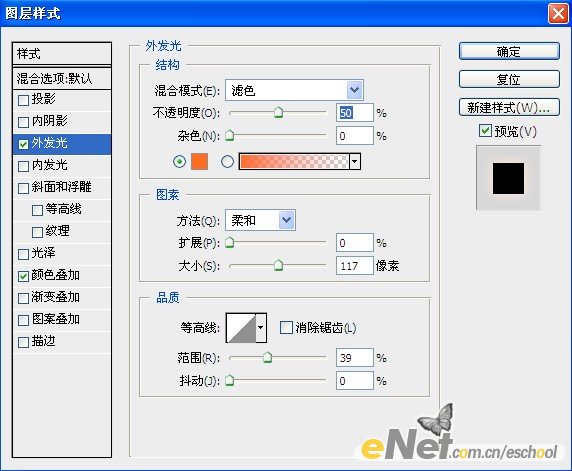
效果如下: 
11、新建一个图层得到“图层5”,设置前景色为#2e2100,选择画笔工具,在其工具选项栏中设置适当的画笔大小及不透明度,在人物下方涂抹,以制作阴影,直至得到如图所示效果。  #p# 12、选择“底色”图层组,并新建一个图层得到“图层6”,设置前景色的颜色值为#ec7705,选择画笔工具,按F5键显示 “画笔“调板,单击右上角三角按钮,在弹出的菜单中选择“载入画笔”命令,在弹出的对话框中选择 “素材3”,按“载入”按钮载入素材。在人物上半身周围进行涂抹,得到如图所示效果。
新建一个图层得到“图层7”设置 画笔大小为50像素,并设置前景色为#fad426,接着在人物周围进行涂抹,效果如图。  #p# 13、选择“图层5”,按照第12步的操作方法,添加画笔“素材4”,继续在人物下身制作环绕星光效果,得到如下图所示效果,然后选中“图层8”至“图层11”所有图层,将其组合成一个组,并修改名称为“围绕的星光”。


 #p# 16、按Ctrl+J组合键复制“形状2”得到“形状2副本”,并将其移至“形状2”的下方,更改“外发光”图层样式的设置,颜色块颜色值为#ee7805。然后将“形状2”和“形状2副本”编组,并重新命名为“项链及耳环”。
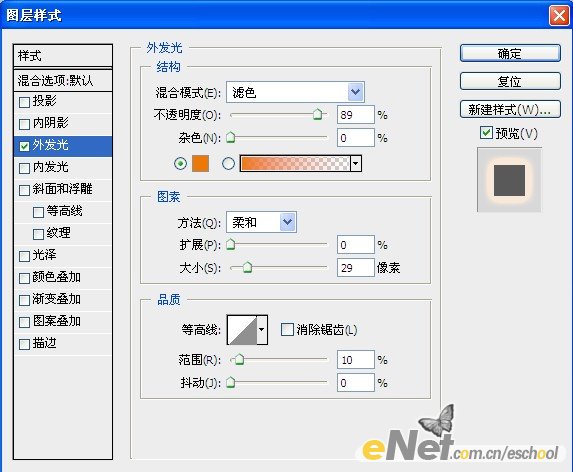

17、下面通过“亮度/对比度”命令,将画面的亮度及对比度调整更加清晰。单击创建新的填充或调整图层按钮,在弹出的菜单中选择“亮度/对比度”命令,并设置其对话框如图,同时得到图层“亮度/对比度1”。 
 #p# 18、按Ctrl+Alt+Shift+E组合键应用“盖印“命令,从而将当前所有可见图层合并至一个图层,得到”图层12“。选择“滤镜”“锐化”“USM锐化”命令,并设置对话框如图:
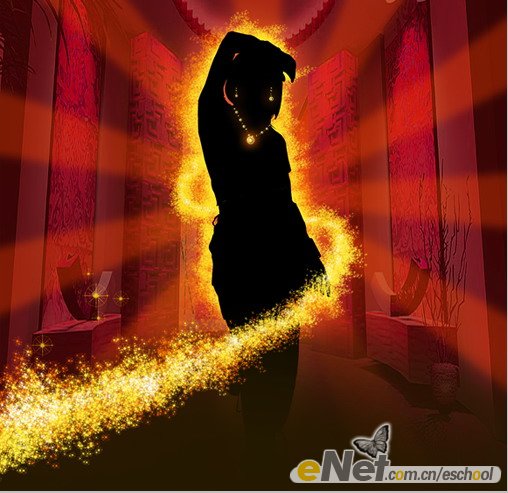
19、最后结合文字工具,选择适当的字体和大小,在当前画布上添加文字,完成制作,得到最终效果!

 Photoshop for Photographers: Enhancing and Retouching ImagesApr 25, 2025 am 12:01 AM
Enhance and retouching photos in Photoshop can be achieved by adjusting brightness and contrast, using the Repair Brush Tool. 1) Adjust brightness and contrast: Increase brightness and contrast to improve underexposed photos through the Image->Adjustments->Brightness/Contrast menu. 2) Use the Repair Brush Tool: Select HealingBrushTool in the toolbar and apply to remove miscellaneous points or scars in the image.
 Accessing Photoshop: Methods and AvailabilityApr 24, 2025 am 12:07 AM
Photoshop can be obtained by purchasing a permanent license or subscribing to CreativeCloud. 1. Purchase a permanent license for long-term use, no monthly payment, but no latest updates are available. 2. Subscribe to CreativeCloud to access the latest version and other Adobe software, and you need to pay a monthly or annual fee. The choice should be based on frequency of use and requirements.
 What Photoshop Does Best: Common Tasks and ProjectsApr 23, 2025 am 12:06 AM
Photoshop is specialized in image editing, layering and masking, digital painting and a variety of design applications. 1) Image editing and repair: remove defects and adjust color and brightness. 2) Layers and masks: non-destructive editing and creation. 3) Digital paintings and illustrations: create art works. 4) Practical applications: graphic design, web design and digital art creation.
 Using Photoshop: Creative Possibilities and Practical UsesApr 22, 2025 am 12:09 AM
Photoshop is very practical and creative in practical applications. 1) It provides basic editing, repairing and synthesis functions, suitable for beginners and professionals. 2) Advanced features such as content recognition fill and layer style can improve image effects. 3) Mastering shortcut keys and optimizing layer structure can improve work efficiency.
 Photoshop: Advanced Techniques and ToolsApr 21, 2025 am 12:08 AM
Advanced features of Adobe Photoshop include advanced selection tools, layer blending modes, and actions and scripts. 1) Advanced selection tools such as the Quick Selection Tool and the Color Range Selection Tool can accurately select image areas. 2) Layer blending mode such as "overlapping" mode can create unique visual effects. 3) Actions and scripts can automate repetition of tasks and improve work efficiency.
 Photoshop's Main Feature: Retouching and EnhancementApr 20, 2025 am 12:07 AM
Photoshop's powerful functions in photo editing and enhancement include: 1. Use the "Repair Brush Tool" to remove acne, 2. Use the "Liquefaction Tool" to slim face, 3. Use the "Frequency Separation" technology to accurately retouch images. These functions are implemented through algorithms and image processing technology to optimize image processing effects.
 Photoshop's Key Features: A Deep DiveApr 19, 2025 am 12:08 AM
Key features of Photoshop include layers and masks, adjustment tools, filters and effects. 1. Layers and masks allow independent editing of image parts. 2. Adjust tools such as brightness/contrast can modify image tone and brightness. 3. Filters and effects can quickly add visual effects. Mastering these features can help creative professionals achieve their creative vision.
 Photoshop and Digital Art: Painting, Illustration, and CompositingApr 18, 2025 am 12:01 AM
Photoshop's applications in digital art include painting, illustration and image synthesis. 1) Painting: Using brushes, pencils and mixing tools, the artist can create realistic effects. 2) Illustration: With vector and shape tools, artists can accurately draw complex graphics and add effects. 3) Synthesis: Using mask and layer blending mode, artists can seamlessly blend different image elements.


Hot AI Tools

Undresser.AI Undress
AI-powered app for creating realistic nude photos

AI Clothes Remover
Online AI tool for removing clothes from photos.

Undress AI Tool
Undress images for free

Clothoff.io
AI clothes remover

Video Face Swap
Swap faces in any video effortlessly with our completely free AI face swap tool!

Hot Article
Hot Tools

SublimeText3 English version
Recommended: Win version, supports code prompts!

ZendStudio 13.5.1 Mac
Powerful PHP integrated development environment

MinGW - Minimalist GNU for Windows
This project is in the process of being migrated to osdn.net/projects/mingw, you can continue to follow us there. MinGW: A native Windows port of the GNU Compiler Collection (GCC), freely distributable import libraries and header files for building native Windows applications; includes extensions to the MSVC runtime to support C99 functionality. All MinGW software can run on 64-bit Windows platforms.

SAP NetWeaver Server Adapter for Eclipse
Integrate Eclipse with SAP NetWeaver application server.

Atom editor mac version download
The most popular open source editor

