


这篇电影海报教程主要讲解如何制作一个超酷的灾难巨片《2012》风格的电影海报,主要利灾难巨片《2012》素材来制作。主要运用了画笔、蒙板、样式等工具完成。希望大家喜欢。
先看效果图

图0
1、选择“文件/新建”菜单,打开“新建”或者Ctrl+N对话框 名称为:2102,宽度:为210毫米, 高度:为297毫米, “分辨率”为300 , “模式”为RGB颜色的文档,如图1所示。
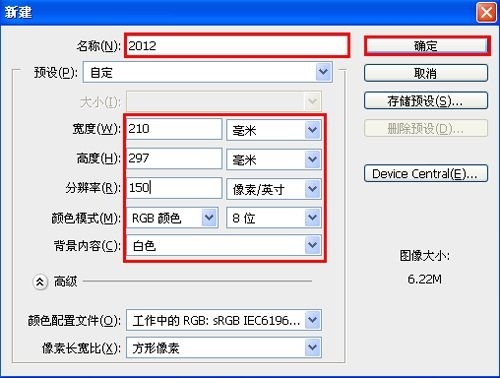
图1
2、在图层控制面板击新建图层按钮,新建一个图层,选择工具箱渐变工具(快捷键G),在工具选项栏中设置为线性渐变,然后点按可编辑渐变,弹出渐变编辑器。双击如图2中的A处,设置色彩RGB分别为130、123、136.再双击图2中所示的B处,设置RGB分别为255、255、255,单击确定按钮,如图2所示。效果图如图3所示。

图2

图3
3、执行菜单:“文件”/“置入”,置入素材1,调整其到适合的位置及大小,按Enter确定,接着点击添加蒙板按钮给素材添加一个蒙板,然后在工具箱中画笔工具,设置215px,不透明度为29%,在工作区中擦,并不断设置不透明度的数值,接着设置图层混合模式为深色,如图4所示。

图4
4、执行菜单:“文件”/“置入”,置入素材2,调整其到适合的位置及大小,按Enter确定,接着点击添加蒙板按钮给素材添加一个蒙板,然后在工具箱中画笔工具,设置215px,不透明度为29%,在工作区中擦,并不断设置不透明度的数值,如图5所示。效果图如图6所示。
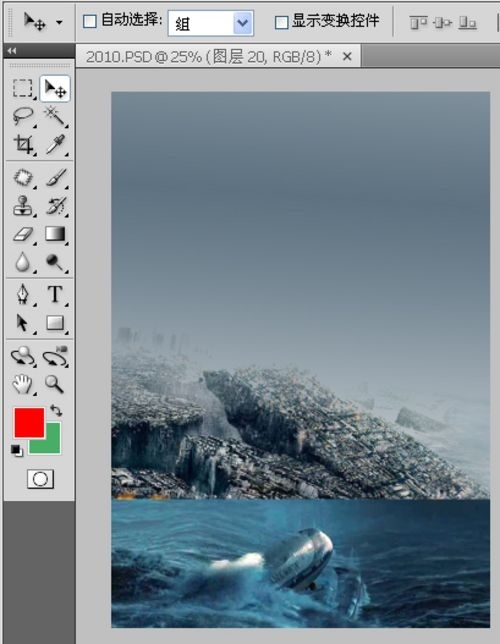
图5
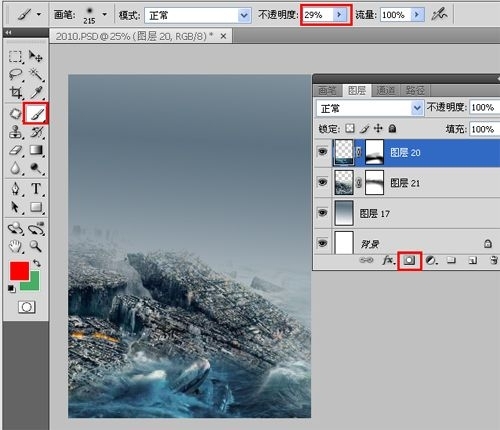
图6
5、执行菜单:“文件”/“置入”,置入素材3,调整其到适合的位置及大小,按Enter确定,接着点击添加蒙板按钮给素材添加一个蒙板,然后在工具箱中画笔工具,设置215px,不透明度为29%,在工作区中擦,并不断设置不透明度的数值,如图7所示。效果图如图8所示。

图7

图8
6、执行菜单:“文件”/“置入”,置入素材4,调整其到适合的位置及大小,按Enter确定,接着点击添加蒙板按钮给素材添加一个蒙板,然后在工具箱中画笔工具,设置215px,不透明度为29%,在工作区中擦,并不断设置不透明度的数值,接着设置图层混合模式为叠加,如图9所示。效果图如图10所示。
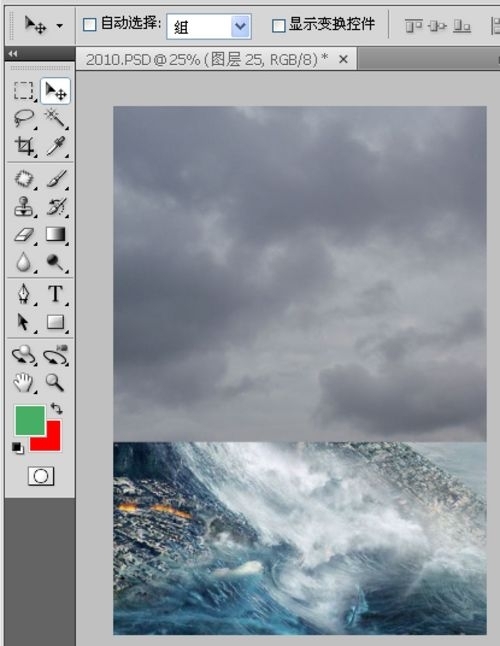
图9

图10
7、执行菜单:“文件”/“置入”,置入素材5,调整其到适合的位置及大小,按Enter确定,接着点击添加蒙板按钮给素材添加一个蒙板,然后在工具箱中画笔工具,设置215px,不透明度为29%,在工作区中擦,并不断设置不透明度的数值,如图11所示。

图11
8、执行菜单:“文件”/“置入”,置入素材6,调整其到适合的位置及大小,按Enter确定,接着点击添加蒙板按钮给素材添加一个蒙板,然后在工具箱中画笔工具,设置215px,不透明度为29%,在工作区中擦,并不断设置不透明度的数值,如图12所示。
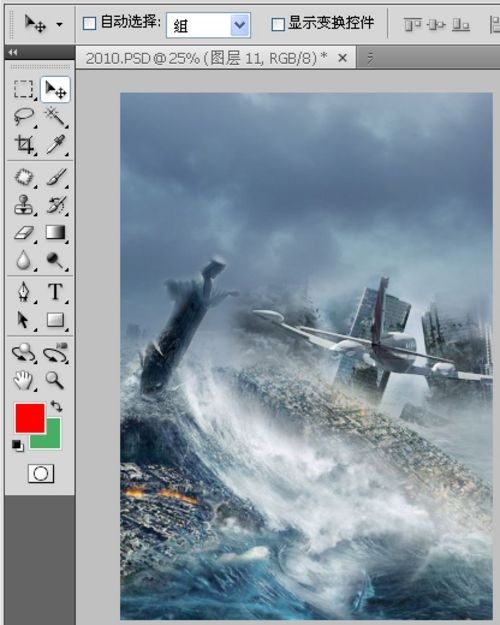
图12
9、在工具箱中选择直排文字工具 ,在画面中用鼠标单击后,出现一个输入文字光标,在光标后输入“2012”,在工具选项栏中设置字体为“问鼎CS大黑”,设置字体大小为“217.63点”,设置消除锯齿为“浑厚”,设置字体颜色为白色,并按快捷键Ctrl+T自由变化工具调整,双单击文字层进入到图层样式,分别勾选内阴影、内发光、外发光、、光泽、、图案叠加、渐变叠加复选项、描边。设置值参考图14、15、16、17、18、19、20图,效果图如图21所示。

图13

图14

图15
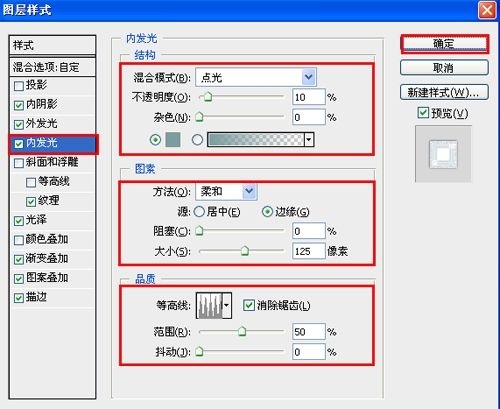
图16
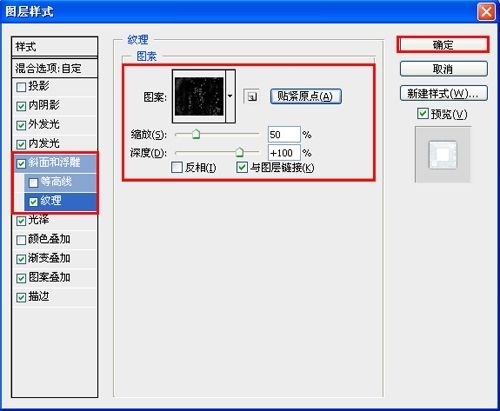
图17
设置素材属性
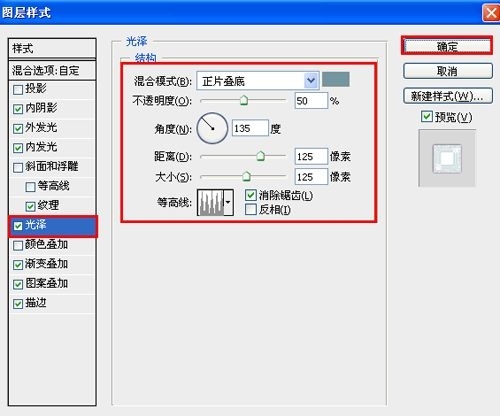
图18

图19

图20

图21
10、在工具箱中选择直排文字工具 ,在画面中用鼠标单击后,出现一个输入文字光标,在光标后输入“WE WERE WARNED”,在工具选项栏中设置字体为“Arial”,设置字体大小为“26点”,设置消除锯齿为“浑厚”,设置字体颜色为白色,如图22所示。
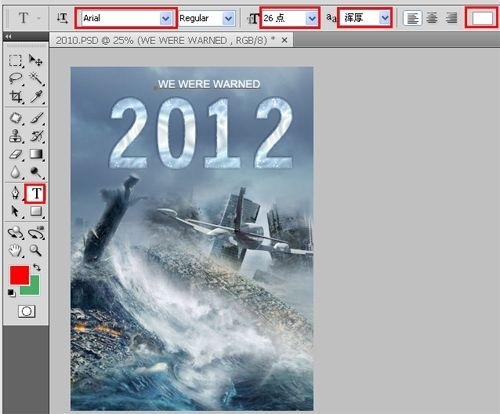
图22
11、其他的英文文字也是同步骤10做法一样,调整后的效果,也是最终效果,如图23所示。
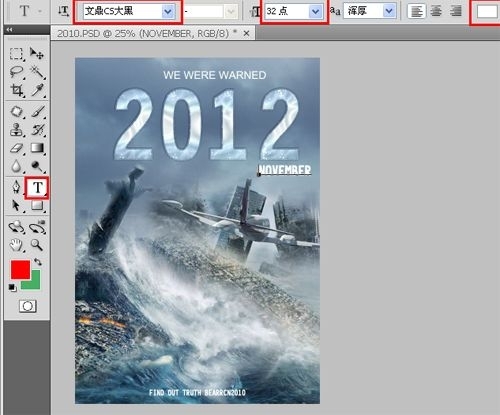
图23

 Accessing Photoshop: Methods and AvailabilityApr 24, 2025 am 12:07 AM
Photoshop can be obtained by purchasing a permanent license or subscribing to CreativeCloud. 1. Purchase a permanent license for long-term use, no monthly payment, but no latest updates are available. 2. Subscribe to CreativeCloud to access the latest version and other Adobe software, and you need to pay a monthly or annual fee. The choice should be based on frequency of use and requirements.
 What Photoshop Does Best: Common Tasks and ProjectsApr 23, 2025 am 12:06 AM
Photoshop is specialized in image editing, layering and masking, digital painting and a variety of design applications. 1) Image editing and repair: remove defects and adjust color and brightness. 2) Layers and masks: non-destructive editing and creation. 3) Digital paintings and illustrations: create art works. 4) Practical applications: graphic design, web design and digital art creation.
 Using Photoshop: Creative Possibilities and Practical UsesApr 22, 2025 am 12:09 AM
Photoshop is very practical and creative in practical applications. 1) It provides basic editing, repairing and synthesis functions, suitable for beginners and professionals. 2) Advanced features such as content recognition fill and layer style can improve image effects. 3) Mastering shortcut keys and optimizing layer structure can improve work efficiency.
 Photoshop: Advanced Techniques and ToolsApr 21, 2025 am 12:08 AM
Advanced features of Adobe Photoshop include advanced selection tools, layer blending modes, and actions and scripts. 1) Advanced selection tools such as the Quick Selection Tool and the Color Range Selection Tool can accurately select image areas. 2) Layer blending mode such as "overlapping" mode can create unique visual effects. 3) Actions and scripts can automate repetition of tasks and improve work efficiency.
 Photoshop's Main Feature: Retouching and EnhancementApr 20, 2025 am 12:07 AM
Photoshop's powerful functions in photo editing and enhancement include: 1. Use the "Repair Brush Tool" to remove acne, 2. Use the "Liquefaction Tool" to slim face, 3. Use the "Frequency Separation" technology to accurately retouch images. These functions are implemented through algorithms and image processing technology to optimize image processing effects.
 Photoshop's Key Features: A Deep DiveApr 19, 2025 am 12:08 AM
Key features of Photoshop include layers and masks, adjustment tools, filters and effects. 1. Layers and masks allow independent editing of image parts. 2. Adjust tools such as brightness/contrast can modify image tone and brightness. 3. Filters and effects can quickly add visual effects. Mastering these features can help creative professionals achieve their creative vision.
 Photoshop and Digital Art: Painting, Illustration, and CompositingApr 18, 2025 am 12:01 AM
Photoshop's applications in digital art include painting, illustration and image synthesis. 1) Painting: Using brushes, pencils and mixing tools, the artist can create realistic effects. 2) Illustration: With vector and shape tools, artists can accurately draw complex graphics and add effects. 3) Synthesis: Using mask and layer blending mode, artists can seamlessly blend different image elements.
 Advanced Photoshop Tutorial: Master Retouching & CompositingApr 17, 2025 am 12:10 AM
Photoshop's advanced photo editing and synthesis technologies include: 1. Use layers, masks and adjustment layers for basic operations; 2. Use image pixel values to achieve photo editing effects; 3. Use multiple layers and masks for complex synthesis; 4. Use "liquefaction" tools to adjust facial features; 5. Use "frequency separation" technology to perform delicate photo editing, these technologies can improve image processing level and achieve professional-level effects.


Hot AI Tools

Undresser.AI Undress
AI-powered app for creating realistic nude photos

AI Clothes Remover
Online AI tool for removing clothes from photos.

Undress AI Tool
Undress images for free

Clothoff.io
AI clothes remover

Video Face Swap
Swap faces in any video effortlessly with our completely free AI face swap tool!

Hot Article
Hot Tools

VSCode Windows 64-bit Download
A free and powerful IDE editor launched by Microsoft

Atom editor mac version download
The most popular open source editor

SublimeText3 Chinese version
Chinese version, very easy to use

Dreamweaver Mac version
Visual web development tools

Zend Studio 13.0.1
Powerful PHP integrated development environment

