水晶花朵制作起来也非常简单,只需要用心制作一片花瓣即可,其它的花瓣可以直接复制。制作花瓣的时候尽量要把高光及暗部刻画明显一点,这样水晶效果才更通透。
最终效果
1、新建一个1024 * 768像素的文档,背景填充橙红色:#F08E19,效果如下图。
<图1>
2、新建一个图层,用椭圆选框工具拉出下图所示的椭圆选区,羽化100个像素后填充橙黄色:#FFD945,作为中间的高光,效果如下图。
<图2>
3、现在开始制作花瓣,需要完成的效果如下图。
<图3>
4、新建一个组,命名为“花瓣”。用钢笔勾出一片花瓣的轮廓,转为选区后给花瓣添加蒙版,如下图。
<图4>
5、在组里新建一个图层,选择渐变工具,颜色设置如图5,由花瓣的底部向上拉出图6所示的径向渐变。
<图5> 
<图6>
6、新建一个图层,用钢笔勾出图7所示的选区,羽化6个像素后填充淡蓝色:#7AD1FF,局部过渡不自然的可以取消选区后天就图层蒙版,用黑色画笔涂抹一下,效果如图8。
<图7> 
<图8>
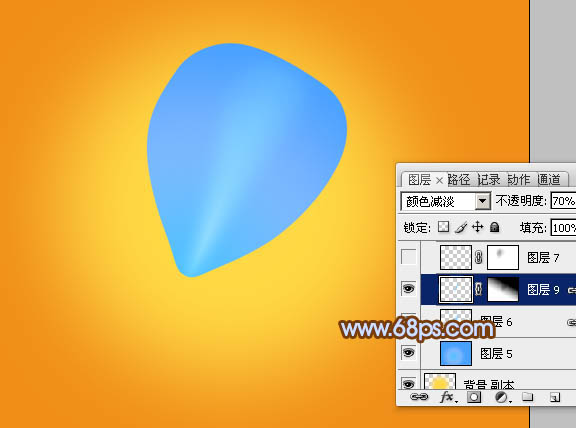
7、调出当前图层选区,选择菜单:选择 > 修改 > 收缩,数值为8,确定后按Ctrl + J 把选区部分的色块复制到新的图层,混合模式改为“颜色减淡”,不透明度改为:70%。添加图层蒙版,用黑色画笔擦掉不需要的部分,效果如图10。
<图9> 
<图10>
8、新建一个图层,用钢笔勾出下图所示的选区,羽化5个像素后填充淡蓝色:#7FE5FF,取消选区后添加图层蒙版,用黑色画笔修饰一下边缘过渡,效果如图12。
<图11> 
<图12>
9、新建一个图层,混合模式改为“强光”,把前景颜色设置为蓝紫色:#A193FF,用画笔把下图选区部分涂上淡淡的高光,效果如下图。
<图13>
10、新建一个图层,用钢笔勾出右侧边缘高光,同上的方法填充淡蓝色,如图14,15。
<图14> 
<图15>
11、新建一个图层,同上的方法制作边缘部分的高光,过程如图16 - 18。
<图16> 
<图17> 
<图18>
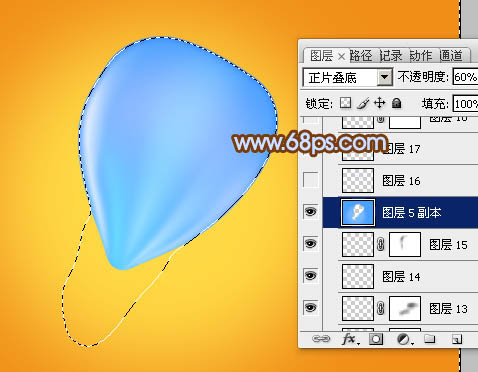
12、新建一个图层,用钢笔沿着花瓣的边缘勾出图19所示的选区,羽化2个像素后填充蓝色,混合模式改为“正片叠底”,不透明度改为:60%,效果如图20。
<图19> 
<图20>
13、新建一个图层,把前景颜色设置为淡蓝色:#CDDFFC,用画笔把下图选区部分涂上高光,效果如图22。
<图21> 
<图22>
14、新建一个图层,用钢笔勾出一些细小的条纹如图23,填充淡蓝色,混合模式改为“滤色”,再适当降低图层不透明度,效果如图24。
<图23> 
<图24>
15、新建一个图层,同上的方法再添加一些较暗的条纹,混合模式为“正片叠底”,效果如下图。
<图25>
16、把背景图层影藏,在图层的最上面新建一个图层,按Ctrl + Alt + Shift + E盖印图层。这样我们就得到一个完整的花瓣图层,如下图。
<图26>
17、把“花瓣”组影藏,背景图层显示出来,把盖印的花瓣调整大小和位置,效果如下图。
<图27>
18、按Ctrl + J 把当前花瓣图层复制一层,按Ctrl + T 变形,调整好中心点及角度,如图28。确定后按Ctrl + Alt + Shift + T 复制,效果如图29。
<图28> 
<图29>
19、用加深工具加深一下花瓣叠加的暗部区域,效果如下图。
<图30>
20、新建一个图层,添加一些花蕊,效果如下图。
<图31>
最后调整一下细节和颜色,完成最终效果。
 Accessing Photoshop: Methods and AvailabilityApr 24, 2025 am 12:07 AM
Photoshop can be obtained by purchasing a permanent license or subscribing to CreativeCloud. 1. Purchase a permanent license for long-term use, no monthly payment, but no latest updates are available. 2. Subscribe to CreativeCloud to access the latest version and other Adobe software, and you need to pay a monthly or annual fee. The choice should be based on frequency of use and requirements.
 What Photoshop Does Best: Common Tasks and ProjectsApr 23, 2025 am 12:06 AM
Photoshop is specialized in image editing, layering and masking, digital painting and a variety of design applications. 1) Image editing and repair: remove defects and adjust color and brightness. 2) Layers and masks: non-destructive editing and creation. 3) Digital paintings and illustrations: create art works. 4) Practical applications: graphic design, web design and digital art creation.
 Using Photoshop: Creative Possibilities and Practical UsesApr 22, 2025 am 12:09 AM
Photoshop is very practical and creative in practical applications. 1) It provides basic editing, repairing and synthesis functions, suitable for beginners and professionals. 2) Advanced features such as content recognition fill and layer style can improve image effects. 3) Mastering shortcut keys and optimizing layer structure can improve work efficiency.
 Photoshop: Advanced Techniques and ToolsApr 21, 2025 am 12:08 AM
Advanced features of Adobe Photoshop include advanced selection tools, layer blending modes, and actions and scripts. 1) Advanced selection tools such as the Quick Selection Tool and the Color Range Selection Tool can accurately select image areas. 2) Layer blending mode such as "overlapping" mode can create unique visual effects. 3) Actions and scripts can automate repetition of tasks and improve work efficiency.
 Photoshop's Main Feature: Retouching and EnhancementApr 20, 2025 am 12:07 AM
Photoshop's powerful functions in photo editing and enhancement include: 1. Use the "Repair Brush Tool" to remove acne, 2. Use the "Liquefaction Tool" to slim face, 3. Use the "Frequency Separation" technology to accurately retouch images. These functions are implemented through algorithms and image processing technology to optimize image processing effects.
 Photoshop's Key Features: A Deep DiveApr 19, 2025 am 12:08 AM
Key features of Photoshop include layers and masks, adjustment tools, filters and effects. 1. Layers and masks allow independent editing of image parts. 2. Adjust tools such as brightness/contrast can modify image tone and brightness. 3. Filters and effects can quickly add visual effects. Mastering these features can help creative professionals achieve their creative vision.
 Photoshop and Digital Art: Painting, Illustration, and CompositingApr 18, 2025 am 12:01 AM
Photoshop's applications in digital art include painting, illustration and image synthesis. 1) Painting: Using brushes, pencils and mixing tools, the artist can create realistic effects. 2) Illustration: With vector and shape tools, artists can accurately draw complex graphics and add effects. 3) Synthesis: Using mask and layer blending mode, artists can seamlessly blend different image elements.
 Advanced Photoshop Tutorial: Master Retouching & CompositingApr 17, 2025 am 12:10 AM
Photoshop's advanced photo editing and synthesis technologies include: 1. Use layers, masks and adjustment layers for basic operations; 2. Use image pixel values to achieve photo editing effects; 3. Use multiple layers and masks for complex synthesis; 4. Use "liquefaction" tools to adjust facial features; 5. Use "frequency separation" technology to perform delicate photo editing, these technologies can improve image processing level and achieve professional-level effects.


Hot AI Tools

Undresser.AI Undress
AI-powered app for creating realistic nude photos

AI Clothes Remover
Online AI tool for removing clothes from photos.

Undress AI Tool
Undress images for free

Clothoff.io
AI clothes remover

Video Face Swap
Swap faces in any video effortlessly with our completely free AI face swap tool!

Hot Article

Hot Tools

Notepad++7.3.1
Easy-to-use and free code editor

Atom editor mac version download
The most popular open source editor

MinGW - Minimalist GNU for Windows
This project is in the process of being migrated to osdn.net/projects/mingw, you can continue to follow us there. MinGW: A native Windows port of the GNU Compiler Collection (GCC), freely distributable import libraries and header files for building native Windows applications; includes extensions to the MSVC runtime to support C99 functionality. All MinGW software can run on 64-bit Windows platforms.

Zend Studio 13.0.1
Powerful PHP integrated development environment

WebStorm Mac version
Useful JavaScript development tools


