


图标的制作关键在于对高光和阴影把控;色彩的选用也很关键,决定了你的作品是否是高品质的。通过对本文的学习,你可以很好的掌握制作图标的各种技巧,举一反三的应用到其他作品中
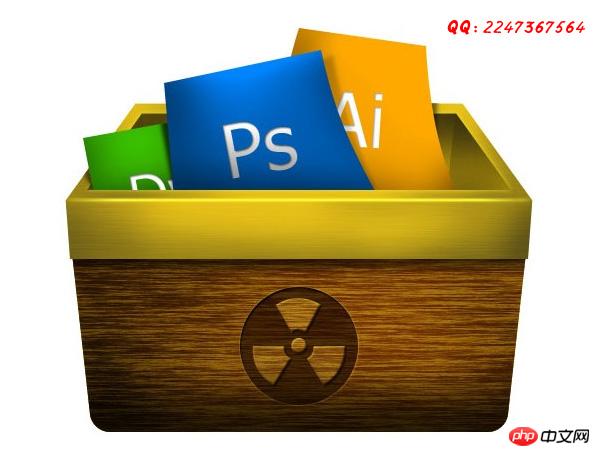
最终效果图

教程素材
1、木质纹理 下载
第一步
1、按ctrl+N,新建一个文档,大小600x500px,命名为"木箱子"
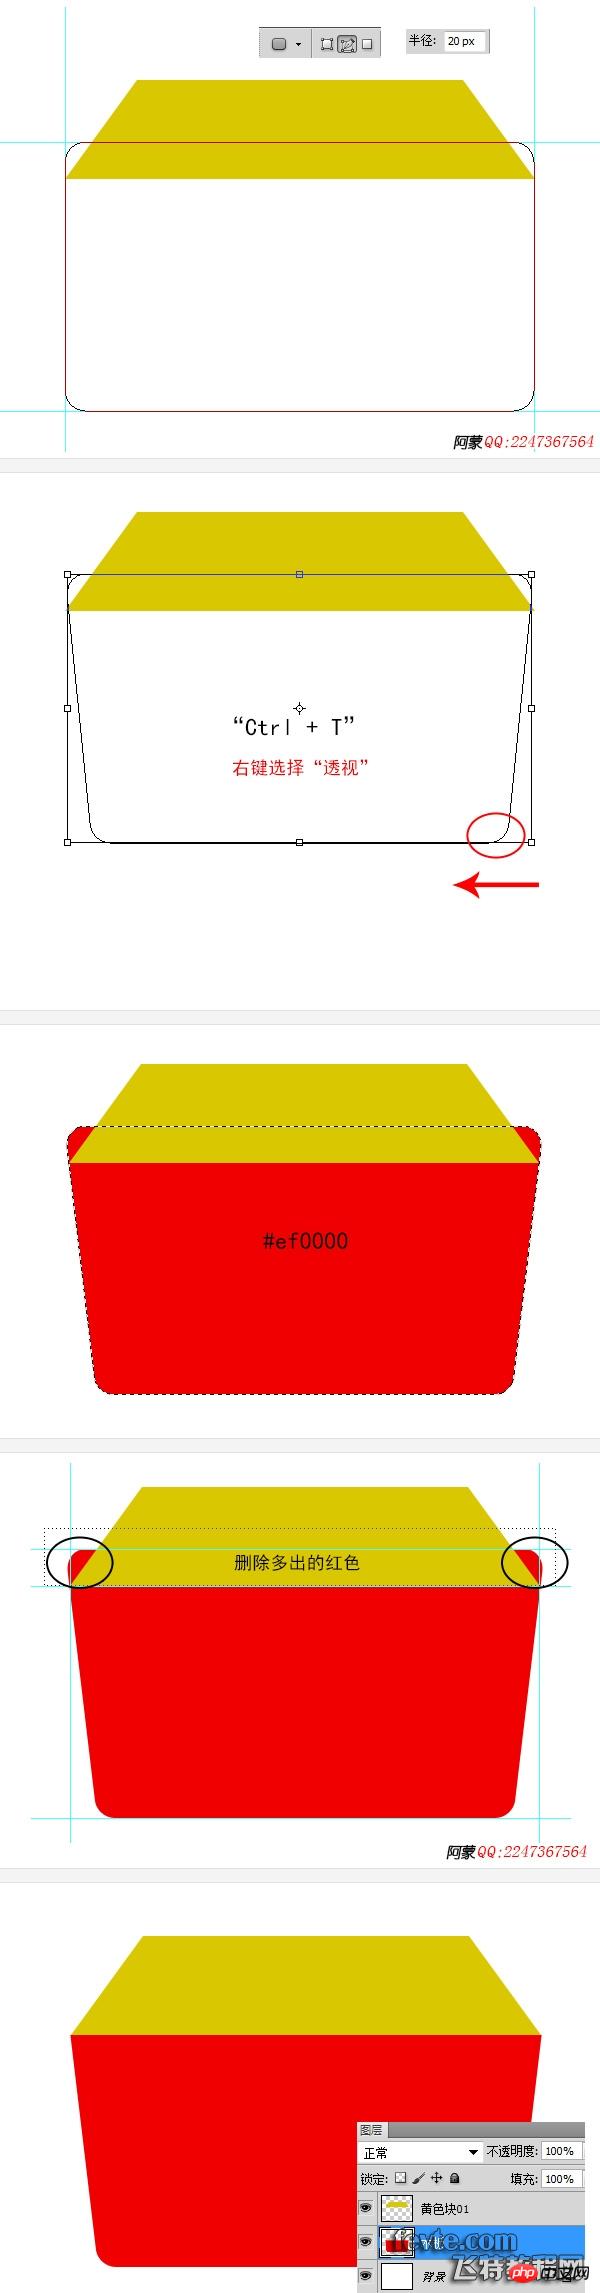
2、创建一个新层,命名为"黄色块01",用矩形工具(U)绘制一个梯形路径,按Ctrl + Enter,将路径转成选区,并填充,颜色 #d9c700

第二步
1、创建一个新层,命名"木板",在图层"黄色块01"下方,用圆角矩形工具(U),绘制一个圆角矩形路径,圆角半径为 20px
2、按Ctrl + T,右键,选择"透视",将圆角矩形底部往内缩
3、按Ctrl + Enter,将路径转成选区,并填充红色 #ef0000
4、用选区工具(M),删除超出的区域
第三步
1、在图层"木板"上方,创建一个新层,命名为"黄色块02",用矩形工具(U),绘制一个矩形路径,如下图
2、按Ctrl + Enter,将路径转成选区,并填充颜色 #d9c700
3、用选区工具(M),删除超出的区域

第四步
1、新建一个图层,在最上方,命名为"黄色块03"
2、按住Ctrl键,鼠标点击图层"黄色块01"的缩览图,获得选区,接着"菜单 > 选择 > 修改 > 收缩",输入 10px,填充颜色 #d9bb14

第五步
1、用加深工具(O),在图层"黄色块01"不同点进行涂抹(如下图)

第六步
1、用加深工具(O)涂抹"黄色块03",如下图

第七步
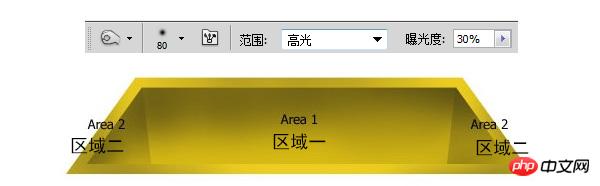
1、用矩形工具(U),绘制一个路径,按Ctrl + Enter将路径转成选区,此选区把"黄色块03",分成2个区域

第八步
1、选择图层"黄色块03",用加深工具(O)涂抹区域一,如图
2、按 Ctrl + Shift + I 反选选区,用加深工具(O)涂抹区域二,如下图,通过对着2个区域明暗处理,产生立体效果。
第九步
1、给"黄色块03"添加外发光样式

第十步
1、选择"黄色块02",用加深工具(O)涂抹

第十一步
1、新建一个图层在顶部,命名为"高光线01"
2、设置画笔,大小 3px,颜色 #ffffff,硬度 100%,不透明度 100%,流量 90%
3、用钢笔工具(P),绘制一条直线,如下图,接着" 右键 > 描边路径"

第十二步
1、选择图层"高光线01",接着" 菜单 > 滤镜 > 模糊 > 高斯模糊",输入值 1.0
2、" 菜单 > 滤镜 > 模糊 > 动感模糊",角度 0,距离 10px
3、把图层混合模式改为"叠加",不透明度 50%

第十三步
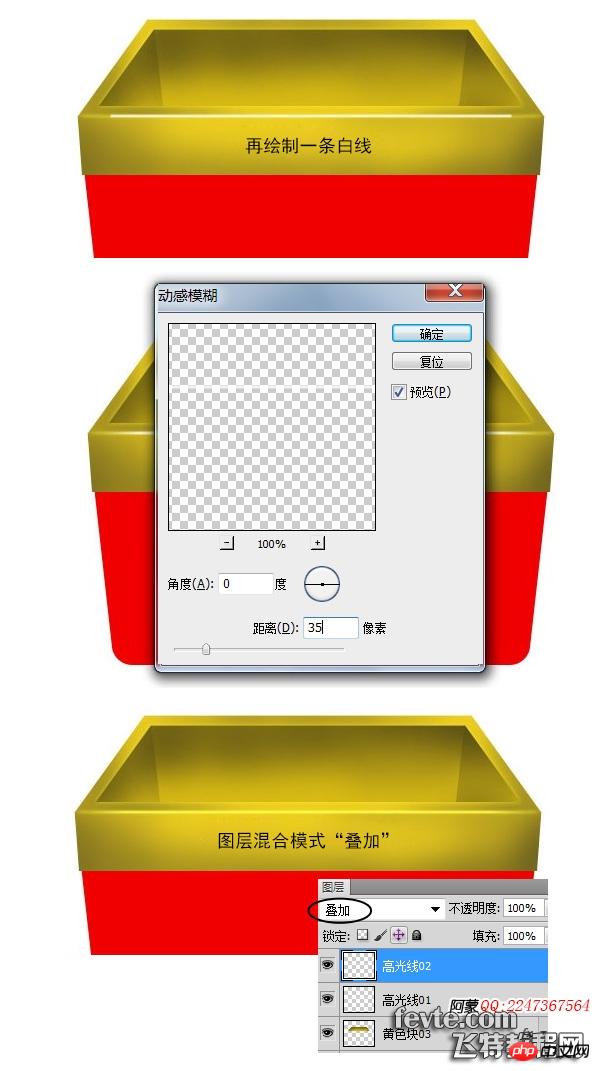
1、新建一个图层在"高光线01"上方,命名为"高光线02",再绘制一白色线条
2、" 菜单 > 滤镜 > 模糊 > 动感模糊",角度 0,距离 35px
3、把图层混合模式改为"叠加"
第十四步
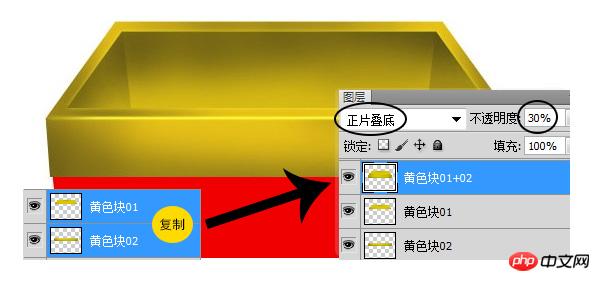
1、选择"黄色块01"和"黄色块02",右键点击,选择"复制图层",然后按Ctrl + E合并图层,将新的图层命名为"黄色块01+02",接着把图层混合模式改为"正片叠底",不透明度 30%
第十五步
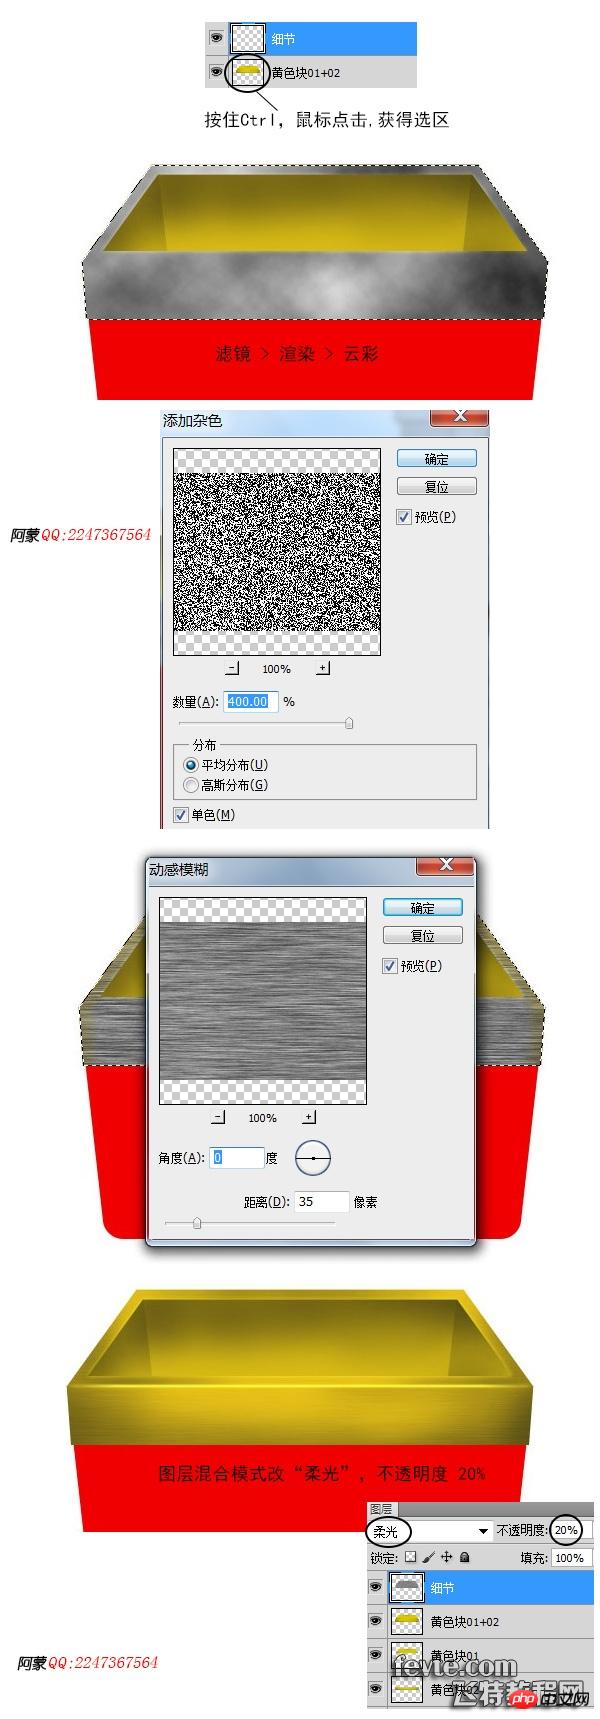
1、新建一个图层在"黄色块01+02"上方,命名为"细节"
2、按住Ctrl键,鼠标点击"黄色块01+02"的缩览图,获得选区
3、按D键,使前景色为黑色,背景色为白色
4、"菜单 > 滤镜 > 渲染 > 云彩"
5、"菜单 > 滤镜 > 杂色 > 添加杂色"
5、"菜单 > 滤镜 > 模糊 > 动感模糊"
6、把图层混合模式改"柔光",不透明度 20%
第十六步
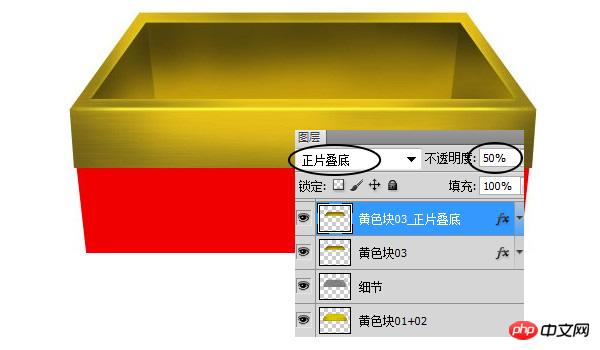
1、按Ctrl + J,复制"黄色块03",命名为"黄色块03_正片叠底",然后把图层混合模式改为"正片叠底",不透明度 50%
第十七步
1、打开素材木质纹理.jpg,并复制到木箱子.psd中,置于图层"木板"上方,命名为"木质纹理"
2、按住Alt键,鼠标在图层"木板"和"木质纹理"之间点击,则纹理只在木板区域内显示;

第十八步
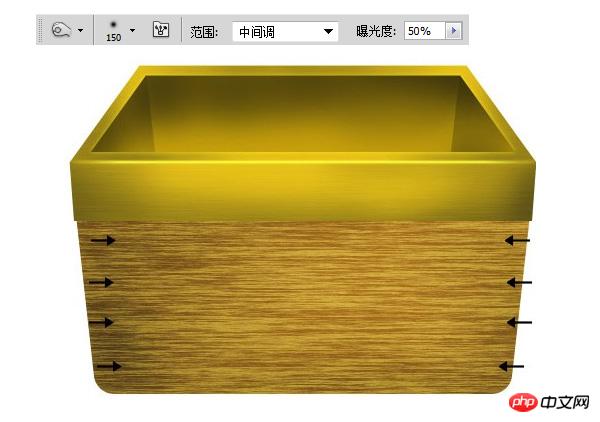
1、选择图层"木质纹理",用加深工具(O),涂抹边缘,如下图
第十九步
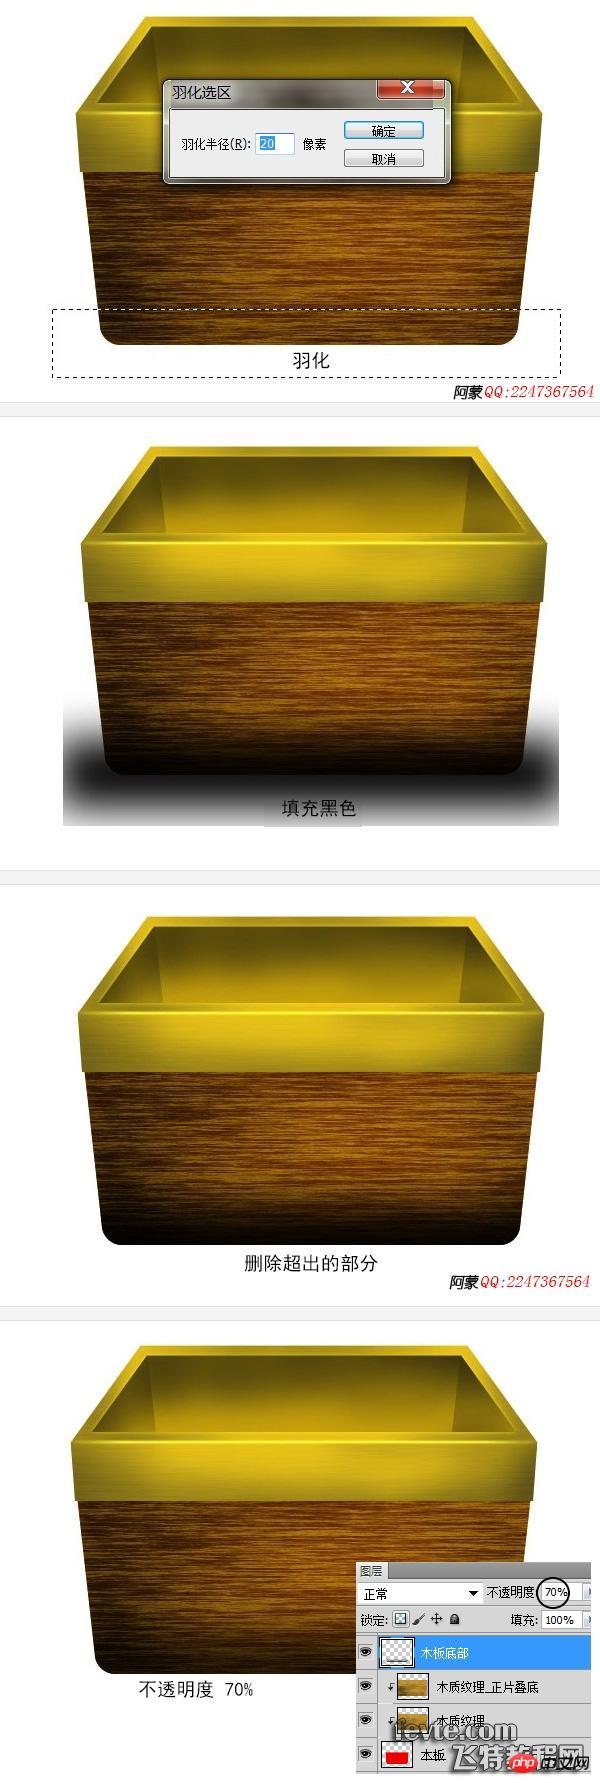
1、按Ctrl + J,复制图层"木质纹理",并命名为"木质纹理_正片叠底",设置图层混合模式为"正片叠底",不透明度 88%

第二十步
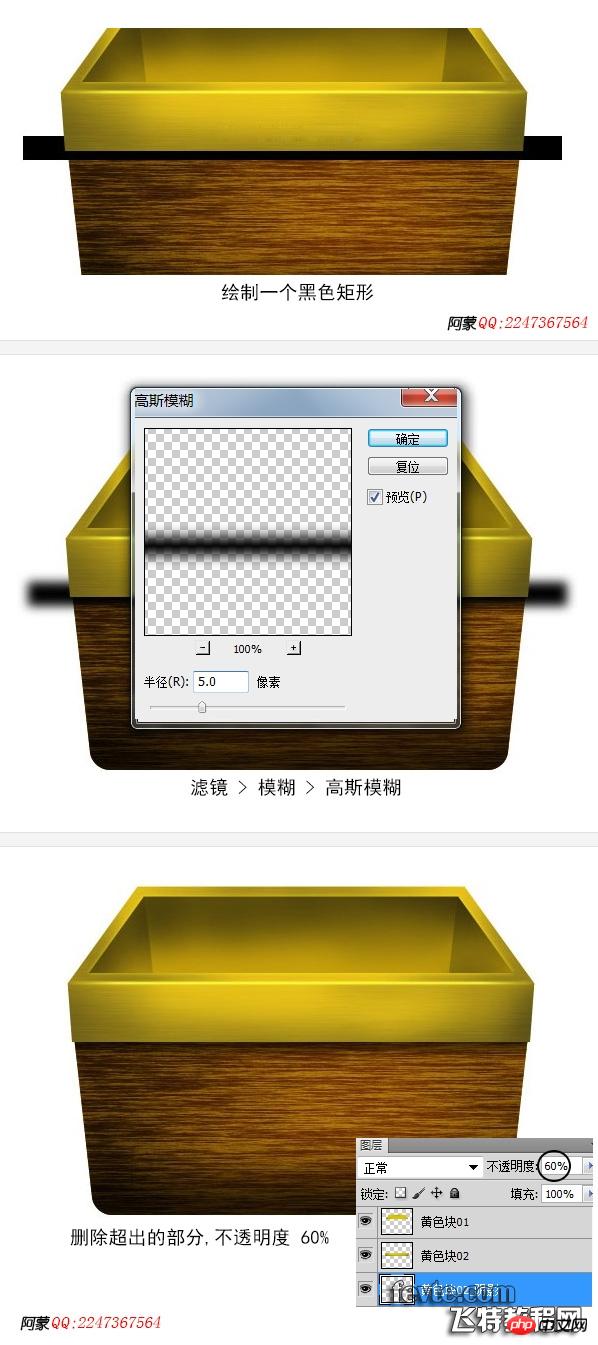
1、创建一个新层,在"木质纹理_正片叠底"上方,命名为"木板底部"
2、用选区工具(M),绘制一个矩形选区,并羽化 20px,填充黑色,把图层不透明度设为 70%
第二十一步
1、创建一个新层,在"黄色块02"下方,命名为"黄色块02_阴影",如图所示制作出阴影
第二十二步
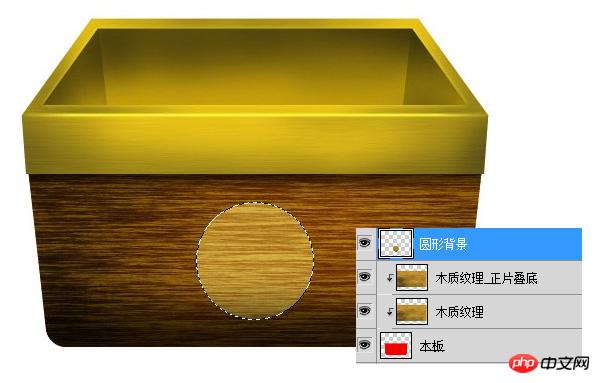
1、选择图层"木质纹理",按住Shift键,用椭圆选区工具(M),绘制个圆形选区,接着按Ctrl + J,把圆形图层命名为"圆形背景"
第二十三步
1、选择"圆形背景",按Ctrl + J,把复制的图层命名为"圆形背景_正片叠底",设置图层混合模式"正片叠底"

第二十四步
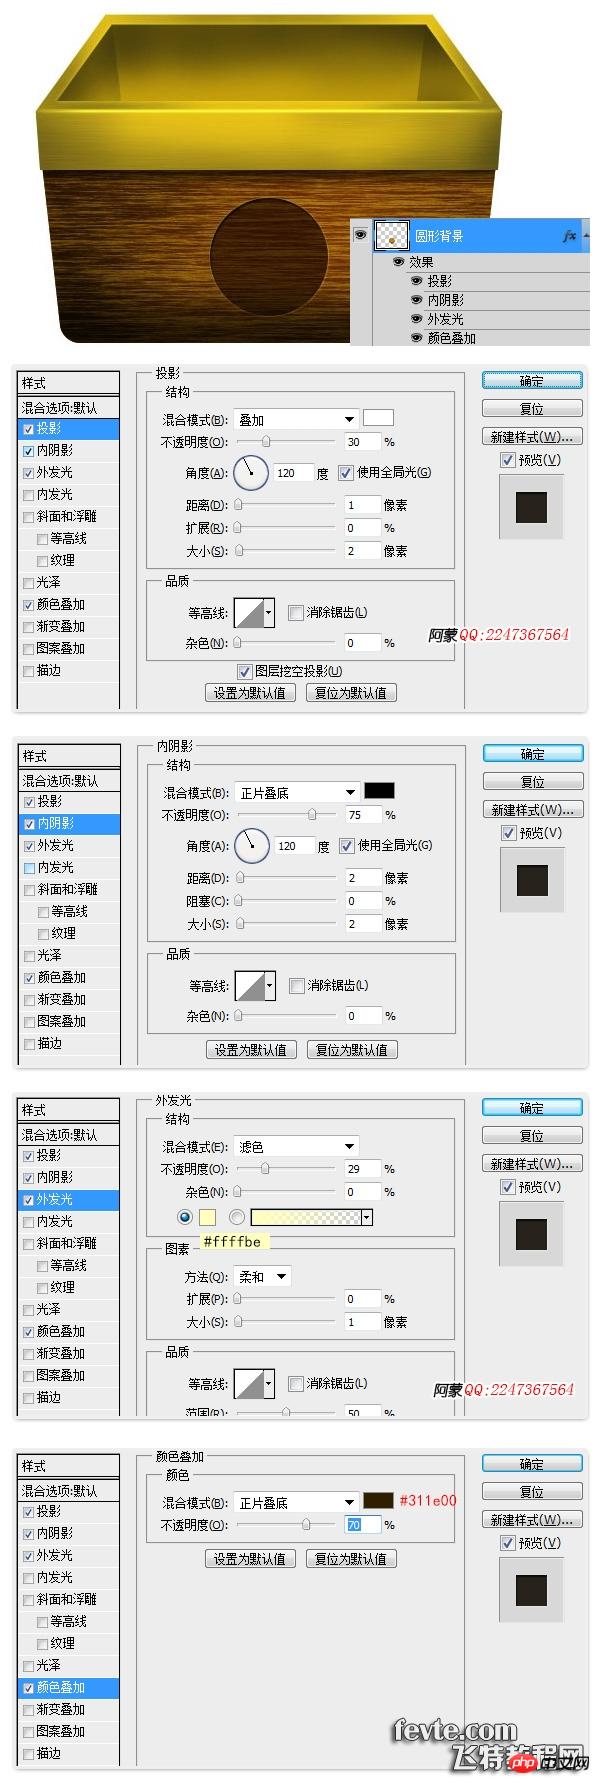
1、给"圆形背景"添加图层样式
第二十五步
1、用自定义形状工具(U),绘制一个形状,按Ctrl + Enter,将路径转成选区

第二十六步
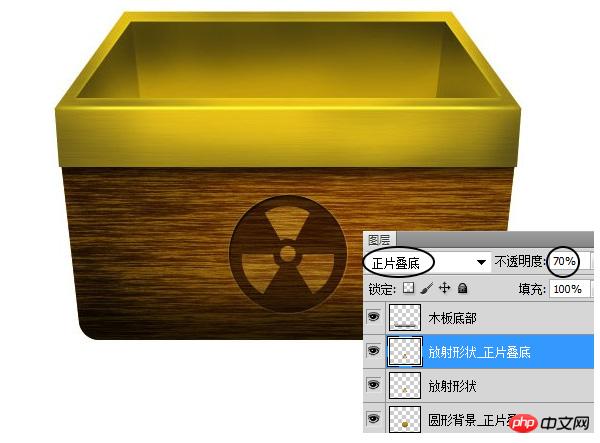
1、在选区可见情况下,选择图层"木质纹理",按Ctrl + J,复制出一个图层,命名为"放射形状",并把图层放在"木板底部"与"圆形背景_正片叠底"之间

第二十七步
1、按Ctrl + J,复制图层"放射形状",命名为"放射形状_正片叠底",并把图层的混合模式改为"正片叠底",不透明度 70%
第二十八步
1、给"放射形状",添加图层样式

第二十九步
1、创建一个新层,在顶部,命名为"psd背景",用钢笔工具(P)绘制一个方形区域,如下图
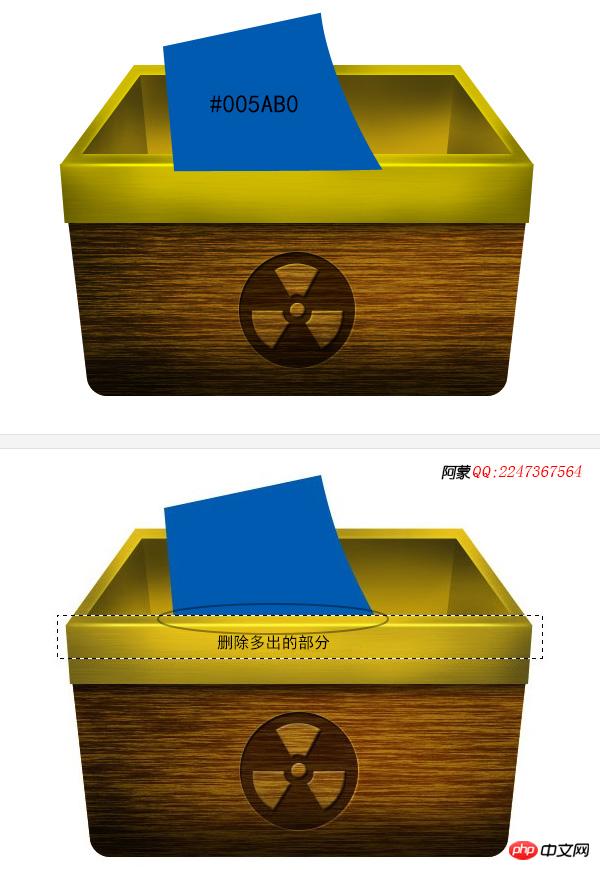
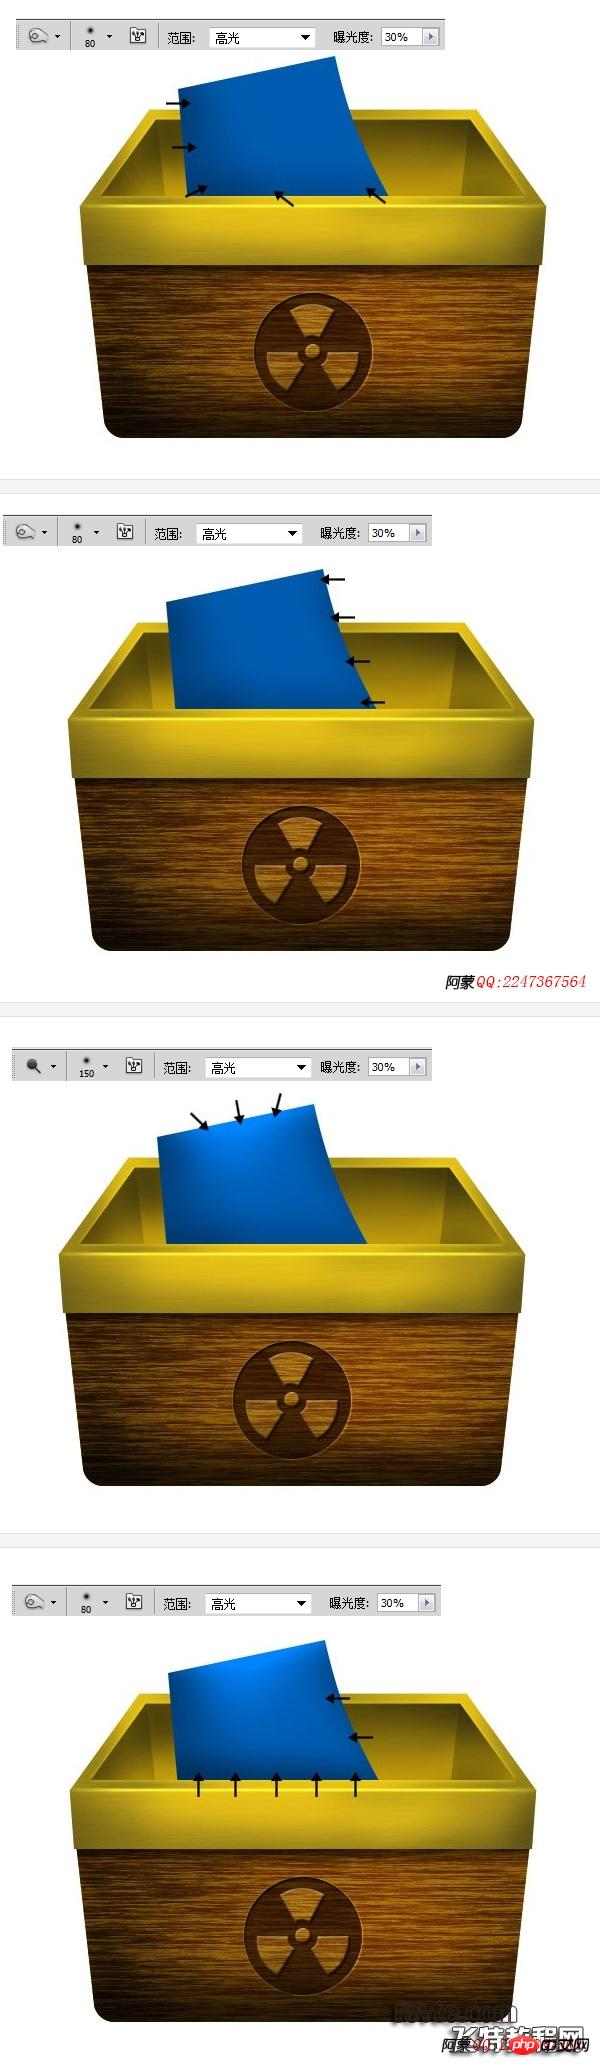
第三十步
1、用加深工具(O)和减淡工具,在"psd背景"上涂抹
第三十一步
1、添加文字"Ps",在图层"psd背景"上方,接着将文字层栅格化,旋转并调整,最后并给文字添加样式

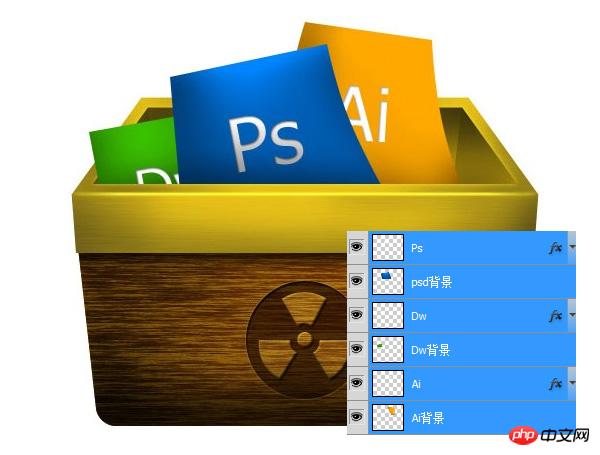
第三十二步
1、用相同操作,制作另外两个对象
第三十三步
1、创建一个新层,在"psd背景"下方,命名为"psd阴影01"

第三十四步
1、创建一个新层,在"psd阴影01"下方,命名为"psd阴影02"

第三十五步
1、用相同操作,制作另外两个对象的阴影部分
第三十六步
1、创建一个图层,在"木板"下方,命名为"箱子阴影",具体操作如下图

第三十七步
1、按Ctrl + J,复制"箱子阴影",并命名为"箱子阴影2",按Ctrl + T,调整大小,如图

第三十八步
按Ctrl + J,复制"箱子阴影2",调整位置和大小,或者继续复制一次直到你觉得效果满意为止;
最后加上背景图,让我们的图标更美观,背景图片你可以源文件中复制过来,在这里我就不做说明了

 What Photoshop Does Best: Common Tasks and ProjectsApr 23, 2025 am 12:06 AM
Photoshop is specialized in image editing, layering and masking, digital painting and a variety of design applications. 1) Image editing and repair: remove defects and adjust color and brightness. 2) Layers and masks: non-destructive editing and creation. 3) Digital paintings and illustrations: create art works. 4) Practical applications: graphic design, web design and digital art creation.
 Using Photoshop: Creative Possibilities and Practical UsesApr 22, 2025 am 12:09 AM
Photoshop is very practical and creative in practical applications. 1) It provides basic editing, repairing and synthesis functions, suitable for beginners and professionals. 2) Advanced features such as content recognition fill and layer style can improve image effects. 3) Mastering shortcut keys and optimizing layer structure can improve work efficiency.
 Photoshop: Advanced Techniques and ToolsApr 21, 2025 am 12:08 AM
Advanced features of Adobe Photoshop include advanced selection tools, layer blending modes, and actions and scripts. 1) Advanced selection tools such as the Quick Selection Tool and the Color Range Selection Tool can accurately select image areas. 2) Layer blending mode such as "overlapping" mode can create unique visual effects. 3) Actions and scripts can automate repetition of tasks and improve work efficiency.
 Photoshop's Main Feature: Retouching and EnhancementApr 20, 2025 am 12:07 AM
Photoshop's powerful functions in photo editing and enhancement include: 1. Use the "Repair Brush Tool" to remove acne, 2. Use the "Liquefaction Tool" to slim face, 3. Use the "Frequency Separation" technology to accurately retouch images. These functions are implemented through algorithms and image processing technology to optimize image processing effects.
 Photoshop's Key Features: A Deep DiveApr 19, 2025 am 12:08 AM
Key features of Photoshop include layers and masks, adjustment tools, filters and effects. 1. Layers and masks allow independent editing of image parts. 2. Adjust tools such as brightness/contrast can modify image tone and brightness. 3. Filters and effects can quickly add visual effects. Mastering these features can help creative professionals achieve their creative vision.
 Photoshop and Digital Art: Painting, Illustration, and CompositingApr 18, 2025 am 12:01 AM
Photoshop's applications in digital art include painting, illustration and image synthesis. 1) Painting: Using brushes, pencils and mixing tools, the artist can create realistic effects. 2) Illustration: With vector and shape tools, artists can accurately draw complex graphics and add effects. 3) Synthesis: Using mask and layer blending mode, artists can seamlessly blend different image elements.
 Advanced Photoshop Tutorial: Master Retouching & CompositingApr 17, 2025 am 12:10 AM
Photoshop's advanced photo editing and synthesis technologies include: 1. Use layers, masks and adjustment layers for basic operations; 2. Use image pixel values to achieve photo editing effects; 3. Use multiple layers and masks for complex synthesis; 4. Use "liquefaction" tools to adjust facial features; 5. Use "frequency separation" technology to perform delicate photo editing, these technologies can improve image processing level and achieve professional-level effects.
 Using Photoshop for Graphic Design: Branding and MoreApr 16, 2025 am 12:02 AM
The steps to using Photoshop for brand design include: 1. Use the Pen tool to draw basic shapes, 2. Add shadows and highlights through layer styles, 3. Adjust colors and details, 4. Use smart objects and actions to automatically generate different versions of the design. Photoshop helps designers create and optimize brand elements with the flexibility of layers and masks, ensuring consistency and professionalism of designs, from simple logos to complex branding guides.


Hot AI Tools

Undresser.AI Undress
AI-powered app for creating realistic nude photos

AI Clothes Remover
Online AI tool for removing clothes from photos.

Undress AI Tool
Undress images for free

Clothoff.io
AI clothes remover

Video Face Swap
Swap faces in any video effortlessly with our completely free AI face swap tool!

Hot Article
Hot Tools

mPDF
mPDF is a PHP library that can generate PDF files from UTF-8 encoded HTML. The original author, Ian Back, wrote mPDF to output PDF files "on the fly" from his website and handle different languages. It is slower than original scripts like HTML2FPDF and produces larger files when using Unicode fonts, but supports CSS styles etc. and has a lot of enhancements. Supports almost all languages, including RTL (Arabic and Hebrew) and CJK (Chinese, Japanese and Korean). Supports nested block-level elements (such as P, DIV),

SublimeText3 English version
Recommended: Win version, supports code prompts!

WebStorm Mac version
Useful JavaScript development tools

SublimeText3 Mac version
God-level code editing software (SublimeText3)

SublimeText3 Linux new version
SublimeText3 Linux latest version

