


在前面的文章中我们介绍了Photoshop光影处理的基本理论以及如何在Photoshop中创建逼真的阴影,同时分享了一些个人使用的一些技巧,今天的文章中我们来说说灯光,我将给大家演示如何在Photoshop中创建逼真的灯光效果,包括如何创建灯光、全局光以及表面光的效果表现方法。
创建灯光
下面的图片这是我工作中的一个图像处理项目,大家可以看到处理前后的效果区别,在Photoshop中实现这种效果并不难,但如果想做的很逼真,就得多想想了。混合模式是非常重要的,不同的灯光效果需要采用不同的混合模式。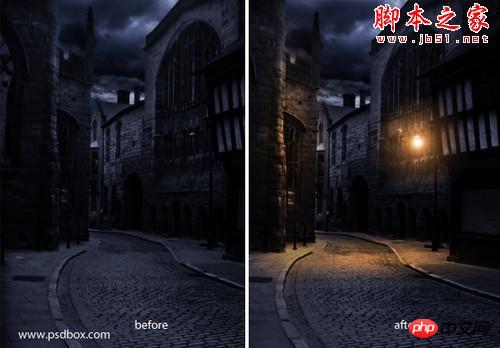
左图:处理前 右图:处理后
第一件事是创建光源。我用一个非常大的黄色的软笔刷,画了一个大点,然后我尝试了所有的混合模式,看哪个效果最好。
请记住,混合模式跟图像的亮度是密不可分的。如果使用了所有的混合模式都没有得到满意的效果,可以使用一个深一点的或饱和度低一点的颜色。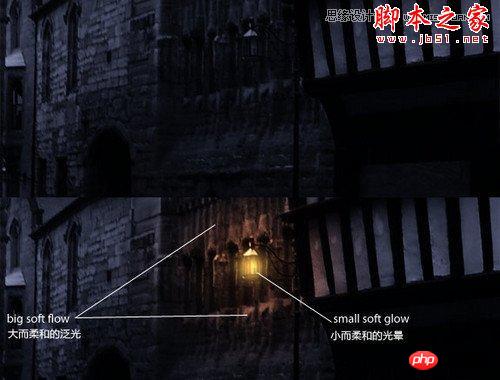
最后我创建灯光的光晕效果,使用Photoshop的滤镜来实现:滤镜〉渲染〉镜头光晕。创建了光晕后,这一图层其地方都成黑的了,我通过色相明度饱和度工具,将它的颜色调整为黄色,然后将图层混合模式设置为滤色,这样黑色就消失了。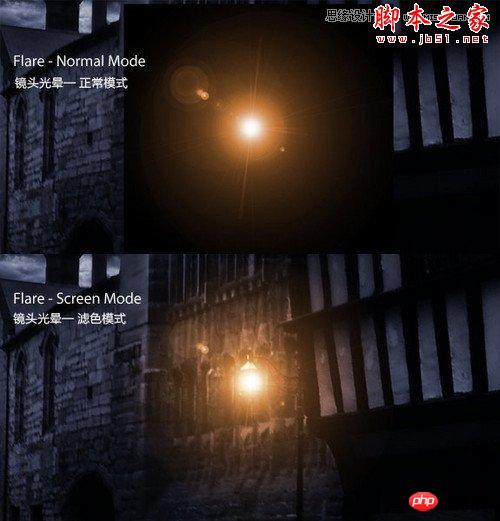
创建灯光的光晕效果
创建光源之后,必须考虑它对其他物体的影响,比如墙面和地面。这种情况下通常使用软黄色的笔刷,将被照亮的地方变亮。
我发现,颜色减淡,亮光或线性减淡(添加),灯光效果的混合模式是最好的,但正如我所说,这取决于的背景的颜色和亮度水平。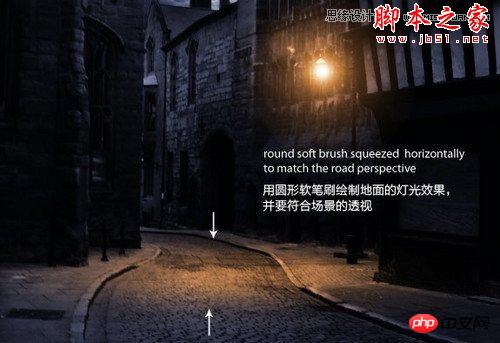
使用软黄色的笔刷,将被照亮的地方变亮
正如在上图中所见,地面上加了灯光后,画面就变得更真实了。它是用一个大的软黄色笔刷绘制的,使用颜色减淡的混合模式,然后我使用变形工具让它符合透视。墙上的光我也是使用了相同的办法。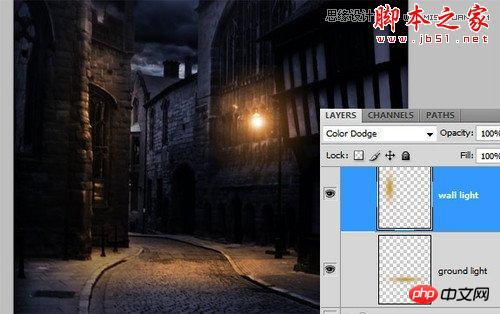
墙上的光
下面我们介绍表面光的效果处理。
表面光
另一种创造不同光源的方法是利用Photoshop的图层样式,这种技术可以用在当光源从对象的一侧或后面照射过来的时候。 这种方法包含添加阴影并使用图层混合样式,而它的效果非常不错。使用同一种混合模式并不总是管用,需要多尝试。
这里的目的是重新创建出物体边缘的灯光。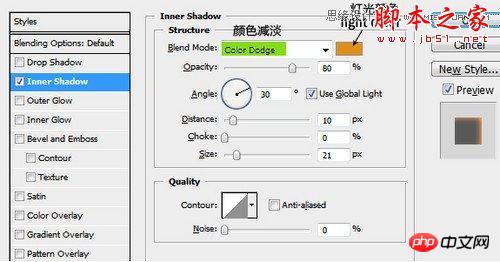
用PS图层特效制造表面光
光源的颜色取决与准备合成的事白天还是夜景。如果使用颜色减淡或亮光混合模式,必须用深色,因为这种混合模式会让画面看起来非常亮。
这是一个尝试的过程,直到找到合适的亮度,特定的混合模式,以及合理的颜色搭配。此外,效果并不一定要非常的强烈,即使是柔和的影响,也会改变画面的感觉。
我做了一个简单的设置,来解释我上面所说的。这只是一个粗略的设置,但效果还不错。下图就是我将上面设置的内阴影应用的效果。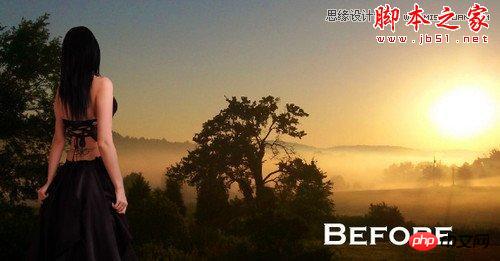
原图
内阴影应用的效果
下图是另一个例子。
内阴影应用的效果
这种方法也有它的缺陷,当设置内阴影的时候,可能在不希望出现灯光的地方,它也会出现灯光。
我通常会增加距离的设置,并改匹配光源的防线,但即使如此,有时也会有不想要的结果出现。增加大小的设置,会得到一个平滑柔和的效果,但一般出现“高光线”,效果会好看些。我给的效果比较强烈,可以看到,效果还挺不错,详细设置请看下图。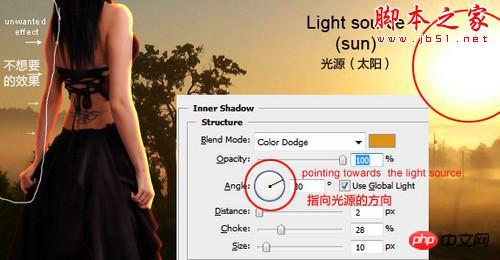
指向光源的方向
从上图也可以看到,有些不应该出现灯光的地方也出现了灯光,但这个例子比较特殊,在这里可能看起来效果还不错,但知道我并不像那些区域出现灯光效果。
怎么解决这个问题呢?在这里不能用橡皮擦,因为它是图层样式产生的效果。我想了很长时间,但我找到办法了。方法就是将突出样式效果转换成图层(这里是将内阴影这个效果),前面讲阴影的时候已经提到了 。这个方法在处理两种不同的阴影效果时确实管用。
建立新蒙版
那么,在需要的图层样式上右键,然后选择新建图层。这样它会自动创建一个新图层,并继承在样式中设置的混合模式以及不透明度。然后,可以创建蒙版,把不需要的部分隐藏掉。
下面我们介绍全局光的效果表现。
全局光
最后一种灯光效果是全局光,我使用滤镜中的“渲染〉光照效果”来实现。使用这个滤镜几乎是我所有图层处理的最后一步,这是一个将之前99%的工作看起来更好的一个效果。这是一个一次性的滤镜,效果不能被撤销。
可以在菜单“滤镜〉渲染〉光照效果”中找到它。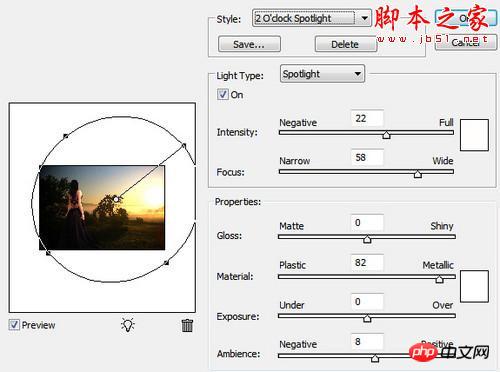
使用全局光滤镜
当然,可以将图层换成智能对象,这项这个滤镜的效果就不会是破坏性的了。
下面就是处理前后的对比。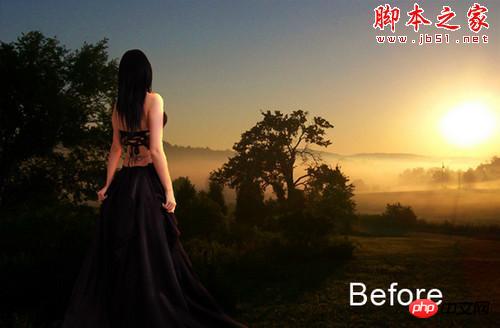
处理前
处理后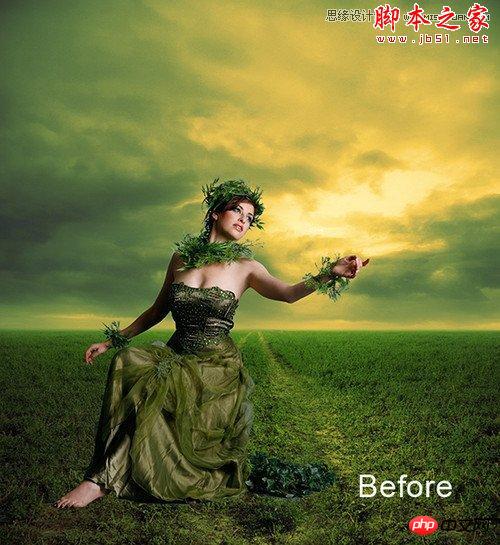
处理前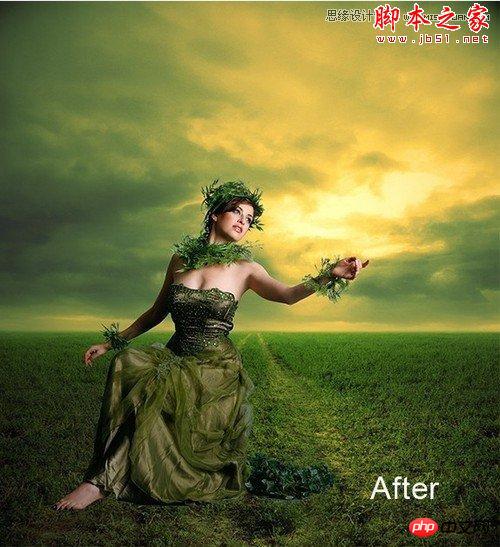
处理后
以上我们通过三篇文章为大家介绍了关于Photoshop表现阴影与灯光的方法和技巧,希望大家能从中学到一些东西,多尝试,多练习。

 What Photoshop Does Best: Common Tasks and ProjectsApr 23, 2025 am 12:06 AM
Photoshop is specialized in image editing, layering and masking, digital painting and a variety of design applications. 1) Image editing and repair: remove defects and adjust color and brightness. 2) Layers and masks: non-destructive editing and creation. 3) Digital paintings and illustrations: create art works. 4) Practical applications: graphic design, web design and digital art creation.
 Using Photoshop: Creative Possibilities and Practical UsesApr 22, 2025 am 12:09 AM
Photoshop is very practical and creative in practical applications. 1) It provides basic editing, repairing and synthesis functions, suitable for beginners and professionals. 2) Advanced features such as content recognition fill and layer style can improve image effects. 3) Mastering shortcut keys and optimizing layer structure can improve work efficiency.
 Photoshop: Advanced Techniques and ToolsApr 21, 2025 am 12:08 AM
Advanced features of Adobe Photoshop include advanced selection tools, layer blending modes, and actions and scripts. 1) Advanced selection tools such as the Quick Selection Tool and the Color Range Selection Tool can accurately select image areas. 2) Layer blending mode such as "overlapping" mode can create unique visual effects. 3) Actions and scripts can automate repetition of tasks and improve work efficiency.
 Photoshop's Main Feature: Retouching and EnhancementApr 20, 2025 am 12:07 AM
Photoshop's powerful functions in photo editing and enhancement include: 1. Use the "Repair Brush Tool" to remove acne, 2. Use the "Liquefaction Tool" to slim face, 3. Use the "Frequency Separation" technology to accurately retouch images. These functions are implemented through algorithms and image processing technology to optimize image processing effects.
 Photoshop's Key Features: A Deep DiveApr 19, 2025 am 12:08 AM
Key features of Photoshop include layers and masks, adjustment tools, filters and effects. 1. Layers and masks allow independent editing of image parts. 2. Adjust tools such as brightness/contrast can modify image tone and brightness. 3. Filters and effects can quickly add visual effects. Mastering these features can help creative professionals achieve their creative vision.
 Photoshop and Digital Art: Painting, Illustration, and CompositingApr 18, 2025 am 12:01 AM
Photoshop's applications in digital art include painting, illustration and image synthesis. 1) Painting: Using brushes, pencils and mixing tools, the artist can create realistic effects. 2) Illustration: With vector and shape tools, artists can accurately draw complex graphics and add effects. 3) Synthesis: Using mask and layer blending mode, artists can seamlessly blend different image elements.
 Advanced Photoshop Tutorial: Master Retouching & CompositingApr 17, 2025 am 12:10 AM
Photoshop's advanced photo editing and synthesis technologies include: 1. Use layers, masks and adjustment layers for basic operations; 2. Use image pixel values to achieve photo editing effects; 3. Use multiple layers and masks for complex synthesis; 4. Use "liquefaction" tools to adjust facial features; 5. Use "frequency separation" technology to perform delicate photo editing, these technologies can improve image processing level and achieve professional-level effects.
 Using Photoshop for Graphic Design: Branding and MoreApr 16, 2025 am 12:02 AM
The steps to using Photoshop for brand design include: 1. Use the Pen tool to draw basic shapes, 2. Add shadows and highlights through layer styles, 3. Adjust colors and details, 4. Use smart objects and actions to automatically generate different versions of the design. Photoshop helps designers create and optimize brand elements with the flexibility of layers and masks, ensuring consistency and professionalism of designs, from simple logos to complex branding guides.


Hot AI Tools

Undresser.AI Undress
AI-powered app for creating realistic nude photos

AI Clothes Remover
Online AI tool for removing clothes from photos.

Undress AI Tool
Undress images for free

Clothoff.io
AI clothes remover

Video Face Swap
Swap faces in any video effortlessly with our completely free AI face swap tool!

Hot Article
Hot Tools

SAP NetWeaver Server Adapter for Eclipse
Integrate Eclipse with SAP NetWeaver application server.

VSCode Windows 64-bit Download
A free and powerful IDE editor launched by Microsoft

SecLists
SecLists is the ultimate security tester's companion. It is a collection of various types of lists that are frequently used during security assessments, all in one place. SecLists helps make security testing more efficient and productive by conveniently providing all the lists a security tester might need. List types include usernames, passwords, URLs, fuzzing payloads, sensitive data patterns, web shells, and more. The tester can simply pull this repository onto a new test machine and he will have access to every type of list he needs.

Notepad++7.3.1
Easy-to-use and free code editor

Safe Exam Browser
Safe Exam Browser is a secure browser environment for taking online exams securely. This software turns any computer into a secure workstation. It controls access to any utility and prevents students from using unauthorized resources.

