

 Software TutorialOffice SoftwareHow to deal with the situation where a Word table is split into two pages
How to deal with the situation where a Word table is split into two pages

To deal with the situation where the Word table is split into two pages, you first need to understand the possible reasons for this situation. Usually, broken page breaks in Word tables occur when other content in the document prevents the table from fully displaying on the same page. In this case, some simple adjustments can be made to handle the broken page of the table so that the table can be displayed completely on the same page. This article will introduce some possible ways to solve this problem.
Method 1: Adjust the size of the table
The first method is to adjust the size of the table so that it can be fully displayed on the same page. You can try the following steps:
- Select the table: Click the upper left corner of the table with the mouse, and the entire table will be selected.
- Adjust table size: Select the "Layout" tab in the Word menu bar, then click the "Autofit" button in "Table Tools" and select "Automatically adjust column width" or "Automatically adjust row height" option to fit the table to the page width.
- Check the effect: After adjusting the table size, check whether the table can be displayed completely on the same page. If there are still parts of the table that are broken by paging, you can try to adjust the font size or line spacing to reduce the space occupied by the table.
Method 2: Set the row height and the distance before and after the paragraph
The second method is to adjust the position of the table on the page by setting the row height and the distance between the front and back paragraphs so that It can be displayed completely on the same page. You can follow the steps below:
- Select the table: Click the edge of the table with the mouse to select the entire table.
- Set the row height: Select the "Layout" tab in the Word menu bar, then click the "Row Height" button, and set the appropriate row height in the pop-up dialog box so that there is space between table rows. Proper spacing.
- Set the distance before and after paragraphs: Select the "Home" tab in the Word menu bar, then click the "Paragraph" button, and set the appropriate distance before and after paragraphs in the pop-up dialog box to make the table more consistent with other content There is appropriate spacing between them.
- Adjust the position: By setting the row height and the distance between the front and back paragraphs, the table should be positioned appropriately on the page to avoid page breaks.
Method 3: Adjust page settings
The third method is to avoid table pagination disconnection by adjusting page settings. You can follow these steps:
- Adjust page margins: Select the "Layout" tab in the Word menu bar, then click the "Page Setup" button, and adjust the top, bottom, left, and right margins of the page in the pop-up dialog box so that The table has enough space to appear completely on the same page.
- Set page positioning: In the page setting dialog box, you can select "Portrait" or "Horizontal" page positioning, and choose the appropriate page positioning method according to the size of the table and page layout.
- Preview effect: After adjusting the page settings, you can use the "Print Preview" function to view the display effect of the entire document to ensure that the table can be completely displayed on the same page.
Through the adjustment of the above methods, the problem of broken paging of Word tables can usually be effectively solved, so that the table can be displayed completely on the same page. If the above methods cannot solve the problem, you can consider appropriately adjusting or splitting the table content to achieve the best presentation effect.
The above is the detailed content of How to deal with the situation where a Word table is split into two pages. For more information, please follow other related articles on the PHP Chinese website!

 Excel CONCATENATE function to combine strings, cells, columnsApr 30, 2025 am 10:23 AM
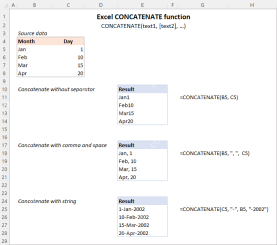
This article explores various methods for combining text strings, numbers, and dates in Excel using the CONCATENATE function and the "&" operator. We'll cover formulas for joining individual cells, columns, and ranges, offering solutio
 Merge and combine cells in Excel without losing dataApr 30, 2025 am 09:43 AM
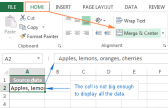
This tutorial explores various methods for efficiently merging cells in Excel, focusing on techniques to retain data when combining cells in Excel 365, 2021, 2019, 2016, 2013, 2010, and earlier versions. Often, Excel users need to consolidate two or
 Excel: Compare two columns for matches and differencesApr 30, 2025 am 09:22 AM
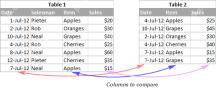
This tutorial explores various methods for comparing two or more columns in Excel to identify matches and differences. We'll cover row-by-row comparisons, comparing multiple columns for row matches, finding matches and differences across lists, high
 Rounding in Excel: ROUND, ROUNDUP, ROUNDDOWN, FLOOR, CEILING functionsApr 30, 2025 am 09:18 AM
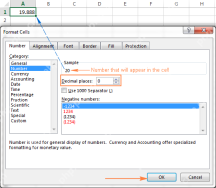
This tutorial explores Excel's rounding functions: ROUND, ROUNDUP, ROUNDDOWN, FLOOR, CEILING, MROUND, and others. It demonstrates how to round decimal numbers to integers or a specific number of decimal places, extract fractional parts, round to the
 Consolidate in Excel: Merge multiple sheets into oneApr 29, 2025 am 10:04 AM
This tutorial explores various methods for combining Excel sheets, catering to different needs: consolidating data, merging sheets via data copying, or merging spreadsheets based on key columns. Many Excel users face the challenge of merging multipl
 Calculate moving average in Excel: formulas and chartsApr 29, 2025 am 09:47 AM
This tutorial shows you how to quickly calculate simple moving averages in Excel, using functions to determine moving averages over the last N days, weeks, months, or years, and how to add a moving average trendline to your charts. Previous articles
 How to calculate average in Excel: formula examplesApr 29, 2025 am 09:38 AM
This tutorial demonstrates various methods for calculating averages in Excel, including formula-based and formula-free approaches, with options for rounding results. Microsoft Excel offers several functions for averaging numerical data, and this gui
 How to calculate weighted average in Excel (SUM and SUMPRODUCT formulas)Apr 29, 2025 am 09:32 AM
This tutorial shows you two simple ways to calculate weighted averages in Excel: using the SUM or SUMPRODUCT function. Previous articles covered basic Excel averaging functions. But what if some values are more important than others, impacting the f


Hot AI Tools

Undresser.AI Undress
AI-powered app for creating realistic nude photos

AI Clothes Remover
Online AI tool for removing clothes from photos.

Undress AI Tool
Undress images for free

Clothoff.io
AI clothes remover

Video Face Swap
Swap faces in any video effortlessly with our completely free AI face swap tool!

Hot Article
Hot Tools

SublimeText3 Linux new version
SublimeText3 Linux latest version

MantisBT
Mantis is an easy-to-deploy web-based defect tracking tool designed to aid in product defect tracking. It requires PHP, MySQL and a web server. Check out our demo and hosting services.

Safe Exam Browser
Safe Exam Browser is a secure browser environment for taking online exams securely. This software turns any computer into a secure workstation. It controls access to any utility and prevents students from using unauthorized resources.

SAP NetWeaver Server Adapter for Eclipse
Integrate Eclipse with SAP NetWeaver application server.

Zend Studio 13.0.1
Powerful PHP integrated development environment

