Home >Software Tutorial >Office Software >How to set the number of lines in word
How to set the number of lines in word
- WBOYWBOYWBOYWBOYWBOYWBOYWBOYWBOYWBOYWBOYWBOYWBOYWBforward
- 2024-03-19 18:20:071307browse
Wanting to set the number of rows in Word is actually very simple. First, open the Word document, click the Page Layout tab, and then select "Line Numbers" in the Page Setup group. Then, in the pop-up window, select the "Layout" tab, then select "Continuous" in the "Line Number" drop-down menu, and finally click "OK" to complete the settings. In this way, you can easily set the number of rows in your Word document. If you have any other questions, please feel free to consult PHP editor Xinyi at any time.
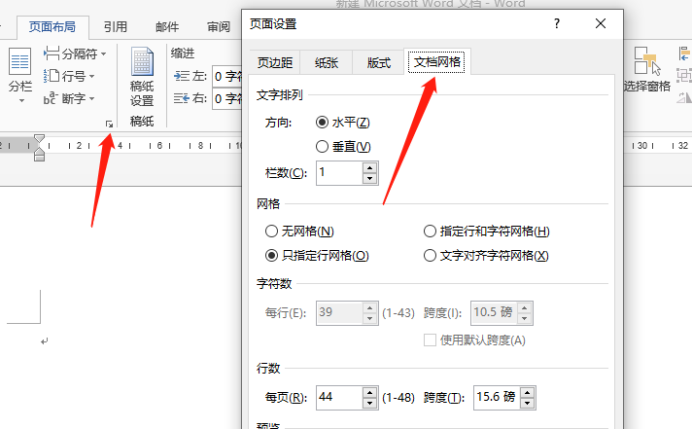
First, we need to create a new Word document and open it. In order to set the number of rows per page, we need to click on the "Page Layout" tab at the top of the page. Next, in the lower right corner we will see an icon that looks like a small square, which can be seen in the red box. The schematic is shown below.

#2. After that, click the small square icon to bring up the [Page Settings] setting box, and we select [Document Grid]. As shown below.

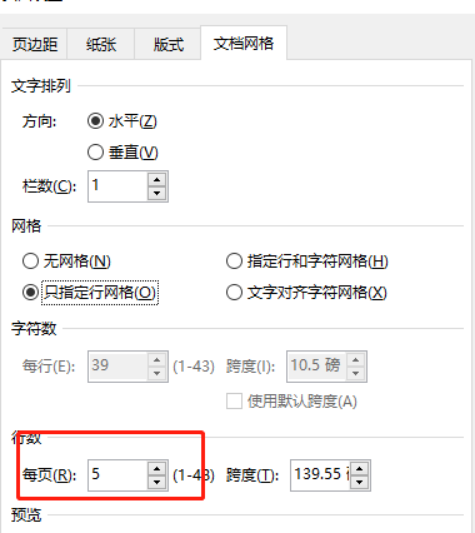
3. We can see that there are many setting options in this interface, such as the number of characters per line. Of course, the number of lines obviously also has setting options in it. We The number of rows can be determined according to specific requirements. Let's try to set up 5 rows, as shown in the figure below.

#4. After the setting is completed, in order to verify the effect, we can enter some text at will. In the picture below, we enter a few lines of text. The number of word lines is indeed only five lines per page. . The effect is as follows.

#The method of setting the number of word lines is so simple and fast. Have you mastered it? You can try setting it up to see if it can be combined with other settings and learn to draw inferences.
The above is the detailed content of How to set the number of lines in word. For more information, please follow other related articles on the PHP Chinese website!

