
 Software TutorialOffice SoftwareLet's talk about the difference between PPT's 'read-only mode” and 'restricted editing”
Let's talk about the difference between PPT's 'read-only mode” and 'restricted editing”

php editor Strawberry wants to talk to you today about the difference between the "read-only mode" and "restricted editing" functions of PPT. In daily use of PPT, these two functions are often used, but many people may not be aware of the specific differences between them. Let’s take a look!
When setting "Protected Mode" in PPT, you usually consider restricting editing, but unlike Excel or Word, PPT does not have a dedicated "Restrict Editing" option.
PPT can be protected from editing by setting it to "read-only mode". Different from the "read-only mode" of Excel or Word, the "read-only mode" of PPT cannot be edited after being set, which is similar to the restricted editing function of Excel or Word.
So, there is no distinction between "read-only mode" and "restricted editing" in PPT, and there is no [restricted editing] option. You only need to set [read-only].
There are two "read-only modes" that can be set for PPT, one is the "read-only mode" without a password, and the other is the "read-only mode" with a password set. Let's talk about the setting method.
1. No password [read-only mode]
After opening the PPT, click the [File] option in the menu, and then click [Information] - [Protect Presentation] - [Always open as read-only].

Then close and save the PPT file, and the "read-only mode" of PPT will be set. When you open the PPT again, you will find that you cannot edit or change the content of the PPT.
If you want to edit the content, you only need to find the prompt at the bottom of the menu [To prevent accidental changes, the author has set this file to open in read-only mode], and then click [Edit Anyway] next to it, and the PPT can be edited normally. Changed.

But after closing the PPT and opening it again, it will still be in this mode. You need to follow the above operations before editing.
If we no longer need protection and don’t want to repeat the above operation every time we edit, we can cancel the “read-only mode”.
Same as the setting operation, click [File]-[Information]-[Protect Presentation]-[Always open as read-only], save the file, and the "read-only mode" of PPT will be cancelled.

2. [Read-only mode] which requires password input
After opening the PPT, also click the [File] option first, then click [Save As], and then select the save address after saving on the right.

After the dialog box pops up, click [General Options] in the [Tools] list at the bottom right. The file name can be left unchanged and the original file can be directly overwritten.

After the dialog box pops up, enter the password you want to set in the [Modify Permission Password] column, confirm the password and enter it again, click [Save], and the [Read-Only Mode] of the PPT with password will be set.

PPT in this mode cannot be opened directly. After opening, a dialog box will pop up, prompting [Enter password to modify or open in read-only mode]. In other words, you must enter a password to edit the PPT. If you do not have a password, you can also open the PPT by clicking [Read Only] under the option, but you will not be able to edit or change the PPT.

So, there are differences between these two methods of protecting PPT. You can choose the appropriate one according to your needs.
How to cancel the second protection mode?
To cancel the [read-only mode] of PPT with password, you can also use [Save As] to cancel, but the prerequisite is that you need to know the originally set password, because only after entering the password and entering the editable mode can you select [ Save as option.
Specific operations:
Open the PPT, enter the editable mode through the password, and select [File]-[Save As]-[Select the path to save] according to the setting method.
After the dialog box pops up, click [General Options] in the [Tools] list on the lower right. After the dialog box pops up again, you can see that a password already exists in the [Modify Permission Password] column. Delete the password and make it blank. , click OK. There will be no [protected mode] in the PPT after saving.

If you forget your password and want to cancel the "read-only mode", you cannot operate it in PPT because there is no option to forget your password in PPT. We can use other tools, such as Pepsi Niu PPT password recovery tool, without input. Secret, you can directly remove the "read-only mode".
In the tool, select the [Unrestriction] module, and then import the PPT file.
Tool link: Pepsi Niu PPT password recovery tool

The PPT after the restriction is lifted will generate a new file and will not overwrite the original PPT. You can see it by clicking [Go to View] in the interface to open the folder.

The above is the detailed content of Let's talk about the difference between PPT's 'read-only mode” and 'restricted editing”. For more information, please follow other related articles on the PHP Chinese website!

 Excel MATCH function with formula examplesApr 15, 2025 am 11:21 AM
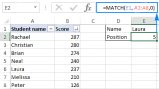
This tutorial explains how to use MATCH function in Excel with formula examples. It also shows how to improve your lookup formulas by a making dynamic formula with VLOOKUP and MATCH. In Microsoft Excel, there are many different lookup/ref
 Nested IF in Excel – formula with multiple conditionsApr 15, 2025 am 11:13 AM
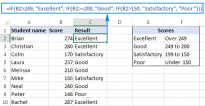
This tutorial demonstrates how to effectively use multiple IF functions in Microsoft Excel, showcasing nested IF formulas for various tasks. The core concept is using nested IF statements to evaluate multiple conditions and return different results
 Leading zeros in Excel: how to add, remove and hideApr 15, 2025 am 09:31 AM
This tutorial explores various methods for managing leading zeros in Excel, covering their preservation, display, and removal. Whether you're working with zip codes, IDs, or other data requiring leading zeros, this guide provides solutions. Excel of
 Excel HLOOKUP function with formula examplesApr 15, 2025 am 09:05 AM
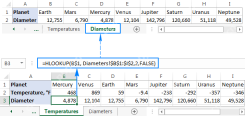
Microsoft Excel's HLOOKUP function: A comprehensive guide Excel offers three lookup functions – LOOKUP, VLOOKUP, and HLOOKUP – but HLOOKUP often causes confusion. This tutorial clarifies HLOOKUP's specifics and provides examples for efficient use. Wh
 If You Don't Rename Tables in Excel, Today's the Day to StartApr 15, 2025 am 12:58 AM
Quick link Why should tables be named in Excel How to name a table in Excel Excel table naming rules and techniques By default, tables in Excel are named Table1, Table2, Table3, and so on. However, you don't have to stick to these tags. In fact, it would be better if you don't! In this quick guide, I will explain why you should always rename tables in Excel and show you how to do this. Why should tables be named in Excel While it may take some time to develop the habit of naming tables in Excel (if you don't usually do this), the following reasons illustrate today
 Microsoft 365 Will Turn Off ActiveX, Because Hackers Keep Using ItApr 12, 2025 am 06:01 AM
Microsoft 365 is finally phasing out ActiveX, a long-standing security vulnerability in its Office suite. This follows a similar move in Office 2024. Beginning this month, Windows versions of Word, Excel, PowerPoint, and Visio in Microsoft 365 will
 How to Use Excel's AGGREGATE Function to Refine CalculationsApr 12, 2025 am 12:54 AM
Quick Links The AGGREGATE Syntax


Hot AI Tools

Undresser.AI Undress
AI-powered app for creating realistic nude photos

AI Clothes Remover
Online AI tool for removing clothes from photos.

Undress AI Tool
Undress images for free

Clothoff.io
AI clothes remover

AI Hentai Generator
Generate AI Hentai for free.

Hot Article
Hot Tools

MantisBT
Mantis is an easy-to-deploy web-based defect tracking tool designed to aid in product defect tracking. It requires PHP, MySQL and a web server. Check out our demo and hosting services.

ZendStudio 13.5.1 Mac
Powerful PHP integrated development environment

Dreamweaver CS6
Visual web development tools

SublimeText3 English version
Recommended: Win version, supports code prompts!

SublimeText3 Linux new version
SublimeText3 Linux latest version

