


php editor Youzi will introduce you how to use 7-Zip software to compress files. 7-Zip is an open source file compression tool that supports multiple compression formats, such as ZIP, RAR, TAR, etc. With simple operations, you can easily compress files or folders into a compressed package, thereby saving storage space and facilitating file transfer. Next, we will introduce in detail how to use 7-Zip software for file compression on Windows systems.
First of all, we can go to the 7-Zip official Chinese website (sparanoid.com) or the software store to download the 7-Zip software.

After clicking [Add] to pop up the [Add to Compressed Package] dialog box, we can modify the name of the compressed package and set options such as compression format. If we need to protect the compressed file, we can also set password protection.

In addition to opening the software and then compressing it, you can also click on the file that needs to be compressed and compress it through the right-click option of the mouse.
After right-clicking the mouse, in the 7-Zip list, select [Add to compressed package] to compress. After selecting, the above [Add to compressed package] dialog box will pop up.
If you do not need to modify the compressed package name or set a password, you can select [Add to "original file name".7z] or [Add to "original file name".zip] according to the compression format to directly compress the file. Set options; if you want to compress the file and send it directly by email, you can select the option with "And Mail" to compress the file.

If the 7-Zip software cannot be used after installing it, it may be that there is no associated file format when installing the software, and we need to set it manually.
After opening the 7-Zip software, click [Options] in the tab [Tools] list;

In the [Options] dialog box, select the first " " icon at the bottom of the [System] page, and then select the file you want to associate in the list. When the blue "Z" association icon appears on the left side of the file, It means the association is successful. Once associated, the software is ready for use.

It should be reminded that after compressing files through 7-Zip software and setting a password, you must save or remember the password, because if you forget the originally set password, you will not be able to decompress or open the 7Z compressed package. 7- Zip software also does not have a "forgot password" option.
If you really forget it accidentally, you can try to use tools to help us.
For example, the Pepsi Niu ZIP password recovery tool can retrieve lost passwords for compressed files and supports both Zip and 7-Zip format files.
The tool provides 4 retrieval methods. After importing the compressed package into the tool, select one or more of them and follow the prompts.
Tool link: Pepsi Niu ZIP password recovery tool

Then wait for the password to be retrieved.

The above is the detailed content of How does 7-Zip software compress files?. For more information, please follow other related articles on the PHP Chinese website!

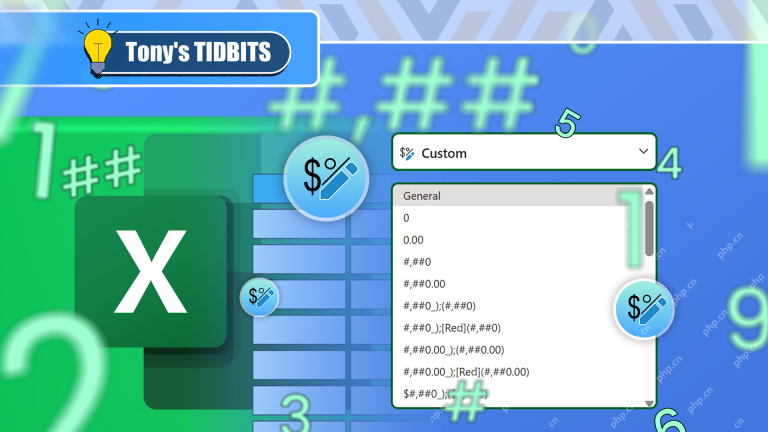 I Use Custom Number Formatting Instead of Conditional Formatting in ExcelMay 06, 2025 am 12:56 AM
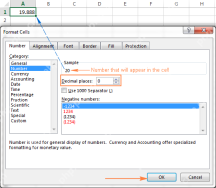
Detailed explanation of custom number formats: Quickly create personalized number formats in Excel Excel provides a variety of data formatting tools, but sometimes built-in tools are not able to meet specific needs or are inefficient. At this point, custom digital formats can come in handy to quickly create digital formats that meet your needs. What is a custom number format and how it works? In Excel, each cell has its own number format, which you can view by selecting the cell and in the Number group on the Start tab of the ribbon. Related: Excel's 12 digital format options and their impact on data Adjust the number format of the cell to match its data type. You can click on the "Number Format" dialog launcher and then
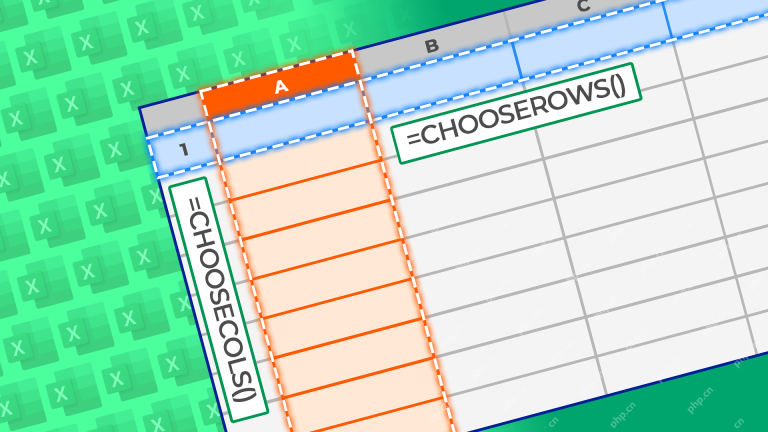 How to Use the CHOOSECOLS and CHOOSEROWS Functions in Excel to Extract DataMay 05, 2025 am 03:02 AM
Excel's CHOOSECOLS and CHOOSEROWS functions simplify extracting specific columns or rows from data, eliminating the need for nested formulas. Their dynamic nature ensures they adapt to dataset changes. CHOOSECOLS and CHOOSEROWS Syntax: These functio
 How to Use AI Function in Google SheetsMay 03, 2025 am 06:01 AM
Google Sheets' AI Function: A Powerful New Tool for Data Analysis Google Sheets now boasts a built-in AI function, powered by Gemini, eliminating the need for add-ons to leverage the power of language models directly within your spreadsheets. This f
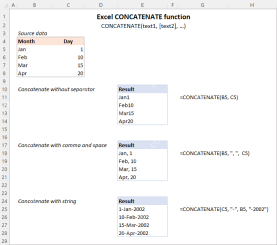 Excel CONCATENATE function to combine strings, cells, columnsApr 30, 2025 am 10:23 AM
This article explores various methods for combining text strings, numbers, and dates in Excel using the CONCATENATE function and the "&" operator. We'll cover formulas for joining individual cells, columns, and ranges, offering solutio
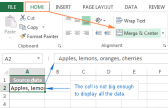 Merge and combine cells in Excel without losing dataApr 30, 2025 am 09:43 AM
This tutorial explores various methods for efficiently merging cells in Excel, focusing on techniques to retain data when combining cells in Excel 365, 2021, 2019, 2016, 2013, 2010, and earlier versions. Often, Excel users need to consolidate two or
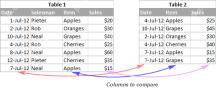 Excel: Compare two columns for matches and differencesApr 30, 2025 am 09:22 AM
This tutorial explores various methods for comparing two or more columns in Excel to identify matches and differences. We'll cover row-by-row comparisons, comparing multiple columns for row matches, finding matches and differences across lists, high
 Rounding in Excel: ROUND, ROUNDUP, ROUNDDOWN, FLOOR, CEILING functionsApr 30, 2025 am 09:18 AM
This tutorial explores Excel's rounding functions: ROUND, ROUNDUP, ROUNDDOWN, FLOOR, CEILING, MROUND, and others. It demonstrates how to round decimal numbers to integers or a specific number of decimal places, extract fractional parts, round to the
 Consolidate in Excel: Merge multiple sheets into oneApr 29, 2025 am 10:04 AM
This tutorial explores various methods for combining Excel sheets, catering to different needs: consolidating data, merging sheets via data copying, or merging spreadsheets based on key columns. Many Excel users face the challenge of merging multipl


Hot AI Tools

Undresser.AI Undress
AI-powered app for creating realistic nude photos

AI Clothes Remover
Online AI tool for removing clothes from photos.

Undress AI Tool
Undress images for free

Clothoff.io
AI clothes remover

Video Face Swap
Swap faces in any video effortlessly with our completely free AI face swap tool!

Hot Article
Hot Tools

WebStorm Mac version
Useful JavaScript development tools

Safe Exam Browser
Safe Exam Browser is a secure browser environment for taking online exams securely. This software turns any computer into a secure workstation. It controls access to any utility and prevents students from using unauthorized resources.

VSCode Windows 64-bit Download
A free and powerful IDE editor launched by Microsoft

Dreamweaver CS6
Visual web development tools

DVWA
Damn Vulnerable Web App (DVWA) is a PHP/MySQL web application that is very vulnerable. Its main goals are to be an aid for security professionals to test their skills and tools in a legal environment, to help web developers better understand the process of securing web applications, and to help teachers/students teach/learn in a classroom environment Web application security. The goal of DVWA is to practice some of the most common web vulnerabilities through a simple and straightforward interface, with varying degrees of difficulty. Please note that this software

