
 System TutorialWindows SeriesHow to enable secure boot on win11 computer? How to set up win11 secure boot
How to enable secure boot on win11 computer? How to set up win11 secure boot

How to enable secure boot on Win11 computer? How to set up Win11 secure boot Win11, Microsoft's latest operating system version, introduces many new features and improvements. One of the important features is secure boot, which can provide higher system security and protection capabilities. So, how to enable secure boot on a Win11 computer? In this article, we will introduce you in detail how to set up Win11 secure boot. Whether you are a novice or a user with some computer experience, you can easily follow our instructions to complete the setup. Let’s take a look!
win11 secure boot setting method
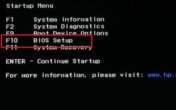
1. First, we restart the computer, use the hotkey to open the bios setup when the logo appears, and then press "F10" to enter the bios setup.
#2. Then find “boot options” under the “configuration” option and select to enter.

#3. Then find “secure boot” and change it to “Enabled”.

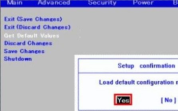
#4. Finally, press "F10" to save. If a dialog box pops up, select "Yes".
The above is the detailed content of How to enable secure boot on win11 computer? How to set up win11 secure boot. For more information, please follow other related articles on the PHP Chinese website!

 Automate Repetitive Tasks via AI-Generated PowerShell Scripts - Make Tech EasierMay 16, 2025 am 02:35 AM
I've always held the belief that computers should serve us, rather than the reverse. This belief was tested when I found myself dedicating endless hours to repetitive tasks. However, this changed when I began leveraging artificial intelligence (AI) t
 What To Do if There's an Unusual Sign in Activity on Your Microsoft AccountMay 16, 2025 am 02:34 AM
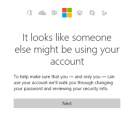
Similar to other large companies, Microsoft prioritizes your account security and protection from unauthorized access by individuals with harmful intentions.If Microsoft detects an unusual login attempt, it marks it as suspicious. You will receive an
 How to Roll Back a Driver in Windows - Make Tech EasierMay 16, 2025 am 02:33 AM
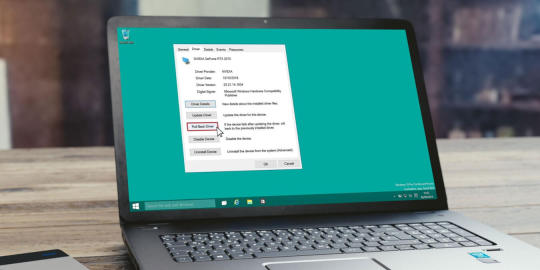
Driver issues are quite common in Windows systems. Sometimes, updates to new drivers may cause a Blue Screen of Death (BSOD) error message in Windows. Fortunately, this problem can be solved by rolling back the driver. You can use the Rollback Driver feature to restore the driver update to a previous version to check if it is functioning properly. Here is a detailed guide on how to roll back drivers in Windows. Directory Rollback Driver in Windows What to do if the Rollback Driver option is disabled? FAQ Rollback Driver in Windows Windows comes with some built-in tools designed to detect and resolve possible conflicts in the operating system. This pack
 How to Take Full Ownership of Windows Registry Keys - Make Tech EasierMay 16, 2025 am 02:28 AM
The Windows Registry is a central hub for storing all configurations related to the Windows operating system and its software. This is why numerous Windows tutorials often involve adding, modifying, or deleting Registry keys.However, you may encounte
 How to Remove 'System Requirements Not Met” Watermark in Windows 11 - Make Tech EasierMay 16, 2025 am 02:27 AM
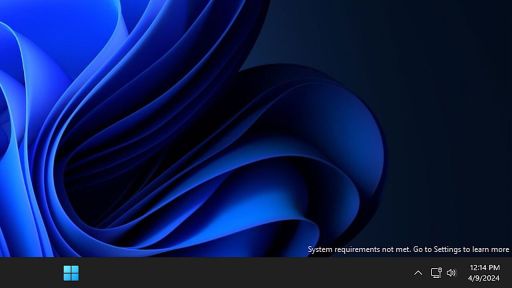
Windows 11 does have strict installation requirements. However, installing Windows 11 on unsupported devices is not difficult. If you have successfully installed it, don't rush to celebrate. You also need to clear the desktop "System Requirements Not Meeted" watermark that Microsoft introduced to prevent installation on unsupported hardware. This guide lists three ways to remove this watermark. Directory Group Policy Editor Windows Registry Editor Script Group Policy Editor If you are using Windows Pro or Enterprise and you have Group Policy Editor enabled, this method is the easiest. Follow the instructions below to disable the watermark through the Group Policy Editor. Enter "Group Policy" in Windows Search and click Edit Group in the results
 Microsoft Teams Camera Not Working? Learn How to Fix ItMay 16, 2025 am 02:22 AM
Microsoft Teams is a widely used platform for collaboration and communication within organizations. Despite its effectiveness, you might occasionally face issues with the camera during calls. This guide offers a range of solutions to resolve the came
 How to Check Your RAM Type in Windows - Make Tech EasierMay 16, 2025 am 02:21 AM
If you plan to upgrade your RAM or test its performance, it is important to know your RAM type. This means that your laptop or PC needs to be evaluated to determine the DDR module it supports, as well as other details like the form, speed and capacity of RAM. This tutorial shows how to check RAM types using various Windows applications and third-party tools in Windows. Directory Check RAM type via command prompt Check RAM type via task manager Check RAM type in Windows Check RAM type in PowerShell Check RAM type using CPU-Z Check RAM type using Novabench Check RAM type via visual inspection of motherboard Check RAM type via command prompt Check RAM type
 How to Fix 'Local Security Authority Protection Is Off' on Windows - Make Tech EasierMay 16, 2025 am 02:20 AM
Local Security Authority (LSA) protection is a crucial security feature designed to safeguard a user's credentials on a Windows computer, preventing unauthorized access. Some users have encountered an error message stating that "Local Security A


Hot AI Tools

Undresser.AI Undress
AI-powered app for creating realistic nude photos

AI Clothes Remover
Online AI tool for removing clothes from photos.

Undress AI Tool
Undress images for free

Clothoff.io
AI clothes remover

Video Face Swap
Swap faces in any video effortlessly with our completely free AI face swap tool!

Hot Article
Hot Tools

Atom editor mac version download
The most popular open source editor

Dreamweaver Mac version
Visual web development tools

SublimeText3 Chinese version
Chinese version, very easy to use

Safe Exam Browser
Safe Exam Browser is a secure browser environment for taking online exams securely. This software turns any computer into a secure workstation. It controls access to any utility and prevents students from using unauthorized resources.

SublimeText3 English version
Recommended: Win version, supports code prompts!

