


php editor Banana brings you an introduction to the PS brush shortcut keys on Mac. When designing in Photoshop, mastering the brush shortcut keys can improve work efficiency. Whether it's adjusting brush size, hardness or switching between different brush tools, mastering these shortcut keys will make your design process smoother and more efficient. Next, we will introduce in detail how to use the PS Brush shortcut keys on Mac to help you better use this powerful tool.
What is the difference between the PS shortcut keys on Mac and Windows computers?
The interface is similar, but the desktop of the Mac version is transparent and can display wallpapers, while the Windows version is gray. In addition, the Mac and PC versions of Photoshop use slightly different shortcut keys. Under Windows, the Ctrl key is the Command key on Mac, and the Alt key is the Option key on Mac. Similarly, the interface of AI is similar.
There are some differences between Photoshop (Ps) under Mac and Windows operating systems. First, their shortcut keys are different. On Mac, use the Command key or the Option key in combination with other keys to invoke the PS drawing tool, while on Windows you may use the Ctrl key or other keys. Secondly, there are differences in the selection tools, and Mac and Windows may have some different options and shortcuts. Finally, there are also differences in the renaming function, which may have different methods and steps under different operating systems. These are some differences between Ps on Mac and Windows.
There are some differences between Photoshop (PS) under Mac and Windows operating systems. First, their shortcut keys are different. In PS under Mac, shortcut keys use the Command or Option key in combination with other keys to invoke drawing functions. Secondly, there are some differences in the selection tools. Different operating systems may have different default selection tool settings. Finally, the renaming functionality may also differ. These minor differences need to be understood and adapted based on the specific operating system and software version.

How to use the mouse to control the brush size in PS in Mac?
1. Directly hold down the left square bracket key [[] on the keyboard to reduce the size of the brush , press and hold the right square bracket key []] on the keyboard to enlarge the brush. You can also hold down the [Alt] key while holding down the right mouse button and drag to the left (reduce the brush diameter) or right (increase the brush diameter).
When using PS, mastering shortcut keys is a very important skill. You can adjust the diameter of the brush by holding down the "Alt" key while holding down the right mouse button and dragging left or right. This operation can quickly and easily change the size of the brush and improve your creative efficiency. Therefore, in the daily use of PS, be sure to use shortcut keys frequently to improve work efficiency.
3. Control Option: Click the left button and drag the mouse at the same time. Move left and right to adjust the brush size, and move up and down to adjust the brush hardness.
Looking for shortcut keys for Photoshop on Apple computers!!
The following are commonly used shortcut keys for Photoshop on Apple computers. Mastering these shortcut keys can improve design efficiency, reduce operating steps, and make work more efficient and faster. .
This is an article about the guide to using Photoshop shortcut keys. It will help you master the 32 most commonly used Photoshop shortcut keys. Among them, Ctrl T is a very commonly used shortcut key for free deformation. Through this shortcut key, you can perform rotation, scaling and other deformation adjustments on the layer. At the same time, you can also modify the position of the layer in the picture by dragging it. This function key is very practical in design and can improve your work efficiency. Hope this guide helps you!
After opening the Photoshop software, click "Edit" in the menu bar, and then select "Keyboard Shortcuts". A dialog box will pop up, which will display the list of currently set shortcut keys.
Zoom out part: Alt+Spacebar+Mouse click; Scroll to view: PageUp/PageDown; Show or hide the ruler: Ctrl+R; Show or hide the dashed line: Ctrl+H; Show or hide the grid: Ctrl+”.
The software used in the demonstration is the image processing software Photoshop, and the version used is photoshop CS6. First open the photoshop image processing software, and use the shortcut key Shift Ctrl N to create a new layer. The new layer created using the shortcut key Shift Ctrl N is The default is a transparent layer.
The reason why the action shortcut keys of photoshop on mac system cannot be used and the solution are: because the ps software shortcut keys conflict with the shortcut keys that come with MAC. The solution is to reset the ones you are used to. Shortcut keys, avoid the shortcut keys that come with MAC to avoid conflicts.
When my college girlfriend wanted to learn PS, someone compiled these
Clipping masks wanted to make the font color more beautiful , you can add a picture you like on top of the font layer, then hold down Alt, move the mouse between the two layers, and when a downward arrow appears, just left-click.
PS 2023 installation tutorial Step 1: Download the installation package Step 2: Right-click the downloaded installation package to decompress Step 3: Open the decompressed folder, select set-up, right-click and run as administrator to start the installation Program.
If you want to learn PS, it is difficult to find a complete learning step. Step D1: Familiarize yourself with the tools, use common PS tools and introduce how to use them 1. Move tools: layer movement, text movement, and selection movement.
Introduction to 10 commonly used functions of ps Tip 1: Erase everything you don’t want To remove the girl paper in the picture below from the screen, select the [Lasso] tool and make a selection for it. Then click [Edit Fill], select [Content Awareness] and click OK.
Open PS on the computer, click [File]-[New], we can also directly import pictures on the computer, at this time we need to click [File]-[Open]). These are the Brush Tool, Rectangular Marquee Tool, Eraser Tool, Paint Bucket Tool, Quick Selection Tool).
ps Simple Poster Making Tutorial 1: Open hotshop and create a poster design drawing board. 2: Select the fill tool and set the background color. If necessary, click the gradient button to set the gradient background. 3: Import the design materials prepared in advance into the layer, and adjust the size and position after the import is completed.
mac computer ps brush installation tutorial
How to install mac computer ps brush: First, open ps, click on the "Window" above, then open the "Brush" in the drop-down menu and click on the upper right corner of the brush Click "Options" in the corner, then click "Import Brush" below, and finally double-click to open the downloaded brush file on your computer.
First download the brushes you want and then move them to the default brush presets folder (Program Files Adobe Photoshop CC2019 Preset Brushes) or a custom brush library folder of your choice where you can easily Find it.
Now let me tell you the methods and steps for installing PS brushes. Here's how: Open Photoshop and click the Stroke tool. Click the small triangle to the right of the brush size in the brush menu bar. The brush style bar will pop up. Click the settings button in the brush style bar and select "Load Brush" in the pop-up menu.
Conclusion: The above is all the content about the PS brush shortcut keys for Mac compiled by this site for you. Thank you for taking the time to read the content of this site. I hope it will be helpful to you. Don’t forget to learn more related content. Find it on this site.
The above is the detailed content of PS brush shortcut key for mac?. For more information, please follow other related articles on the PHP Chinese website!

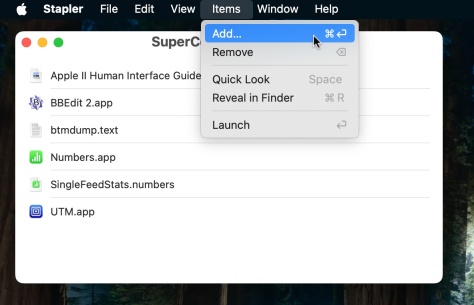 Launch All Apps & Documents Related to a Project with Stapler for MacMay 13, 2025 am 10:37 AM
Longtime Mac users may recall a handy old shareware application for the Classic Macintosh called Stapler, which essentially helped manage projects by grouping a series of apps and documents into a single document that when opened would then launch al
 How to Get Apple Intelligence on Your iPhone, iPad, or MacMay 13, 2025 am 10:32 AM
Apple Intelligence is a set of AI features that Apple is rolling out in beta, and will debut to a larger set of Apple device owners in the fall. Apple Intelligence offers many features from writing and creating text and emails, to taking actions and
 MacOS Sonoma 14.6.1 & Ventura 13.6.9 Released with Bug FixesMay 13, 2025 am 10:25 AM
If you feel like you have spent a significant amount of your time updating system software on your Apple devices lately, you’re in for a treat; another round of system software updates! This time around, Apple has released MacOS Sonoma 14.6.1 alon
 MacOS Sequoia 15 Beta 6 Available for TestingMay 13, 2025 am 10:23 AM
Apple has issued the 6th beta version of MacOS Sequoia for users enrolled in the developer beta testing program. Usually a matching public beta build arrives soon after, which in this case dev beta 6 would be versioned as public beta 4. MacOS Sequoia
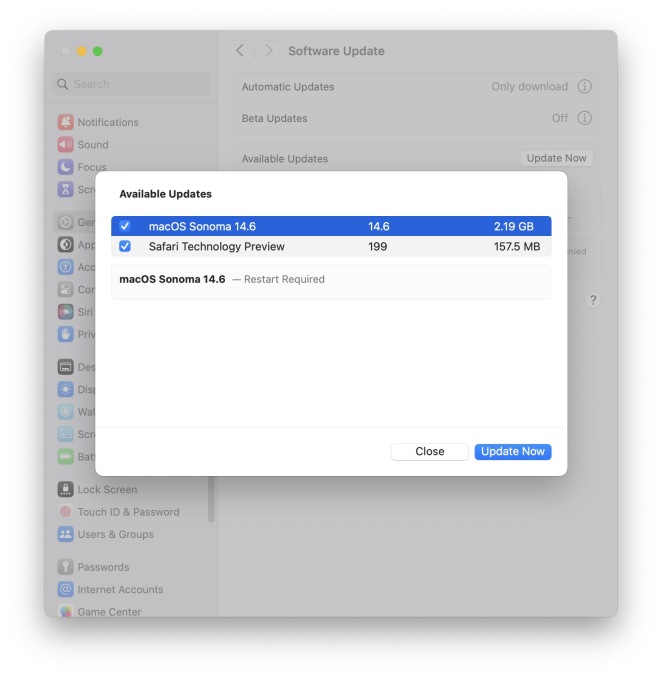 MacOS Sonoma 14.6 Update Released with Bug Fixes & Security UpdatesMay 13, 2025 am 10:20 AM
Apple has released macOS Sonoma 14.6 for Mac users running the Sonoma operating system. The MacOS Sonoma 14.6 software update primarily focuses on bug fixes and security updates for most Macs, however it does include a nice new feature specifically
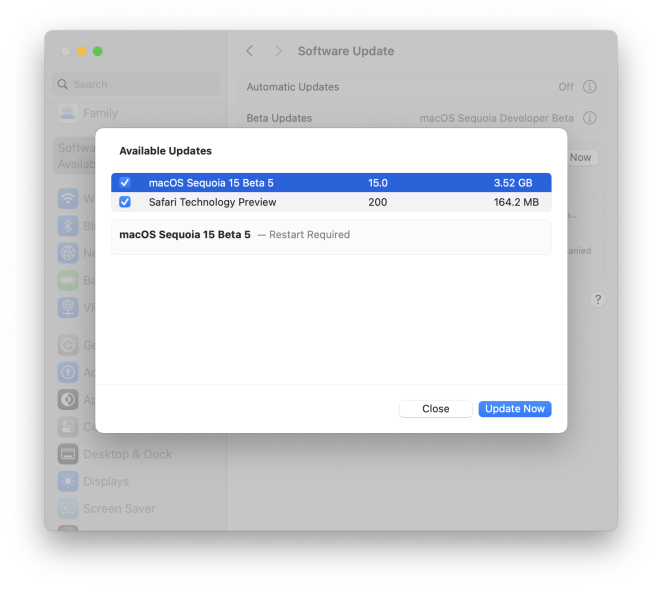 MacOS Sequoia 15 Beta 5 Available to DownloadMay 13, 2025 am 10:06 AM
MacOS Sequoia beta 5 is now available for users enrolled in the developer beta testing program to download and install onto their Macs. MacOS Sequoia beta 5 carries the build of 24A5309e, and usually a new developer beta build is soon followed by a m
 Beta 2 of iOS 18.1, MacOS Sequoia 15.1, & iPadOS 18.1 Released with Apple IntelligenceMay 13, 2025 am 09:49 AM
Apple has released the second beta of iOS 18.1, iPadOS 18.1, and MacOS Sequoia 15.1, each with support for Apple Intelligence AI features, on supported devices anyway. The release of these new beta updates is unusual in that they’re concurrent wit
 How to Uninstall VMWare Fusion on MacMay 13, 2025 am 09:44 AM
You might be aware that VMWare Fusion Pro is now free to download and install, and perhaps you installed it on a Mac to test virtual machines or to play around with, and now you’ve decided you no longer need VMware on the Mac. But VMware Fusion P


Hot AI Tools

Undresser.AI Undress
AI-powered app for creating realistic nude photos

AI Clothes Remover
Online AI tool for removing clothes from photos.

Undress AI Tool
Undress images for free

Clothoff.io
AI clothes remover

Video Face Swap
Swap faces in any video effortlessly with our completely free AI face swap tool!

Hot Article
Hot Tools

SublimeText3 English version
Recommended: Win version, supports code prompts!

EditPlus Chinese cracked version
Small size, syntax highlighting, does not support code prompt function

VSCode Windows 64-bit Download
A free and powerful IDE editor launched by Microsoft

Dreamweaver Mac version
Visual web development tools

Atom editor mac version download
The most popular open source editor

