

Quick start USB disk installation system tutorial win7

php editor Xigua brings you an introduction to the quick-start U disk installation system tutorial Win7. In this article, we will introduce in detail how to use a USB flash drive to quickly install the Windows 7 operating system. With simple steps, you can easily install the system on your computer and avoid the tedious CD installation process. There is no need to worry about technical difficulties, just follow the step-by-step tutorial and you will be able to quickly set up your own Win7 system. Let’s take a look!
Looking at people’s faces, it’s better to learn a trick yourself.
Last time I illustrated the installation of a new Windows 10 system. If you read it completely, today's installation of the Windows 7 system should be less difficult.
There are two reasons for redoing the system:
1. The system is normal, but it takes too long. I personally feel that the system is slowing down, and I would be worried if I don’t do it;
2. The system is completely down and cannot enter the desktop, so I have to do the system operation.
If it is the first case, back up the desktop and C drive data to other drives, just format the C drive and keep the D drive and other drives, so that the data will not be affected.
If you cannot enter the system desktop to back up data, export the data first and then redo the system.
Are you a little boring? Don’t fall asleep. I’m giving you a high-definition mobile phone wallpaper to cheer you up!

There are two ways to redo the system:
1. Use the official tool "RefreshWindowsTool"
Advantages: Official system, pure and without implants.
Disadvantages: Desktop and C drive data cannot be exported, and it is difficult for novices to operate.
2. Using the PE system
Advantages: simple operation, easy to export data, and a variety of tools available.
Disadvantages: None.
Let’s talk about it in three steps: preparation, installation process, system optimization
1. Preparation
If a worker wants to do his job well, he must first sharpen his tools and do the system , the most taboo thing is to be anxious. If you are anxious, you will easily make mistakes. If you make mistakes, you will lose the information, and then you can only look at each other with tears.
The reason why I emphasize this sentence is because when I was in the system stage before, I cried just talking about it.

Preparation materials: official windows7 system image, bootable USB disk, and necessary software;
Let me talk about a few doubts in advance.
Doubt 1: The win7 system image must be the official original version
Where can I find the official system image? Ask Du Niang "I tell you", the first one is.
I have seen many people looking for system images and looking for them directly on Du Niang. What they download is either a ghost version or a system that has been modified twice. Most of these system images have been planted. Adware or Trojan viruses are included. There are truly pure versions, but they are rare.
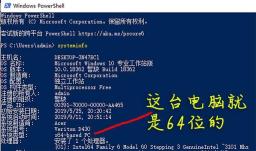
Doubt 2: 32-bit CPU uses 32-bit system, 64-bit CPU uses 64-bit system
How to determine whether your processor is 32-bit or 64-bit? Open the cmd window, enter systeminfo and press Enter, find the "System Type" item. For example, if my computer is 64-bit, then I should install a 64-bit system on my computer.
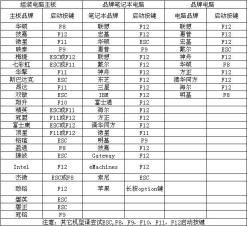
Doubt 3: It is recommended to use AHCI for the hard disk mode of win7 system
Why should we use AHCI?
The hard disk mode is divided into AHCI and IDE (some computer motherboards display Compatible, not IDE).
IDE is an early hard disk mode with good compatibility and is suitable for systems before XP.
AHCI is a relatively new hard disk mode, which can greatly increase the speed of the hard disk and is suitable for systems after win7. Only use IDE unless various special factors prevent installation under AHCI.
How to find AHCI mode on the motherboard?
The screenshot of my computer is as follows. The AHCI position of other brands of motherboards is different. Please ask Yu Duniang.

Start the U disk, I have posted it separately before: 10 minutes to teach you how to make a U disk into a boot disk, detailed tutorial with pictures and text
Must-have software, I have posted it separately before I said in the post: Before redoing the system, what necessary software should be stored in the USB flash drive to start?
2. Installation process
The installation process is more words than pictures!
1. Insert the boot USB flash drive into the computer to turn it on, and press F12 wildly. The keys are different for each brand, so please check the correct one.
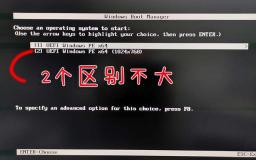
2. In the shortcut menu, find your own USB flash drive, antique machine Select Legacy, and select UEFI boot for new models

3. The resolution is different, but there is no other difference
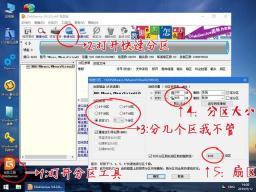
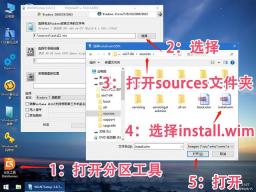
4. Enter the pe system and open the partition tool.
I emphasize again that if your D drive and E drive have data, then you only need to format the C drive and never format the D drive or E drive.
If there is no data or it is a new hard drive, it is recommended to repartition it all and clean the hard drive.
The picture below is formatting only the C drive

The picture below shows all formatting
If it is a 128G solid state drive, it is recommended to use it as C drive, no partitioning is necessary.
Difficulty points:
a. There is a common misunderstanding. Some people like to divide it into many areas, such as software area, photo area, work area, movie area, etc. In fact, having too many partitions is not good. Why? Fewer partitions, faster hard drive speed, and better hard drive life.
b. There is another misunderstanding. Many people like to install software on the D drive. Wrong, the software is installed on the C drive and runs faster (although the difference is so small that you can’t feel it).
c. For the sectors marked 5 in the picture above, select 4096 sectors for the solid-state drive, which means aligning to 4K. Otherwise, the performance and life of the solid-state drive will be affected. Mechanical hard drive selection 2048. (Experts are controversial on this point and will not discuss it)
5. After dividing the partitions, my personal habit is to put the system image in the U disk to the D disk, because when writing data, the hard disk is faster than the U disk. It's much faster.
6. Open the windows installer and find the image file you just copied into the D drive.
7. Select the system installation location and boot location, and select the version.
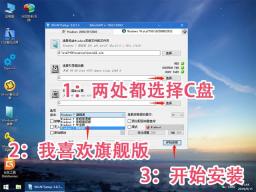
8. Keep the parameters in the pop-up window as default, OK.
9. Wait for 1 to 2 minutes.
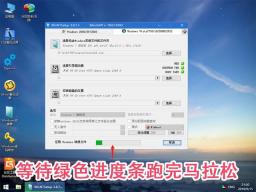
10. After the green progress bar runs out, restart for the first time.

11. After restarting, wait a moment.

12. Data is being written to the C drive. After writing, it will restart for the second time.

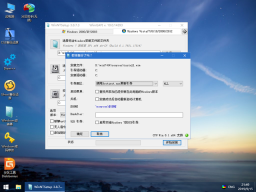
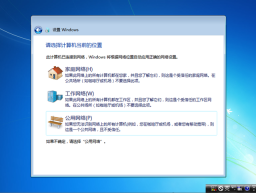
13. After restarting, enter this screen, keep the parameters as default, and go to the next step.

14. Choose a username based on your personal interests.

15. Whether to set a password depends on personal needs.

16. If you have the key, enter it. Most of them should not, so skip it.

17. Who will read the terms and accept them?

18. Choose recommendation.

19. As long as the bios battery is charged, the time will be correct and the next step will be the default.

Doubtful point: bios battery, commonly known as button battery, can be used for 2-3 years. Its main function is to record time and save BIOS settings. If the battery is out of power, the most obvious symptom is that the time in the lower right corner of the computer returns to 2002 or other times (when the motherboard came out). A button battery costs 50 cents. Now the price has increased, and it costs an ocean. The bios battery looks like this:

20. The meaning is very clear, choose according to the situation.
21. Finally entered the desktop.

22. The system is ready, but why are there no commonly used icons on the desktop?
The official original system is just like this. There is only one recycle bin on the desktop, which is very clean.
How to bring up desktop icons:

23. At this point, the new official Windows 7 system is installed.

3. System Optimization
After the new system installation is completed, do not rush to install various software, you must do these things
1. Install the system driver
Method a. Enter the official website, technical support page, and download the official driver.
Method b. Install the driver wizard or driver life, and use the software to drive, which is more intuitive and convenient.
2. Install anti-virus software
Free personal recommendation Tinder, small size and fast. Refuse all kinds of housekeepers, and use the whole family to do it.
4. This is something that suddenly occurred to me
It is strongly recommended that you transfer the desktop, my pictures, my documents, and favorites folders to the D drive, so that once the system If the system crashes due to an unexpected situation, you don’t have to worry about losing the desktop data due to the manual operation of the system.
Take transferring the desktop folder as an example. The method is as follows:
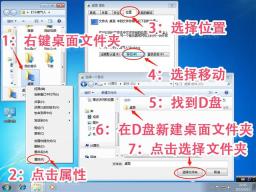
After selecting the new desktop location, you can see that the old desktop location has been migrated from the C drive to the D drive

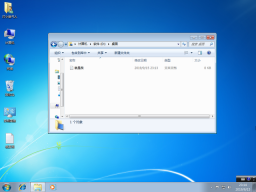
To experiment, I created a notepad on the desktop, which has been synchronized to the new desktop folder on the D drive.
Favorites, my pictures, my Documentation, migration method is the same.
Okay, the official original new installation method of Windows 7 system is like this. I must mention that since there are many brands of machines and the assembly of machines is more complicated, I may deviate from yours in a few places. , if you have any questions, please leave a message with a picture and I will try my best to reply.
The next section will describe how to upgrade win7 to win10, and how to downgrade to win7 if you are not used to win10.
Finally attached is a beautiful high-definition wallpaper

The above is the detailed content of Quick start USB disk installation system tutorial win7. For more information, please follow other related articles on the PHP Chinese website!

 Top 8 Fixes for Hogwarts Legacy Stuck on Loading ScreenApr 21, 2025 am 12:50 AM
Hogwarts Legacy is one of the hottest role-play adventure game that is based on Harry Potter. If you are bothered by Hogwarts Legacy stuck on loading screen at the moment, then this guide on php.cn Website is for you!
 192.168.12.1 – Admin Login & Change Password & Fix Login Issues - MiniToolApr 21, 2025 am 12:49 AM
What is 192.168.12.1? How to log into 192.168.12.1 admin smoothly? If you want to know these answers, read this post now! This post from php.cn shows you the detailed steps for performing the 192.168.49.1 login process.
 How to Add Fonts to Google Docs? 2 Ways for You to Try! - MiniToolApr 21, 2025 am 12:48 AM
If you want to figure out a way to add creative-looking fonts to your Google documents, you are in the right place. In this post, php.cn guides you on how to add fonts to Google Docs in 2 ways. Move to the next parts to find what you are looking for.
 How to Extract Multiple ZIP Files at Once? - MiniToolApr 21, 2025 am 12:47 AM
Can you unzip multiple files at once to save time? With the help of a special unzip tool, you can do this. In this post, php.cn Software will show you how to extract multiple zip files at once using different tools. Besides, if you want to recover lo
 News And Interests Taking up Memory? Fix It Now! - MiniToolApr 21, 2025 am 12:46 AM
News and Interests can provide you with the latest information or events on sports, entertainment, finance, weather and more. However, if there are too many items in this feature, it will take up many resources hence influencing your computer perform
 How to Uninstall Parallels on Mac? Try Two Ways to Remove It! - MiniToolApr 21, 2025 am 12:45 AM
How to uninstall Parallels Mac? If you wonder about this question, you come to the right place. In this post, php.cn will give you 2 ways to completely uninstall Parallels on Mac, including the Parallels Desktop for Mac app itself and the created vir
 How to Remove Microsoft Office Error Code 30088-26 or 30010-45? - MiniToolApr 21, 2025 am 12:43 AM
Do you receive error code 30088-26 or 30010-45 when attempting to install or update Microsoft Office? If yes, this post on php.cn Website will show you how to get rid of them step by step.
 JunkCtrl Helps to Remove Stock Apps to Debloat Windows 11 - MiniToolApr 21, 2025 am 12:42 AM
What is JunkCtrl for Windows 11? How to run this debloater to remove Windows 11 stock apps or pre-installed apps? In this post, php.cn guides you through many details about the open-source Windows 11 bloatware removal tool JunkCtrl. Let’s get started


Hot AI Tools

Undresser.AI Undress
AI-powered app for creating realistic nude photos

AI Clothes Remover
Online AI tool for removing clothes from photos.

Undress AI Tool
Undress images for free

Clothoff.io
AI clothes remover

Video Face Swap
Swap faces in any video effortlessly with our completely free AI face swap tool!

Hot Article
Hot Tools

MinGW - Minimalist GNU for Windows
This project is in the process of being migrated to osdn.net/projects/mingw, you can continue to follow us there. MinGW: A native Windows port of the GNU Compiler Collection (GCC), freely distributable import libraries and header files for building native Windows applications; includes extensions to the MSVC runtime to support C99 functionality. All MinGW software can run on 64-bit Windows platforms.

SublimeText3 English version
Recommended: Win version, supports code prompts!

SublimeText3 Chinese version
Chinese version, very easy to use

VSCode Windows 64-bit Download
A free and powerful IDE editor launched by Microsoft

DVWA
Damn Vulnerable Web App (DVWA) is a PHP/MySQL web application that is very vulnerable. Its main goals are to be an aid for security professionals to test their skills and tools in a legal environment, to help web developers better understand the process of securing web applications, and to help teachers/students teach/learn in a classroom environment Web application security. The goal of DVWA is to practice some of the most common web vulnerabilities through a simple and straightforward interface, with varying degrees of difficulty. Please note that this software

