Home >Web Front-end >H5 Tutorial >HTML5 learning while playing (3) Pixels and colors _html5 tutorial skills
HTML5 learning while playing (3) Pixels and colors _html5 tutorial skills
- WBOYWBOYWBOYWBOYWBOYWBOYWBOYWBOYWBOYWBOYWBOYWBOYWBOriginal
- 2016-05-16 15:51:161714browse
1. Understanding Color
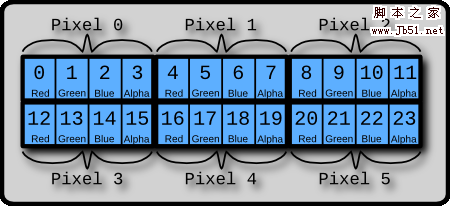
We can see colorful images on the computer screen. In fact, these images are composed of pixels. So what are pixels? What is the color? (If you ask these two questions, you must be a person who loves thinking) A pixel actually corresponds to a set of consecutive binary bits in memory. Since it is a binary bit, the value of each bit can of course only be 0 or 1 already! In this way, this set of consecutive binary bits can be combined into many situations by 0 and 1, and each combination determines a color of the pixel. Take a look at the picture below
Statement: This article is an original article and the author reserves all rights! Reprinting is welcome, please indicate the author Zuo Yu and the source Blog Garden

We can see that this picture describes six pixels and is composed of a total of 24 small boxes.
Note: The small box in the picture represents a byte , which is 8 binary bits.
Therefore, each pixel consists of four bytes . The meaning of these four bytes is also marked in the picture:
The first byte determines the red value of the pixel
The second byte determines the green value of the pixel
The third byte determines the blue value of the pixel
The fourth byte determines the transparency value of the pixel
The size of each color value is from 0 to 255 (question: why can it only go to 255?). The value of transparency: 0 represents completely transparent, 255 represents completely opaque
In this way, we can use (255, 0, 0, 255) to represent a pure red pixel
In memory, it is a 32-bit string like this: 11111111 00000000 00000000 11111111
2. Manipulate pixels
Understanding the essence of colors and pixels, we can perform more complex processing on graphics.
However, HTML5 currently does not provide methods to directly manipulate pixels like setPixel or getPixel, but we also have ways
Just use the ImageData object:
ImageData object is used to save image pixel values. It has three attributes: width, height and data. The data attribute is a continuous array. All pixel values of the image are actually stored in data.
The data attribute stores pixel values in exactly the same way we saw in the previous image:
imageData.data[index*4 0]
imageData.data[index*4 1]
imageData.data[index*4 2]
imageData.data[index*4 3]
The above takes out the four consecutive adjacent values in the data array. These four values respectively represent the index 1 pixel.
Note: index starts from 0, there are a total of width * height pixels in the image, and a total of width * height * 4 values are saved in the array
Context object Context has three methods for creating, reading and setting ImageData objects, they are
createImageData
(width, height): Create an ImageData object (i.e. pixel array) of a specified size in memory. The pixels in the object are all black and transparent, i.e. rgba(0,0, 0,0)getImageData
(x, y, width, height): Returns an ImageData object. This IamgeData object contains the pixel array of the specified areaputImageData
(data, x, y): Draw the ImageData object to the specified area of the screen
3. A simple image processing example
Having said so much, we use the knowledge we have to play with image programming. Maybe one day we will play PhotoShop in Chrome.
The program probably looks like this:1. Draw an image onto a canvas element. In order not to cause a security error (Security_ERR:DOM EXCEPTION 18), I use the banner background image at the top of my blog. If you want to run this example, you may need to change it to your own image
2、有四个滑动条,分别代表 GRBA 四个分量
3、拖动滑动条,图像中对应的颜色分量就会增加或者减少
4、如果图像变成透明,就会显示 canvas 元素的背景,我把这个背景设置成了我的头像,呵呵。
思路:其实就是用 getImageData 方法,将你想改变的那一块区域的像素数组取出来,然后根据你拖动的滑动条和滑动条的数值,来更改那一块区域里所有像素对应颜色分量的值。处理完毕后再用 putImageData 方法绘制到画布上,就是这么简单。
下面是代码:
简单的图像处理
红色:
绿色:
蓝色:
透明:
演示效果:
提示:您可以先修改部分代码再运行
四、绘制随机颜色的点
这个例子是在画布上随机选择一个点,然后再给他一个随机的颜色值,其实用到的方法和上面的例子大同小异,就是需求不同罢了。
下面是代码和程序实例:
随机颜色的点
演示效果:
提示:您可以先修改部分代码再运行
Related articles
See more- AlloyTouch full-screen scrolling plug-in creates a smooth H5 page in 30 seconds
- HTML5 actual combat and analysis of touch events (touchstart, touchmove and touchend)
- Detailed explanation of image drawing examples in HTML5 canvas 9
- Regular expressions and new HTML5 elements
- How to combine NodeJS and HTML5 to drag and drop multiple files to upload to the server

