
 Computer TutorialsComputer KnowledgeHow to adjust virtual memory in win11 system? Win11 system virtual memory setting guide
How to adjust virtual memory in win11 system? Win11 system virtual memory setting guide

php editor Xinyi introduces you to the operation tutorial on how to set up virtual memory in Win11 system. Virtual memory plays an important role in computers and can improve system performance and stability. Setting up virtual memory allows you to better manage your computer's memory resources and avoid running out of memory. In Win11 system, setting up virtual memory is very simple, just follow the steps below. By setting the appropriate virtual memory size, you can optimize system performance and enhance your computing experience. Next, let’s take a look at the specific setting methods!
How to set virtual memory in win11
1. First, press the win button on the keyboard, click to find and enter the setting page.

#2. Then, select the About option under System Settings on the right.

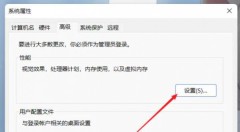
#3. Then, find the advanced system setting options in the relevant links.

#4. Then click the Settings button in the performance area of the current page.
5. In the page after the jump, find the virtual memory and click the change button.

The above is the detailed content of How to adjust virtual memory in win11 system? Win11 system virtual memory setting guide. For more information, please follow other related articles on the PHP Chinese website!

 Must-Know Fixes - Cannot Type Password on the Login ScreenApr 24, 2025 am 12:50 AM
Unable to type password at login screen Windows 7/8/10/11? Why does this issue occur? What should you do when you cannot type password on the login screen? This post from php.cn provides you with several feasible solutions to this matter.
![[Solved] macOS Cannot Verify That This App Is Free from Malware - MiniTool](https://img.php.cn/upload/article/001/242/473/174542694917149.png?x-oss-process=image/resize,p_40) [Solved] macOS Cannot Verify That This App Is Free from Malware - MiniToolApr 24, 2025 am 12:49 AM
[Solved] macOS Cannot Verify That This App Is Free from Malware - MiniToolApr 24, 2025 am 12:49 AMHave you encountered the “macOS cannot verify that this app is free from malware” notification when running apps on Mac? This post from php.cn shows you how to solve this problem.
 3 Targeted Solutions for Error Code 2000-0415 on DellApr 24, 2025 am 12:48 AM
Error code 2000-0415 is a small issue that is connected to some specific cables of your computer. It is pretty common in Dell devices. If you receive this error at the moment, the tips and tricks of this post on php.cn Website will be helpful to you.
 Computer Freezes But Mouse Still Moves - Results-Driven MethodsApr 24, 2025 am 12:47 AM
Have you ever encountered a situation where the computer freezes but mouse still moves? Many people are troubled by this problem and they choose to forcefully shut down their computers. In fact, there are other methods that can help you solve this pr
 Windows 7 Ultimate SP1 Free Download and Install (32/64 Bits) - MiniToolApr 24, 2025 am 12:46 AM
Some users still use the Windows 7 edition and they want to download Windows 7 Ultimate SP1. However, they don’t know where to find the ISO file. Don’t worry! This post from php.cn tells you how to free download and install Windows 7 Ultimate SP1.
 Is Your Spectrum DVR Not Working? Try These Fixes! - MiniToolApr 24, 2025 am 12:45 AM
What will you do if there is a conflict between your favourite TV shows and work appointments? Spectrum DVR can help you out! It allows you to record your favourite games or TV shows and watch them whenever you want. If you are plagued by Spectrum DV
 How to Enable Selection Checkboxes in File Explorer Windows 10 - MiniToolApr 24, 2025 am 12:44 AM
Do you have any idea how to show or remove checkboxes in File Explorer? If not, you’ve come to the right place. This paper on php.cn shows you a couple of feasible ways to enable selection checkboxes in File Explorer.
 5 Fixes for VSS Error 0x800423F4 When Backup in Win10/11Apr 24, 2025 am 12:43 AM
VSS error 0x800423F4 happens when creating a system image on Windows 11/10. If you are plagued by this annoying issue, follow the fixes collected by php.cn to root out it. Besides, professional Windows backup software like php.cn ShadowMaker is intro


Hot AI Tools

Undresser.AI Undress
AI-powered app for creating realistic nude photos

AI Clothes Remover
Online AI tool for removing clothes from photos.

Undress AI Tool
Undress images for free

Clothoff.io
AI clothes remover

Video Face Swap
Swap faces in any video effortlessly with our completely free AI face swap tool!

Hot Article
Hot Tools

VSCode Windows 64-bit Download
A free and powerful IDE editor launched by Microsoft

Atom editor mac version download
The most popular open source editor

EditPlus Chinese cracked version
Small size, syntax highlighting, does not support code prompt function

Dreamweaver CS6
Visual web development tools

SublimeText3 English version
Recommended: Win version, supports code prompts!

