

 Computer TutorialsTroubleshootingHow to correctly set the BIOS boot sequence of Gigabyte B85 motherboard?
php editor Banana brings you the answer to correctly start the BIOS settings of Gigabyte B85 motherboard. As an important part of computer hardware, motherboard BIOS settings are crucial to the normal startup of the computer. When using the Gigabyte B85 motherboard, correctly setting the BIOS can ensure system stability and performance. This article will introduce you how to correctly set the BIOS of your Gigabyte B85 motherboard to ensure that your computer can start smoothly and achieve optimal performance.

Gigabyte b85 motherboard bios settings start correctly?
The Gigabyte b85 motherboard sets up the solid state drive to boot through the BIOS. For computers with the Gigabyte b85 motherboard, press the del key after turning on the computer, enter the BIOS, select the boot option, and select the first boot disk drop-down list. SSD or other startup items, then save the settings and restart. When you turn on the computer, the computer will automatically find the SSD and set the UEFI boot mode through the SSD's boot and operating system.
Gigabyte b85 motherboard bios?
Answer: How to set uefi boot mode in Gigabyte b85 motherboard bios:
First method: Press the power button, immediately click the DEL key, enter the bios, click "BIOS Features" (Integrated External Set), click "boot option #1" (boot option #1), and set it to the required hard disk, U disk and other devices. Press F10 to save and exit.
Type 2: ①: Press the power button when the GIGABYTE LOGO appears. ②: Press the F12 key immediately to bring up the boot menu and select the required USB disk and other devices to start.
B85 motherboard bios is set to Chinese?
1. Turn on the computer and continuously click on the keyboard to enter the BIOS system settings. Each motherboard has different setting methods, but the methods are similar.
2. After entering, you will see the System option above, click it.
3. Then choose to find the System Language option through the down key on the keyboard, which is the "System Language Options".
4. You will find that English is displayed. After selecting, hit the Enter key to change it.
5. Then select the language you use, usually "Simplified Chinese".
6. Finally, we need to save our changes. Saving can be performed through the fast forward key F10, and the shortcut keys vary from computer to computer.
7. For most computers, when you press the ESC key to exit the BIOS setting interface, the system will prompt whether to save. At this time, select "Yes" to save the setting operation. In this way, when you enter the BIOS setting interface in the future, it will be in Chinese.
Asus b85 motherboard bios settings?
1. First, turn on the computer, keep pressing delete, enter the BIOS, and select the language setting here.
2. If there is no language setting, press f2 to enter the traditional BIOS settings.
3. Select system information.
4. Then select the language here, see English, and set it to Chinese.
5. If you want to save the setting status, click save exit.
6. Then select save&exit stup.
How to set the bios of Gigabyte b85 motherboard?
The Gigabyte b85 motherboard bios setting method is as follows
1. On the Gigabyte motherboard startup page, quickly press del to enter the bios.
2. After joining the interface, click on the second high-end function item and press Enter to enter the web page.
3. On the entry and exit page, everyone can enter the hard disk startup sequence option and press the Enter key to enter.
4. When you enter this web page, you can see the usb click option, which is the name of our USB disk.
5. When you use the keyboard buttons to move the mouse cursor into it, put it partially into the first part of the interface and successfully set it as the first startup item.
6. Finally, be sure to set F10 to save each changed setting. At this time, a dialog box will pop up to confirm the storage and withdrawal. You can press the Enter key.
How to upgrade the blos of Gigabyte b85m/d3v?
You can use Q-Flash in the BIOS to refresh:
1. First, put the prepared BIOS file to be refreshed into the root directory of the U disk, not into the folder. (Note that before refreshing, it is best to back up the existing BIOS). The file system of the U disk is FAT32.
2. Start the computer. Press "DEL" on the keyboard to enter the BIOS main interface. Press F8 in the main interface to enter the Q-FLASH refresh program.
3. There are 2 options: Update BIOS from Drive - upgrade the motherboard BIOS from the device... Save BIOS to Drive - save the current BIOS file to the device... (You can back up and then refresh here)
4. After the backup is completed, directly select the first item "Update BIOS from Drive".
5. The two options after entering are: floppy drive and HDD. Now I am using a U disk, so I choose HDD directly here.
6. After entering the root directory of the U disk, move the cursor to find the BIOS file and confirm. Note that the BIOS file to be flashed should not be named in Chinese, otherwise it will appear garbled! !
7. You will then be asked if you are sure to upgrade the BIOS, just confirm.
8. Then Q-FLASH starts to upgrade the BIOS file, wait patiently for the program refresh to complete, and then press any key to continue.
9. You can then choose to restart or shut down. Note: After flashing, you need to enter the BIOS, press F7 to load the default settings, save and then restart.
Gigabyte b85g1b5 motherboard bios settings?
Motherboard BIOS settings are generally set according to personal needs and specific circumstances, but you need to pay attention to some basic matters. First, set the hard disk boot sequence in the BIOS to ensure that the system can start normally; second, set parameters such as CPU frequency, voltage, and temperature to improve system performance and stability; in addition, security settings, such as passwords, must be made. Protection, startup item restrictions, etc. to improve system security. It is worth noting that improper BIOS settings may cause the computer to fail to start or cause other problems, so be sure to operate with caution. If you need specific Gigabyte B85G1B5 motherboard BIOS setting operation procedures, you can refer to the official technical documentation or related video tutorials. You also need to pay attention to backing up important data when operating to avoid data loss due to incorrect settings.
Flash bios on Gigabyte b85-hd3?
How to flash the BIOS of Gigabyte b85-hd3 motherboard,
1. Download the matching BIOS file, you can see three files, among which the one with b85 is the correct master and BIOS program.
2. Turn on the computer and start F12 PE. Here we take Laomaotao as an example.
3. Enter the Max Dos toolbox and enter the latest version of the tool.
4. Select pure DOS mode to enter.
5. Enter the C drive, and then enter to display the files in the drive.
6. Enter the backup BIOS program.
7. Enter the batch file and refresh the BIOS directly.
8. Enter the refresh interface and automatically refresh. After the refresh is completed, the device will automatically restart several times, so there is no need to worry.
9. Remove the PE disk and enter BIOS/system normally.
The above is the detailed content of How to correctly set the BIOS boot sequence of Gigabyte B85 motherboard?. For more information, please follow other related articles on the PHP Chinese website!

 Neighbors: Suburban Warfare Black Screen? 4 Fixes HereApr 22, 2025 pm 10:01 PM
Neighbors: Suburban Warfare Black Screen Problem Solving Guide Neighbor: The suburban war game unexpectedly had a black screen problem, resulting in the inability to enter the game? don’t worry! This blog post by MiniTool will provide four effective ways to solve the problem of black screen in Neighbors: Suburban Warfare. Quick navigation: Neighbors: Suburban war black screen Method 1: Run the game as an administrator Method 2: Reinstall Easy Anti-Cheat Method 3: Update the graphics card driver Method 4: Reinstall the game Conclusion Neighbors: Suburban war black screen Newly released games often encounter various problems, Neighbors: Subu
 Works 100%: Recover FL Studio Files (Unsaved & Deleted) EasilyApr 22, 2025 pm 08:01 PM
Recover Lost FL Studio Projects: A Step-by-Step Guide Losing your FL Studio project can be devastating. This guide provides solutions for recovering both unsaved and deleted FL Studio (.flp) files on Windows. Recovering Unsaved FL Studio Files Metho
 How to fix OneDrive error code 0x8004e4be in Windows?Apr 22, 2025 pm 08:00 PM
OneDrive is the native cloud product of Microsoft which allows users to store files, sync them on devices, and access them from anywhere. It is the basic file m
 What if KB5055683 Fails to Install? Here Are Some FixesApr 21, 2025 pm 08:03 PM
The KB5055683 cumulative update is designed to improve the quality and reliability of .NET Framework 3.5, 4.8 and 4.8.1 in Windows 10 systems. If you encounter the failure of KB5055683 installation, how to solve it? This article will provide effective solutions. Windows 10 KB5055683 Update KB5055683 is a cumulative update for .NET Framework 3.5, 4.8 and 4.8.1 for Windows 10 22H2 versions, released on April 8, 2025. This update contains all security improvements from previous versions, but no new security improvements were added. It is recommended that you download and install KB50 as soon as possible
 Fresh Guide! Fix REMATCH A D3D12-compatible GPU ErrorApr 21, 2025 pm 08:01 PM
Encountering the REMATCH D3D12-compatible GPU error on Windows? This guide provides solutions to get you back in the game. REMATCH, a multiplayer online football game, requires a graphics card supporting DirectX 12 (Feature Level 12.0, Shader Model
 Clone a Hard Drive Without OS, Watch Pro Guide with Easy StepsApr 21, 2025 am 10:24 AM
This guide shows you how to clone a hard drive even if your Windows system won't boot. MiniTool ShadowMaker simplifies this process. Windows boot failures are common, caused by issues like corrupted system files or MBR errors. Cloning your hard dri
 League of Legends Play Button Not Working on PC: ResolvedApr 21, 2025 am 10:09 AM
The League of Legends game buttons do not work properly, resulting in the inability to enter the game? don’t worry! This guide will guide you to solve this problem quickly and effectively, allowing you to easily resume the game. Just follow the steps below to quickly resolve the game button issue! Quick navigation: League of Legends game buttons don't work How to fix League of Legends game buttons not working on PC Summarize League of Legends game buttons don't work As a MOBA game, League of Legends continues to attract global players and has a huge and stable player group. To enhance the gaming experience, Riot Games regularly releases updates to introduce new content, but this doesn't always go smoothly. Sometimes, some accidental technical failures may occur after a new update, such as League of Legends games
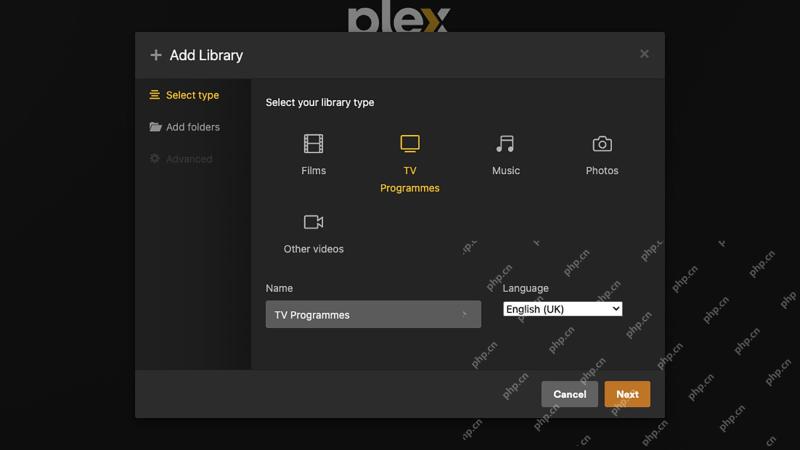 How to use Plex to create your own private Netflix or SpotifyApr 20, 2025 am 10:13 AM
Build Your Own Streaming Service with Plex: A Step-by-Step Guide We're accustomed to on-demand content at our fingertips, thanks to services like Netflix and Spotify. However, building a personal media library offers unique advantages: ownership and


Hot AI Tools

Undresser.AI Undress
AI-powered app for creating realistic nude photos

AI Clothes Remover
Online AI tool for removing clothes from photos.

Undress AI Tool
Undress images for free

Clothoff.io
AI clothes remover

Video Face Swap
Swap faces in any video effortlessly with our completely free AI face swap tool!

Hot Article
Hot Tools

SAP NetWeaver Server Adapter for Eclipse
Integrate Eclipse with SAP NetWeaver application server.

VSCode Windows 64-bit Download
A free and powerful IDE editor launched by Microsoft

SecLists
SecLists is the ultimate security tester's companion. It is a collection of various types of lists that are frequently used during security assessments, all in one place. SecLists helps make security testing more efficient and productive by conveniently providing all the lists a security tester might need. List types include usernames, passwords, URLs, fuzzing payloads, sensitive data patterns, web shells, and more. The tester can simply pull this repository onto a new test machine and he will have access to every type of list he needs.

Notepad++7.3.1
Easy-to-use and free code editor

Safe Exam Browser
Safe Exam Browser is a secure browser environment for taking online exams securely. This software turns any computer into a secure workstation. It controls access to any utility and prevents students from using unauthorized resources.

