
Home >Web Front-end >H5 Tutorial >Introduction to SVG 2D in HTML5 10—Definition and use of filters_html5 tutorial skills
Introduction to SVG 2D in HTML5 10—Definition and use of filters_html5 tutorial skills

- WBOYWBOYWBOYWBOYWBOYWBOYWBOYWBOYWBOYWBOYWBOYWBOYWBOriginal
- 2016-05-16 15:50:101524browse
Filters are the most powerful function of SVG. They allow you to add various filter effects to graphics (graphic elements and container elements) that are only available in professional software. This way you can easily generate and modify images on the client side. Moreover, the filter does not destroy the structure of the original document, so the maintainability is also very good.
Filters are defined with the filter element: When you need to use it, add the filter attribute to the graphics or container that requires the filter effect, and just reference the relevant filter.
The filter element contains a number of filter atomic operations; each atomic operation performs a basic graphics operation on the passed object and produces graphics output. The result generated by most atomic operations is basically an RGBA image. The input to each atomic operation can be either the source graph or the result of other atomic operations. Therefore, the process of referencing the filter effect is to apply the relevant filter atomic operation on the source graphic, and finally generate a new graphic and render it.
When using the filter attribute on a container (such as the g element), the filter effect will be applied to all elements in the container. However, the elements in the container will not be rendered directly to the screen, but will be temporarily stored. Then, the graphics command will be executed as part of the process of processing the referenced filter element, and only then will it be rendered. This is specified using SourceGraphic and SourceAlpha. The third case in the second example below demonstrates this effect.
Some filter effects will generate some undefined pixels, which will be processed into transparent effects.
Let’s look at an example first:
xmlns="http://www.w3.org/2000/svg" version="1.1">
result="specOut"> ;
< g fill="#FFFFFF" stroke="black" font-size="45" font-family="Verdana" >
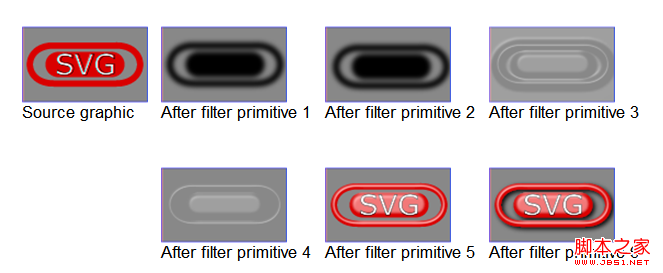
The effect of this example running on FireFox is the result of the last picture:
Note: There may be some differences in other browsers.
This filter uses 6 effects, in order (the single-step effect picture is shown above:):
feGaussianBlur: This step is to perform Gaussian blur processing; the input of this special effect is the transparency value of the source image. The output is stored in the temporary buffer blur. The blur value serves as the input for feOffset and feSpecularLighting below.
feOffset: This step is to translate the image some positions; the input of this special effect is the blur generated in the previous step, generating a new cache offsetBlur.
feSpecularLighting: This step is to process the light on the surface of the picture. The input is the blur generated in the first step, and the output is stored in the new cache specOut.
FeComposite twice: These two steps are to combine different cache layers.
feMerge: This step is to merge different layers. This step is usually the last step, merging the cached layers to generate the final image and rendering it. Although this step can also be completed using multiple feComposite special effects, it is still inconvenient after all.
filter element and filter effect area
The filter effect area refers to the area where the filter effect works. The size of this area is defined by the following attributes of the filter element:
filterUnits = "userSpaceOnUse | objectBoundingBox"
This attribute defines the coordinate space used by x, y, width and height. Like other Unit-related properties, this property also has two values: userSpaceOnUse and objectBoundingBox (default value).
userSpaceOnUse means using the user coordinate system of the element that references the filter element.
objectBoundingBox means using the percentage of the bounding box of the element that references the filter element as the value range.
x,y,width,height
These properties define the rectangular area in which the filter acts. The filter effect will not be applied beyond this area. The default values of x and y are -10%, and the default values of width and height are 120%.
filterRes
This attribute defines the size of the intermediate cache area, so it also defines the quality of the cached image. Normally, there is no need to provide this value, the browser will choose the appropriate value itself. Usually, the filter effect area should be defined so that it corresponds exactly point to point with the background, which will bring certain efficiency advantages.
In addition to these attributes, the following attributes of the filter element are also important:
primitiveUnits = "userSpaceOnUse | objectBoundingBox"
This attribute defines the coordinate space used for coordinates and lengths in each atomic operation , the value of this attribute is still userSpaceOnUse and objectBoundingBox. But the default value is userSpaceOnUse.
xlink:href = "
This attribute is used to reference other filter elements in the current filter element.
It is worth noting that the filter element will only inherit the attributes of its own parent node, and will not inherit the attributes of the element that references the filter element.
Filter Overview
The atomic operations of various filters will not be described in detail. You can check the official documentation when needed. Let’s take a look at what these operations have in common. In addition to the "in" attribute, the following other attributes are available to all atomic operations.
x,y,width,height
Not much to say about these attributes, it defines the area where the filter atoms work, it might as well be called the "filter mirror area". These attributes are limited by the scope of the filter element. By default, the values are 0, 0, 100%, and 100% respectively. The action area of these atoms exceeds the action area of the filter element and has no effect.
result
stores the result of this step of operation. After specifying result, other subsequent operations on the same filter element can use in to specify it as input. You can see this by looking at the example above. If this value is omitted, it can only be used as an implicit input for the next operation. Note that if the input for the next operation has been specified by in, the input specified by in will prevail.
in
represents the input of this step operation. If the in attribute is omitted, the result of the previous step will be used as the input of this step by default. If the in of the first step is omitted, "SourceGraphic" will be used as the value (see the description below). The in attribute can refer to the value stored in the previous result, or it can specify the following 6 special values : SourceGraphic: This value represents using the current graphic element as the input of the operation.
SourceAlpha: This value represents using the Alpha value of the current graphic element as the input of the operation.
BackgroundImage: This value represents using the current background screenshot as input to the operation.
BackgroundAlpha: This value represents using the Alpha value of the current background screenshot as the input of the operation.
FillPaint: This value uses the value of the fill attribute of the current graphic element as the input of the operation.
StrokePaint: This value uses the value of the stroke attribute of the current graphic element as the input to the operation.
Access background screenshot
Normally, we can directly use the background screenshot of the element that references the filter element as the source image of the filter effect. The values representing this input are BackgroundImage and BackgroundAlpha. The former contains color and Alpha values, and the latter contains only Alpha values. In order to support this usage, you also need to explicitly enable this feature on the element that references the filter element. This requires setting the enable-background attribute of the element.
enable-background = "accumulate | new [
The new value represents: Allow the child elements of the container to access the background screenshot of the container, and the child elements of the container will be rendered into the background and on the device.
accumulate is the default value, and its effect depends on the context: if the parent container element uses enable-background: new, then all graphic elements of the container will participate in the rendering of the background. Otherwise, it means that the parent container is not prepared to take background screenshots, and the graphic element display of this element is only displayed on the device.
The following example demonstrates the effect of these values:
xmlns="http://www.w3.org/2000/svg" version ="1.1">
< ;feGaussianBlur stdDeviation="8" />
The renderings are as follows (the first row is the final rendering, the second row is the filter effect):
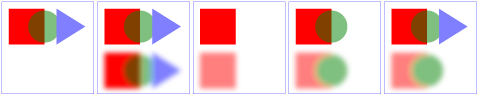
This example contains 5 parts :
1. The pictures in the first group do not use any filter effects.
2. The second group uses the same picture, but turns on the effect of using the background.
3. The third group uses the same image, but uses a filter effect in the inner container.
4. The fourth group uses filter effects on the elements of the content container.
5. The last group uses the same filter effect as the fourth group and the effect generated by merging the source images.
The concept of filters is actually very simple, but the code for each effect looks more complicated. In fact, it will be clear when we try it. However, since different browsers have different levels of support for SVG, the specific It’s better to try it yourself before using it.
Practical reference
Script index: http://msdn.microsoft.com/zh-cn/library/ff971910(v=vs.85).aspx
Development Center: https://developer.mozilla.org/en/SVG
Popular Reference: http://www.chinasvg.com/
Official Documentation: http://www.w3.org/TR/SVG11/
Related articles
See more- AlloyTouch full-screen scrolling plug-in creates a smooth H5 page in 30 seconds
- HTML5 actual combat and analysis of touch events (touchstart, touchmove and touchend)
- Detailed explanation of image drawing examples in HTML5 canvas 9
- Regular expressions and new HTML5 elements
- How to combine NodeJS and HTML5 to drag and drop multiple files to upload to the server