
 System TutorialLINUXCentOS dual network card internal and external network configuration route network card alias detailed explanation
CentOS dual network card internal and external network configuration route network card alias detailed explanation

Dual network card configuration: Add a network card in the virtual machine settings in host-only mode, and after restarting, set it in /etc/udev/rules.d/70-persistent-net.rule Generate a new MAC address, copy the network card eth0 to eth1, be careful to remove the UUID and modify the correct MAC address, modify the configuration file:
BOOTPROTO={static|none|dhcp|bootp}: To use a static address, use static or none; dhcp means using a DHCP server to obtain the address;
IPADDR=: IP address NETMASK=: Subnet mask GATEWAY=: Set the default gateway; two network cards can only set one gateway. The gateway is the gateway in the virtual machine-network editor. If you need to access the Internet, you also need Add DNS1=gateway on the external network eth0. Restart the network card service and you can access the Internet normally.
Network Configuration:
Network configuration file:/etc/sysconfig/network
Network interface configuration file: ifcfg-ethx
/etc/sysconfig/network-scripts/ifcfg-ethx
DEVICE=: The associated device name must be consistent with the second half of the file name "ethx";
BOOTPROTO={static|none|dhcp|bootp}: Boot protocol; to use a static address, use static or none; dhcp means using a DHCP server to obtain the address;
IPADDR=: IP address
NETMASK=:Subnet mask
GATEWAY=:Set the default gateway;
ONBOOT=: Whether to automatically activate this network interface when booting;
HWADDR=: Hardware address, must be consistent with the address in the hardware; can be omitted;
The modification will not take effect immediately, but will take effect if you restart the network service or host;
Add route:
Routing:/etc/sysconfig/network-scripts/route-ethX
Add format one: route-eth1
DEST via NEXTHOP
192.168.10.0 via 10.0.0.254
Add format two:
ADDRESS0=Network address
NETMASK0=Mask
GATEWAY0=Gateway
Add routing command route:
Routing: route add: Add [-host: host route, -net: network route, default: default]
route add -net|-host DEST【iP】 gw NEXTHOP【Gateway】
route add default gw NEXTHOP
del:Delete [-host, -net]
route del -net 10.0.0.0/8
route del -net 0.0.0.0
route del default
[The changes made will become invalid after restarting the network service or host;]
View:route -n: Display related information such as each host or port in numerical form
DNS serverThere is only one way to specify: /etc/resolv.conf
nameserver DNS_IP_1
nameserver DNS_IP_2
Specify local resolution: /etc/hosts: host IP host name host alias [172.16.0.1www.magedu.com www]
Iproute2 command [ifconfig old]
link: Network interface attributes, addr: protocol address, route: routing
link show [ip -slink show eth0] is equivalent to ifconfig eth0
set【ip link set DEV {up|down}】Start the network card
addr add【ip addr add ADDRESSdev DEV】Add IP to the network card device DEV
del【ip addr del ADDRESSdev DEV】delete protocol address
show【ip addr show dev DEV to PREFIX【Specify prefix】】
flush【ip addr flush dev DEV【eth0】 to PREFIX】Clear protocol address
Network card configuration alias:
Network devices can be aliased: ethX:X, eth0:0, eth0:1, ...
Configuration method: ifconfig ethX:X IP/NETMASK [Subnet Mask]
/etc/sysconfig/network-scripts/ifcfg-ethX:X
DEVICE=ethX:X [Non-primary addresses cannot be obtained dynamically using DHCP];
ip eth1, add an address 192.168.100.1
ip addr add 192.168.100.1/24 dev eth1 labeleth1:0 [There is an alias ipconfig displayed, check ip addr show]
ifconfigeth0:0 192.168.50.1 netmask 255.255.255.255 broadcast 192.168.50.1 [Alias complete configuration]
The above is the detailed content of CentOS dual network card internal and external network configuration route network card alias detailed explanation. For more information, please follow other related articles on the PHP Chinese website!

 How does performance differ between Linux and Windows for various tasks?May 14, 2025 am 12:03 AM
Linux performs well in servers and development environments, while Windows performs better in desktop and gaming. 1) Linux's file system performs well when dealing with large numbers of small files. 2) Linux performs excellently in high concurrency and high throughput network scenarios. 3) Linux memory management has more advantages in server environments. 4) Linux is efficient when executing command line and script tasks, while Windows performs better on graphical interfaces and multimedia applications.
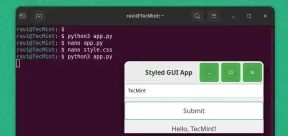 How to Create GUI Applications In Linux Using PyGObjectMay 13, 2025 am 11:09 AM
Creating graphical user interface (GUI) applications is a fantastic way to bring your ideas to life and make your programs more user-friendly. PyGObject is a Python library that allows developers to create GUI applications on Linux desktops using the
 How to Install LAMP Stack with PhpMyAdmin in Arch LinuxMay 13, 2025 am 11:01 AM
Arch Linux provides a flexible cutting-edge system environment and is a powerfully suited solution for developing web applications on small non-critical systems because is a completely open source and provides the latest up-to-date releases on kernel
 How to Install LEMP (Nginx, PHP, MariaDB) on Arch LinuxMay 13, 2025 am 10:43 AM
Due to its Rolling Release model which embraces cutting-edge software Arch Linux was not designed and developed to run as a server to provide reliable network services because it requires extra time for maintenance, constant upgrades, and sensible fi
![12 Must-Have Linux Console [Terminal] File Managers](https://img.php.cn/upload/article/001/242/473/174710245395762.png?x-oss-process=image/resize,p_40) 12 Must-Have Linux Console [Terminal] File ManagersMay 13, 2025 am 10:14 AM
12 Must-Have Linux Console [Terminal] File ManagersMay 13, 2025 am 10:14 AMLinux console file managers can be very helpful in day-to-day tasks, when managing files on a local machine, or when connected to a remote one. The visual console representation of the directory helps us quickly perform file/folder operations and sav
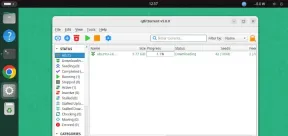 qBittorrent: A Powerful Open-Source BitTorrent ClientMay 13, 2025 am 10:12 AM
qBittorrent is a popular open-source BitTorrent client that allows users to download and share files over the internet. The latest version, qBittorrent 5.0, was released recently and comes packed with new features and improvements. This article will
 Setup Nginx Virtual Hosts, phpMyAdmin, and SSL on Arch LinuxMay 13, 2025 am 10:03 AM
The previous Arch Linux LEMP article just covered basic stuff, from installing network services (Nginx, PHP, MySQL, and PhpMyAdmin) and configuring minimal security required for MySQL server and PhpMyadmin. This topic is strictly related to the forme
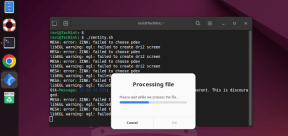 Zenity: Building GTK Dialogs in Shell ScriptsMay 13, 2025 am 09:38 AM
Zenity is a tool that allows you to create graphical dialog boxes in Linux using the command line. It uses GTK , a toolkit for creating graphical user interfaces (GUIs), making it easy to add visual elements to your scripts. Zenity can be extremely u


Hot AI Tools

Undresser.AI Undress
AI-powered app for creating realistic nude photos

AI Clothes Remover
Online AI tool for removing clothes from photos.

Undress AI Tool
Undress images for free

Clothoff.io
AI clothes remover

Video Face Swap
Swap faces in any video effortlessly with our completely free AI face swap tool!

Hot Article
Hot Tools

MinGW - Minimalist GNU for Windows
This project is in the process of being migrated to osdn.net/projects/mingw, you can continue to follow us there. MinGW: A native Windows port of the GNU Compiler Collection (GCC), freely distributable import libraries and header files for building native Windows applications; includes extensions to the MSVC runtime to support C99 functionality. All MinGW software can run on 64-bit Windows platforms.

SublimeText3 Chinese version
Chinese version, very easy to use

DVWA
Damn Vulnerable Web App (DVWA) is a PHP/MySQL web application that is very vulnerable. Its main goals are to be an aid for security professionals to test their skills and tools in a legal environment, to help web developers better understand the process of securing web applications, and to help teachers/students teach/learn in a classroom environment Web application security. The goal of DVWA is to practice some of the most common web vulnerabilities through a simple and straightforward interface, with varying degrees of difficulty. Please note that this software

Zend Studio 13.0.1
Powerful PHP integrated development environment

PhpStorm Mac version
The latest (2018.2.1) professional PHP integrated development tool

