

 Technology peripheralsAITeach you step by step how to build artificial intelligence network applications!
Teach you step by step how to build artificial intelligence network applications!

If you are like me, you will notice the explosion of artificial intelligence technology. It will disrupt not just software engineering, but every industry.
In this series, we'll learn how to integrate OpenAI's AI services into applications built with Qwik, a JavaScript framework focused on the concept of recoverability.
We'll get into the specifics of OpenAI and Qwik, but I'll focus mostly on general knowledge, tools, and implementations that should apply to whatever framework or toolchain you're using. We'll focus as closely as possible on the basics and I'll point out the unique parts of the application.
Preview:

##Preparation
Before we start building anything, we must meet several prerequisites. Qwik is a JavaScript framework, so we have to install Node.js (and NPM). You can download the latest version, but anything higher than v16.8 should work. I will use version 20.
#Next, we also need an OpenAI account to access their API.
At the end of this series, we will deploy the application to a VPS (Virtual Private Server). No matter which provider you choose, the steps we follow should be the same. I'll be using Akamai's cloud computing service (formerly Linode).
Setting up the Qwik application
Assuming we meet the prerequisites, we can open a command line terminal and run the command: <span style="font-family: 宋体, SimSun; font-size: 14px;">npm create qwik@latest</span>. This will run the Qwik CLI which will help us bootstrap our application.
Example:
If everything is fine, open the project and start exploring.
In the project folder you will notice some important files and folders:
<span style="font-family: 宋体, SimSun; font-size: 14px;">/src</span>: Contains all application business logic##/src/components<span style="font-family: 宋体, SimSun; font-size: 14px;"></span>: Contains reusable components to build our application<span style="font-family: 宋体, SimSun; font-size: 14px;">/src/routes</span>: Responsible for Qwik’s file-based routing; each folder represents a route (can be a page or API endpoint). To create a page, place the<span style="font-family: 宋体, SimSun; font-size: 14px;">index.{jsx|tsx}</span>file into the route's folder.<span style="font-family: 宋体, SimSun; font-size: 14px;">/src/root.tsx</span>: This file exports the root component responsible for generating the HTML document root.
Start developing
Qwik uses Vite as the bundler, which is very Convenient because Vite has a built-in development server. It supports running our application locally and updating the browser when files change.
To start the development server, we can open the project in the terminal and execute the command <span style="font-family: 宋体, SimSun; font-size: 14px;">npm run dev</span>. Once the development server is running, you can open a browser and visit <span style="font-family: 宋体, SimSun; font-size: 14px;">http://localhost:5173</span> and you should see a very basic application.
Whenever we make changes to our application, we should see those changes reflected in the browser almost immediately.
Add Styles
This project won't focus too much on styles, so if you want to do your own thing, this part is completely optional. For simplicity, I will use Tailwind.
Qwik CLI makes it easy to add necessary changes by executing terminal commands<span style="font-family: 宋体, SimSun; font-size: 14px;">npm run qwik add</span> .
Example:
You can use the arrow keys to move down to the Tailwind plugin and press Enter. It will then show you the changes that will be made to your codebase and ask for confirmation. As long as it looks good, you can press Enter again.
I also like to have a consistent theme for my projects, so I keep a file in GitHub to copy and paste from style. Obviously you can ignore this step if you want your own theme, but if you want your project to look as stunning as mine, copy the styles from this file on GitHub Go to the file <span style="font-family: 宋体, SimSun; font-size: 14px;">/src/global.css</span>. You can replace the old style but keep the Tailwind directive.
Prepare the homepage
To get the project off to a good start, the last thing we want to do today is make some changes to the homepage . The changes I want to make include:
Remove
<span style="font-family: 宋体, SimSun; font-size: 14px;">head</span>Export<span style="font-family: 宋体, SimSun; font-size: 14px;">h1</span>Remove all text except ; Feel free to add your own page title text.Add some Tailwind classes to center the content and make it
<span style="font-family: 宋体, SimSun; font-size: 14px;">h1</span>largerWrap content with tags
<span style="font-family: 宋体, SimSun; font-size: 14px;">main</span>to make it more semanticAdd the Tailwind class to the
<span style="font-family: 宋体, SimSun; font-size: 14px;">main</span>#tag to add some padding and center the content
These are some minor changes that are not strictly necessary, but I think they will provide a good starting point for building our application in the next article starting point.
This is what the file looks like after I changed it.
import { component$ } from "@builder.io/qwik";
export default component$(() => {
  return (
    <main class="max-w-4xl mx-auto p-4">
      <h1 id="Hi-nbsp-wave-nbsp-emoji">Hi [wave emoji]</h1>
    </main>
  );
});
In your browser:
Conclusion
That’s all we’re going to discuss today. Again, the main focus of this article is to eliminate boilerplate content so that the next article can be dedicated to integrating OpenAI's API into our project.
The above is the detailed content of Teach you step by step how to build artificial intelligence network applications!. For more information, please follow other related articles on the PHP Chinese website!

 Are You At Risk Of AI Agency Decay? Take The Test To Find OutApr 21, 2025 am 11:31 AM
This article explores the growing concern of "AI agency decay"—the gradual decline in our ability to think and decide independently. This is especially crucial for business leaders navigating the increasingly automated world while retainin
 How to Build an AI Agent from Scratch? - Analytics VidhyaApr 21, 2025 am 11:30 AM
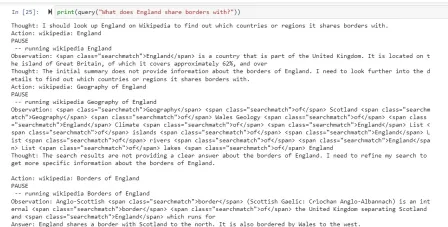
Ever wondered how AI agents like Siri and Alexa work? These intelligent systems are becoming more important in our daily lives. This article introduces the ReAct pattern, a method that enhances AI agents by combining reasoning an
 Revisiting The Humanities In The Age Of AIApr 21, 2025 am 11:28 AM
"I think AI tools are changing the learning opportunities for college students. We believe in developing students in core courses, but more and more people also want to get a perspective of computational and statistical thinking," said University of Chicago President Paul Alivisatos in an interview with Deloitte Nitin Mittal at the Davos Forum in January. He believes that people will have to become creators and co-creators of AI, which means that learning and other aspects need to adapt to some major changes. Digital intelligence and critical thinking Professor Alexa Joubin of George Washington University described artificial intelligence as a “heuristic tool” in the humanities and explores how it changes
 Understanding LangChain Agent FrameworkApr 21, 2025 am 11:25 AM
LangChain is a powerful toolkit for building sophisticated AI applications. Its agent architecture is particularly noteworthy, allowing developers to create intelligent systems capable of independent reasoning, decision-making, and action. This expl
 What are the Radial Basis Functions Neural Networks?Apr 21, 2025 am 11:13 AM
Radial Basis Function Neural Networks (RBFNNs): A Comprehensive Guide Radial Basis Function Neural Networks (RBFNNs) are a powerful type of neural network architecture that leverages radial basis functions for activation. Their unique structure make
 The Meshing Of Minds And Machines Has ArrivedApr 21, 2025 am 11:11 AM
Brain-computer interfaces (BCIs) directly link the brain to external devices, translating brain impulses into actions without physical movement. This technology utilizes implanted sensors to capture brain signals, converting them into digital comman
 Insights on spaCy, Prodigy and Generative AI from Ines MontaniApr 21, 2025 am 11:01 AM
This "Leading with Data" episode features Ines Montani, co-founder and CEO of Explosion AI, and co-developer of spaCy and Prodigy. Ines offers expert insights into the evolution of these tools, Explosion's unique business model, and the tr
 A Guide to Building Agentic RAG Systems with LangGraphApr 21, 2025 am 11:00 AM
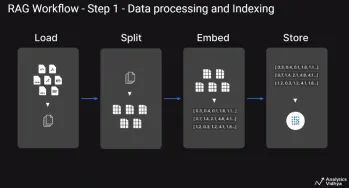
This article explores Retrieval Augmented Generation (RAG) systems and how AI agents can enhance their capabilities. Traditional RAG systems, while useful for leveraging custom enterprise data, suffer from limitations such as a lack of real-time dat


Hot AI Tools

Undresser.AI Undress
AI-powered app for creating realistic nude photos

AI Clothes Remover
Online AI tool for removing clothes from photos.

Undress AI Tool
Undress images for free

Clothoff.io
AI clothes remover

Video Face Swap
Swap faces in any video effortlessly with our completely free AI face swap tool!

Hot Article
Hot Tools

Dreamweaver CS6
Visual web development tools

SAP NetWeaver Server Adapter for Eclipse
Integrate Eclipse with SAP NetWeaver application server.

MantisBT
Mantis is an easy-to-deploy web-based defect tracking tool designed to aid in product defect tracking. It requires PHP, MySQL and a web server. Check out our demo and hosting services.

Zend Studio 13.0.1
Powerful PHP integrated development environment

PhpStorm Mac version
The latest (2018.2.1) professional PHP integrated development tool

