




给定 n 个节点,任务是打印链表末尾的第 n 个节点。程序不得更改列表中节点的顺序,而应仅打印链表最后一个节点中的第 n 个节点。
示例
Input -: 10 20 30 40 50 60
   N=3
Output -: 40
在上面的例子中,从第一个节点开始,遍历到 count-n 个节点,即 10,20 30,40, 50,60,所以倒数第三个节点是 40。
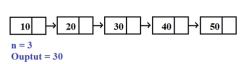
而不是如此高效地遍历整个列表可以遵循的方法 -

- 获取一个临时指针,比如说,节点类型的 temp
- 将此临时指针设置为指向的第一个节点头指针
- 将计数器设置为列表中的节点数
- 将 temp 移动到 temp → 下一个直到 count-n
- 显示 temp → 数据
如果我们使用这种方法,计数将为 5,程序将迭代循环直到 5-3,即 2,因此从 0th 位置上的 10 开始,直到 20结果是在第 1 个位置,第 30 个位置在第二个位置。因此,通过这种方法,不需要遍历整个列表直到结束,这将节省空间和内存。
算法
Start
Step 1 -> create structure of a node and temp, next and head as pointer to a structure node
   struct node
      int data
      struct node *next, *head, *temp
   End
Step 2 -> declare function to insert a node in a list
   void insert(int val)
      struct node* newnode = (struct node*)malloc(sizeof(struct node))
      newnode->data = val
      IF head= NULL
         set head = newnode
         set head->next = NULL
      End
      Else
         Set temp=head
         Loop While temp->next!=NULL
            Set temp=temp->next
         End
         Set newnode->next=NULL
         Set temp->next=newnode
      End
Step 3 -> Declare a function to display list
   void display()
      IF head=NULL
         Print no node
      End
      Else
         Set temp=head
         Loop While temp!=NULL
            Print temp->data
            Set temp=temp->next
         End
      End
Step 4 -> declare a function to find nth node from last of a linked list
   void last(int n)
      declare int product=1, i
      Set temp=head
      Loop For i=0 and i<count-n and i temp="temp-">next
      End
      Print temp->data
Step 5 -> in main()
   Create nodes using struct node* head = NULL
   Declare variable n as nth to 3
   Call function insert(10) to insert a node
   Call display() to display the list
   Call last(n) to find nth node from last of a list
Stop</count-n>
示例
现场演示
#include<stdio.h>
#include<stdlib.h>
//structure of a node
struct node{
   int data;
   struct node *next;
}*head,*temp;
int count=0;
//function for inserting nodes into a list
void insert(int val){
   struct node* newnode = (struct node*)malloc(sizeof(struct node));
   newnode->data = val;
   newnode->next = NULL;
   if(head == NULL){
      head = newnode;
      temp = head;
      count++;
   } else {
      temp->next=newnode;
      temp=temp->next;
      count++;
   }
}
//function for displaying a list
void display(){
   if(head==NULL)
      printf("no node ");
   else {
      temp=head;
      while(temp!=NULL) {
         printf("%d ",temp->data);
         temp=temp->next;
      }
   }
}
//function for finding 3rd node from the last of a linked list
void last(int n){
   int i;
   temp=head;
   for(i=0;i<count-n temp="temp-">next;
   }
   printf("<p>%drd node from the end of linked list is : %d" ,n,temp->data);
}
int main(){
   //creating list
   struct node* head = NULL;
   int n=3;
   //inserting elements into a list
   insert(1);
   insert(2);
   insert(3);
   insert(4);
   insert(5);
   insert(6);
   //displaying the list
   printf("</p>
<p>linked list is : ");
   display();
   //calling function for finding nth element in a list from last
   last(n);
   return 0;
}</p></count-n></stdlib.h></stdio.h>
输出
linked list is : 1 2 3 4 5 6
3rd node from the end of linked list is : 4