
Home >Web Front-end >JS Tutorial >How to install yup in React Native in JavaScript?
How to install yup in React Native in JavaScript?

- 王林forward
- 2023-09-13 11:53:07781browse
Yup is an NPM package that we can install in react-native applications. It is used to validate form values stored in a single object. Additionally, we can use Yup to add different types of validation to different form fields.
Users can execute the following command in the project directory to install Yup in React Native.
npm i Yup
If the user uses Yarn, you can use the following command.
yarn i Yup
grammar
Users can use Yup for form validation in react-native applications by following the following syntax.
const schema = Yup.object().shape({
   key1: Yup.string().required("Required"),
});
await schema.validate(values);
In the above syntax, we created the schema using Yup and used the validate() method to validate the values based on the rules defined in the schema. Here, value is an object containing form property name and value pairs.
step
Step 1 - First, the developer needs to import the required content from Yup.
Step 2 - In the App() component, use Yup to create a "userFormSchema" that defines the rules for the Student_id, age, and Portfolio fields. Here, student_id is a string and a required field, age is a positive integer and a required field, and portfolio is the URL of the website.
Step 3 - Now, use the "useState" hook to define the status of the student information and validation messages.
-
Step 4 - Define the handleChange() function that takes the key and value as parameters and updates the value in the "initialValue" state object.
Step 5 - Next, define the validateValues() function, which uses the validate() method by passing userFormSchema as a reference and a StudentInfo object as a parameter to validate the form values.
Step 6 - Set the message to "Message" status based on validation of the form value.
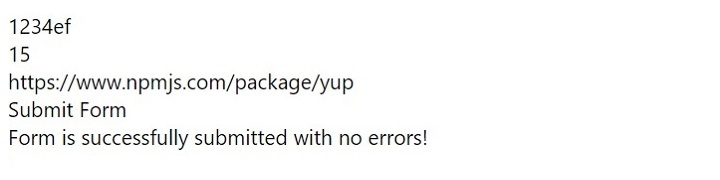
Example 1
In the example below, we create a form to collect student information. We added three input fields to get the Student_id, age, and portfolio website URL. Additionally, we created a submit button.
Whenever the user clicks the submit button, the validateValues() function is called, which displays a validation message on the screen.
import React, { useState } from "react";
import * as Yup from "yup";
import { TouchableOpacity, View, TextInput, Text, Button } from "react-native";
const App = () => {
   // creating the user form schema using Yup to validate student_id, age, and portfolio
   const userFormSchema = Yup.object().shape({
   student_id: Yup.string().required("Required"),
   age: Yup.number().required("Required").positive().integer(),
   portfolio: Yup.string().url().nullable(),
   });
   const [studentInfo, setStudentInfo] = useState({
      student_id: "",
      age: 13,
      portfolio: "",
   });
   const [message, setMessage] = useState("");

   function handleChange(key, val) {
      setStudentInfo({ ...studentInfo, [key]: val });
   }
   // creating the handleFormSubmit function to handle the form submission
   async function validateValues() {
      try {
         await userFormSchema.validate(studentInfo);
         setMessage("Form is successfully submitted with no errors!");
      } catch (error) {
         console.log(error);
         setMessage("Form is not submitted due to errors!");
      }
   }
   return (
      // rendering the form
      <View style = {{ width: "70%" }}>
         {/* text inputs */}
         <TextInput
            placeholder = "student_id"
            value = {studentInfo.student_id}
            onChangeText = {(value) => handleChange("student_id", value)}
         />
         <TextInput
            placeholder = "age"
            value = {studentInfo.age}
            onChangeText = {(value) => handleChange("age", value)}
         />

         <TextInput
            placeholder = "portfolio"
            value = {studentInfo.portfolio}
            onChangeText = {(value) => handleChange("portfolio", value)}
         />
         {/* submit button */}
         <TouchableOpacity onPress = {validateValues}>
            <Text> Submit Form </Text>
         </TouchableOpacity>
         <Text> {message} </Text>
      </View>
   );
};
export default App;
Output
Example 2
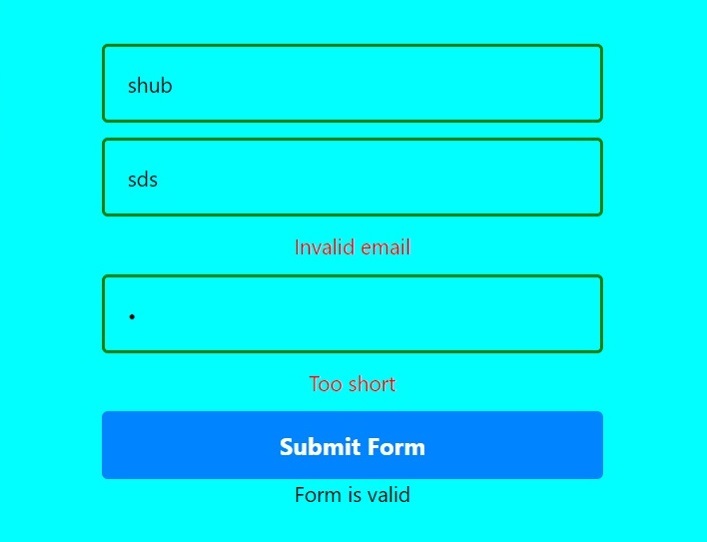
The following example is an advanced version of the above example. Here we have three input fields containing username, email, and password.
In addition, we also created a userFormSchema using Yup to validate the form. Here we define the rules so that the name should be at least three characters in length and is always required. The email should follow the format and is always required, and the password should be at least six characters long.
Additionally, we have provided some styles for input fields and error messages. When the user clicks the submit button, it calls the handleFormSubmit() function, which gets the validation results by calling the validateValues() function. It displays the output message based on form validation.
import React, { useState } from "react";
import * as Yup from "yup";
import {
   StyleSheet,
   TouchableOpacity,
   View,
   TextInput,
   Text,
} from "react-native";
const App = () => {
   // creating the user form schema using Yup to validate name, email and password
   const userFormSchema = Yup.object().shape({
      name: Yup.string().min(3, "Too short").required("Required"),
      email: Yup.string().email("Invalid email").required("Required"),
      password: Yup.string().min(6, "Too short").required("Required"),
   });
   //  creating the styles for the elements
   const elementStyles = StyleSheet.create({
      container: {
         flex: 1,
         alignItems: "center",
         backgroundColor: "aqua",
         justifyContent: "center",
      },
      error: {
         marginBottom: 10,
         color: "red",
      },
      button: {
         backgroundColor: "#0084ff",
         width: "70%",
         borderRadius: 4,
         alignItems: "center",
         padding: 12,
      },
      input: {
         borderWidth: 2,
         padding: 15,
         marginBottom: 10,
         width: "70%",
         borderColor: "green",
         borderRadius: 4,
      },
      buttonText: {
         color: "#fff",
         fontSize: 16,
         fontWeight: "bold",
      },
   });
   // creating the state for the form
   const [initialValues, setInitialValues] = useState({
      name: "",
      email: "",
      password: "",
   });
   // creating the state for the errors
   const [errors, setErrors] = useState({});
   const [message, setMessage] = useState("");
   // creating the handleChange function to handle the change in the input fields
   function handleChange(key, val) {
      setInitialValues({ ...initialValues, [key]: val });
   }
   // creating the validateValues function to validate the form
   async function validateValues() {
      try {
         // validating the form using the userFormSchema
         await userFormSchema.validate(initialValues, { abortEarly: false });
         setErrors({});
      } catch (error) {
         //  if the form is invalid, then the errors are set to the state
         const newErrors = error.inner.reduce((acc, cur) => {
            acc[cur.path] = cur.message;
            return acc;
         }, {});
         setErrors(newErrors);
      }
   }
   // creating the handleFormSubmit function to handle the form submission
   function handleFormSubmit() {
      // validating the form values
      validateValues().then(() => {
         // set message based on the form is valid or invalid.
         if (Object.keys(errors).length === 0) {
         setMessage("Form is valid");
         } else {
            setMessage("Form is invalid");
         }
      });
   }
   return (
      // rendering the form
      <View style = {elementStyles.container}>
         {/* text inputs */}
         <TextInput
            style = {elementStyles.input}
            placeholder = "Name"
            value = {initialValues.name}
         onChangeText = {(value) => handleChange("name", value)}
         />
         {errors.name && <Text style = {elementStyles.error}> {errors.name} </Text>}
         <TextInput
            style = {elementStyles.input}
            placeholder = "Email"
            value = {initialValues.email}
            onChangeText = {(value) => handleChange("email", value)}
         />
         {errors.email && <Text style=  {elementStyles.error}> {errors.email} </Text>}
         <TextInput
            style = {elementStyles.input}
            placeholder = "Password"
            value = {initialValues.password}
            onChangeText = {(value) => handleChange("password", value)}
            secureTextEntry
         />
         {errors.password && (
            <Text style = {elementStyles.error}> {errors.password} </Text>
         )}
         {/* submit button */}
         <TouchableOpacity style = {elementStyles.button} onPress = {handleFormSubmit}>
            <Text style = {elementStyles.buttonText}> Submit Form </Text>
         </TouchableOpacity>
         <Text> {message} </Text>
      </View>
   );
};
export default App;
Output
Users learned to use Yup and React-Native for form validation. Instead of writing custom form validation code, developers can use libraries like Yup, which makes the code more readable and simpler.
The above is the detailed content of How to install yup in React Native in JavaScript?. For more information, please follow other related articles on the PHP Chinese website!
Related articles
See more- An in-depth analysis of the Bootstrap list group component
- Detailed explanation of JavaScript function currying
- Complete example of JS password generation and strength detection (with demo source code download)
- Angularjs integrates WeChat UI (weui)
- How to quickly switch between Traditional Chinese and Simplified Chinese with JavaScript and the trick for websites to support switching between Simplified and Traditional Chinese_javascript skills