
Home >Web Front-end >JS Tutorial >Introduction to HTML5 History API
Introduction to HTML5 History API

- WBOYWBOYWBOYWBOYWBOYWBOYWBOYWBOYWBOYWBOYWBOYWBOYWBOriginal
- 2023-09-13 11:29:111238browse
History is always interesting, isn't it? In older versions of HTML, we had limited control over browser history. We can move back and forth using the available methods, but that's it
Through the HTML5 History API, we can have better control over browser history. For example, we have a way to add an entry to the history or change the URL in the address bar without refreshing the page.
Why use the History API?
In this article, we will learn how the HTML5 History API came to be. Before this API, we often used hashes to change page content, especially for heavy single-page applications, since the URL couldn't be changed without refreshing the page. Additionally, when you change the hash of a URL, no changes are made to the browser history.
But now, both features are available through the HTML5 History API, and script-heavy single-page applications can be developed without the need for hashes. It also allows us to build the application in an SEO friendly way. Additionally, this technology allows us to reduce bandwidth – but how?
In this article, we will develop a single-page application using this API to demonstrate exactly this.
This means we will load all required resources on the first page load. From that point on, the app will download only what it needs. In other words, it does not load all resources all the time, but only those required in the second content request.
Please note that you need to perform some server-side coding to serve only part of the resource rather than the entire page content.
Browser support
At the time of writing, browser support for the HTML5 History API is quite good, and we can check its status here. You can find out what browsers are supported through this link, but it's always a good practice to check for support for a specific feature before using it.
To programmatically determine if your browser supports the API, look at the following lines of code:
return !!(window.history && history.pushState);
Additionally, I recommend you refer to this article to detect support for various HTML5 features.
If you use Modernizr, then you should use the following code:
if (Modernizr.history) {
    // History API Supported
}
If your browser does not support the history API, you can use the history.js polyfill.
Manipulating History
HTML5 provides two new methods:
-
history.pushState() history.replaceState()
Both of these allow us to add and update historical status respectively. Both work the same way and expect the same number of parameters. In addition to these methods, we also have the popstate event. We'll learn how and when to use this popstate event later in this article.
pushState and replaceState expect the same number of parameters, as follows:
-
statecan store JSON strings and can be used inpopstateevents. -
titleis a parameter that is currently ignored by most browsers, so it is best to set it tonull. -
urlcan represent any URL. It will update with the browser's address and won't care if the URL exists. Best of all, it doesn't reload your web page.
The main difference between these methods is that pushState will add a new entry to the history stack, while replaceState will replace the current history value instead of adding a new one. If you are still confused between these two methods, then let us demonstrate the same situation with a better example.
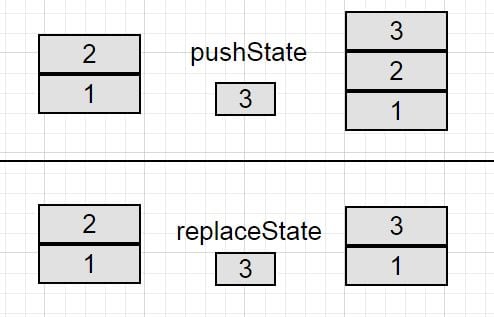
Suppose we have a pile of two blocks marked 1 and 2, and you have a block marked 3 in your hand. Now, when we execute pushState, block 3 will be added to the existing stack, so the stack will have 3 blocks.
Now assume you have two blocks and an identical stack of another block in your hand. When we execute replaceState, it takes block 2 from the stack and places block 3. Therefore the number of historical values will remain the same. pushState on the other hand will increase the history count by one.
The image below shows the same demo.
So far we've covered the pushState and replaceState events in order to control browser history, but let's assume we have various fake history totals in the browser. The user may or may not be redirected to this page. In this case, the problem arises when the user clicks the browser's back and forth button to navigate to the history page.
虽然您可能期望在解决 pushState 或 replaceState 方法时触发 popstate ,但实际上,它是事实并非如此。相反,当您浏览会话历史记录条目时,通过点击后退或前进按钮或使用 history.go 或 history.back 方法。
在WebKit浏览器中,文档的onload事件后会触发popstate事件,但Firefox和IE没有此行为。
演示
HTML
<div class="container">
    <div class="row">
		<ul class="nav navbar-nav">
			<li><a href="home.html" class="historyAPI">Home</a></li>
			<li><a href="about.html" class="historyAPI">About</a></li>
			<li><a href="contact.html" class="historyAPI">Contact</a></li>
		</ul>
	</div>
	<div class="row">
		<div class="col-md-6">
			<div class="well">
				Click on Links above to see history API usage using <code>pushState</code> method.
			</div>
		</div>
		<div class="row">
			<div class="jumbotron" id="contentHolder">
				<h1>Home!</h1>
				<p>Lorem Ipsum is simply dummy text of the printing and typesetting industry.</p>
			</div>
		</div>
	</div>
</div>
JavaScript
<script type="text/javascript">
    jQuery('document').ready(function(){

		jQuery('.historyAPI').on('click', function(e){
			e.preventDefault();
			var href = $(this).attr('href');

			// Getting Content
			getContent(href, true);

			jQuery('.historyAPI').removeClass('active');
			$(this).addClass('active');
		});

	});

	// Adding popstate event listener to handle browser back button
	window.addEventListener("popstate", function(e) {

		// Get State value using e.state
		getContent(location.pathname, false);
	});

	function getContent(url, addEntry) {
		$.get(url)
		.done(function( data ) {

			// Updating Content on Page
			$('#contentHolder').html(data);

			if(addEntry == true) {
				// Add History Entry using pushState
				history.pushState(null, null, url);
			}

		});
	}
</script>
演示 1:HTML5 历史记录 API - PushState
在此演示中,您将体验到浏览器中正在计算历史记录条目,并且您可以使用浏览器后退/前进按钮浏览它。查看演示
演示 2:HTML5 历史记录 API - ReplaceState
在此演示中,您将体验到历史记录条目正在浏览器中更新,并且您无法使用浏览器后退/前进按钮进行导航。查看演示
结论
此 API 对我们的 Web 应用程序的工作方式产生了巨大影响。它消除了对 URL 中哈希值的依赖,以便轻松创建高效、SEO 友好的单页应用程序。
这是一个非常好的 API,不是吗?
The above is the detailed content of Introduction to HTML5 History API. For more information, please follow other related articles on the PHP Chinese website!
Related articles
See more- An in-depth analysis of the Bootstrap list group component
- Detailed explanation of JavaScript function currying
- Complete example of JS password generation and strength detection (with demo source code download)
- Angularjs integrates WeChat UI (weui)
- How to quickly switch between Traditional Chinese and Simplified Chinese with JavaScript and the trick for websites to support switching between Simplified and Traditional Chinese_javascript skills