


In this tutorial, I will show you how to implement a real-time chat application using Node.js, Socket.IO and MongoDB, and then we will deploy the application together to Modulus.
First, let me show you the final look of the application that we will see at the end of the article.

Node.js will be the core of the application, Express as MVC, MongoDB as database, Socket. IO is used for real-time communication. Once completed, we will deploy the application to Modulus. The MongoDB part actually lives inside Modulus.
1. Scenario
- John wants to use our app and opens it in a browser.
- On the first page, he selects the nickname used during the chat and then logs in to the chat.
- He writes something in the text area and presses Enter.
- The text is sent to a RESTful service (Express) and the text is written to MongoDB.
- The same text will be broadcast to the user currently logged into the chat app before being written in MongoDB.
As you can see, this is a very simple application, but it covers almost everything a web application has to offer. There is no channel system in the application, but you can fork the source code and implement the channel module to practice.
2.Design the project from scratch
I will try to explain the small parts of the project first and then put them together at the end. I'll start with the backend and work my way up to the frontend. So, let's start with the domain objects (MongoDB models).
2.1. model
For database abstraction, we will use Mongoose. In this project, we have only one model named Message. This message model only contains text, createDate, and author. The author does not have a model like User, because we will not fully implement the user registration/login system. There will be a simple nickname providing page, and the nickname will be saved to a cookie. This will be used in the Message model as the text in the author field. You can see a sample JSON model below:
{

    text: "Hi, is there any Full Stack Developer here?"

    author: "john_the_full_stack",

    createDate: "2015.05.15"

}
To create such a document, you can use the following Mongoose function to implement the model:
var mongoose = require('mongoose')


var Message = new mongoose.Schema({

    author: String,

    message: String,

    createDate: {

        type: Date,

        default: Date.now

    }

});


mongoose.model('Message', Message)
Simply import the Mongoose module, define the model with fields and field properties in JSON format, and create a model named Message. The model will be included in the page you want to use.
Maybe you have questions, why do we store the message in the database when we are already broadcasting this message to the users in the same channel. It's true that you don't have to store chat messages, but I just wanted to explain the database integration layer. Anyway, we will use this model in the controller in our project. Controller?
2.2. Controller
As I said before, we will use Express for the MVC part. And C here represents Controller. For our project, there are only two messaging endpoints. One of them is loading recent chat messages and the second one is handling sent chat messages which are stored in database and then broadcast to the channel.
.....

app.get('/chat', function(req, res){

    res.sendFile(__dirname + '/index.html');

});


app.get('/login', function(req, res){

    res.sendFile(__dirname + '/login.html');

});


app.post('/messages', function(req, res, next) {

    var message = req.body.message;

    var author = req.body.author;

    var messageModel = new Message();

    messageModel.author = author;

    messageModel.message = message;

    messageModel.save(function (err, result) {

       if (!err) {

           Message.find({}).sort('-createDate').limit(5).exec(function(err, messages) {

               io.emit("message", messages);

           });

           res.send("Message Sent!");

       } else {

           res.send("Technical error occurred!");

       }

    });

});


app.get('/messages', function(req, res, next) {

    Message.find({}).sort('-createDate').limit(5).exec(function(err, messages) {

        res.json(messages);

    });

});

.....
The first and second controllers are only used to serve static HTML files for the chat and login pages. The third is used to handle publish requests to the /messages endpoint to create new messages. In this controller, first convert the request body into a Message model and then use the Mongoose function save.
I won't delve into Mongoose - you can check out the documentation for more details. You can provide a callback function to the save function to check if there are any problems. If successful, we will get the last 5 records in descending order by createDate and broadcast 5 messages to the clients in the channel.
Okay, we're done MC. Let’s switch to the View section.
2.3. Check
Generally speaking, template engines such as Jade, EJS, and Handlebars can be used in Express. However, we only have one page, and that's a chat message, so I'm going to serve it statically. Actually, as I said above, there are two more controllers serving this static HTML page. You can see the following is used to serve a static HTML page.
app.get('/chat', function(req, res){

    res.sendFile(__dirname + '/index.html');

});


app.get('/login', function(req, res){

    res.sendFile(__dirname + '/login.html');

});
This endpoint only serves index.html and login.html using res.sendFile. index.html and login.html are in the same folder as server.js, that's why we use __dirname before the HTML file name.
2.4。前端
在前端页面中,我已经使用了Bootstrap,无需解释我是如何做到这一点的。简单来说,我将一个函数绑定到一个文本框,每当您按下Enter键或发送按钮时,消息就会发送到后端服务。
该页面还有一个必需的Socket.IO js文件,用于监听名为message的频道。 Socket.IO 模块已在后端导入,当您在服务器端使用此模块时,它会自动添加一个端点来提供 Socket.IO js 文件,但我们使用由 cdn <script src="https://cdn.socket.io/socket.io-1.3.5.js"></script>。每当有新消息进入此频道时,都会自动检测到该消息,并且消息列表将刷新为最后 5 条消息。
<script>

        var socket = io();

        socket.on("message", function (messages) {

            refreshMessages(messages);

        });


        function refreshMessages(messages) {

            $(".media-list").html("");

            $.each(messages.reverse(), function(i, message) {

                $(".media-list").append('<li class="media"><div class="media-body"><div class="media"><div class="media-body">'

                + message.message + '<br/><small class="text-muted">' + message.author + ' | ' + message.createDate + '</small><hr/></div></div></div></li>');

            });

        }


        $(function(){


            if (typeof $.cookie("realtime-chat-nickname") === 'undefined') {

                window.location = "/login"

            } else {

                $.get("/messages", function (messages) {

                    refreshMessages(messages)

                });


                $("#sendMessage").on("click", function() {

                    sendMessage()

                });


                $('#messageText').keyup(function(e){

                    if(e.keyCode == 13)

                    {

                        sendMessage();

                    }

                });

            }


            function sendMessage() {

                $container = $('.media-list');

                $container[0].scrollTop = $container[0].scrollHeight;

                var message = $("#messageText").val();

                var author = $.cookie("realtime-chat-nickname");

                $.post( "/messages", {message: message, author: author}, function( data ) {

                    $("#messageText").val("")

                });

                $container.animate({ scrollTop: $container[0].scrollHeight }, "slow");

            }

        })

    </script>
上面的代码中还有一项检查:cookie 部分。如果您没有选择任何聊天昵称,则表示该昵称没有设置cookie,您将自动重定向到登录页面。
如果没有,最后五条消息将通过对 /messages 端点的简单 Ajax 调用来获取。同样,每当您点击发送按钮或按Enter键时,都会从文本框中提取短信,并从文本框中提取昵称。 cookie,这些值将通过 post 请求发送到服务器。这里没有严格检查昵称,因为我想关注实时部分,而不是用户身份验证部分。
正如你所看到的,项目的整体结构非常简单。让我们进入部署部分。正如我之前所说,我们将使用 Modulus,它是用您选择的语言部署、扩展和监控应用程序的最佳 PaaS 之一。
3.部署
3.1。先决条件
我首先想到的是向您展示如何部署,但为了成功部署,我们需要一个工作数据库。我们来看看如何在Modulus上创建数据库,然后进行部署。
创建帐户后转至 Modulus 仪表板。点击左侧的数据库菜单,然后点击创建数据库。

在弹出表单中填写必填字段,如下所示。

当您填写必填字段并点击创建时,它将创建一个 MongoDB 数据库您将在屏幕上看到您的数据库 URL。我们将使用 MONGO URI, 因此请复制该 URI。

在我们的项目中,Mongo URI是从环境变量MONGO_URI中获取的,您需要在仪表板中设置该环境变量。转到信息中心,点击项目菜单,在列表中选择您的项目,然后点击左侧菜单中的管理。在此页面中,向下滚动页面时您将看到环境变量部分,如下所示。

您可以通过两种方式部署到 Modulus:
- 使用仪表板上传项目 ZIP 文件
- 使用 Modulus CLI 从命令行进行部署
我将继续使用命令行选项,因为另一个很容易做到。首先,安装 Modulus CLI:
npm install -g modulus
转到您的项目文件夹并执行以下命令以登录 Modulus。
modulus login
当您执行上述命令时,系统会提示您输入用户名和密码:

如果您已使用 GitHub 创建帐户,则可以使用 --github 选项.
modulus login --github
现在您已登录 Modulus,可以创建项目了。使用以下命令创建项目:
modulus project create "Realtime Chat"
当您运行此函数时,系统会询问您运行时。选择第一个选项,即 Node.js,第二个选项将询问您伺服器的大小,您可以保留默认值。

我们已经创建了一个项目,这次我们将把当前项目部署到Modulus中。执行以下命令将当前项目发送到Modulus端的Realtime Chat项目中。
modulus deploy
它将部署您的项目,并且您将在成功部署消息的末尾获得正在运行的项目 URL:
Realtime Chat running at realtime-chat-46792.onmodulus.net
如您所见,部署到 Modulus 非常简单!
The Modulus CLI has very useful commands that can be used during project deployment or runtime. For example, to track the logs of a running project, you can use modulus project log tail, to create a MongoDB database use modulus mongo create <db-name></db-name>, and to set environment variables, use modulus env set <key> <value></value></key> etc. You can use Modulus Help to see the complete list of commands.
in conclusion
The main purpose of this tutorial is to show you how to create a real-time chat application using Node.js, Socket.IO and MongoDB. To run the project in production, Modulus is used as a PaaS provider. The deployment steps for Modulus are very simple, and it also provides an internal database (MongoDB) for our project. Apart from this, you can also use very useful tools like logging, notifications, autoscaling, database management, etc. in the Modulus dashboard.
To sign up for Modulus, click here and get an extra $10 by becoming a Tuts reader. Use promo code ModulusChat10.
For more information about Modulus enterprise products, click here.
The above is the detailed content of Live Chat: Implemented using Modulus and Node.js. For more information, please follow other related articles on the PHP Chinese website!

 How to easily move your blog from WordPress.com to WordPress.orgApr 18, 2025 am 11:33 AM
Do you want to move your blog from WordPress.com to WordPress.org? Many beginners start with WordPress.com but quickly realize their limitations and want to switch to the self-hosted WordPress.org platform. In this step-by-step guide, we will show you how to properly move your blog from WordPress.com to WordPress.org. Why migrate from WordPress.com to WordPress.org? WordPress.com allows anyone to create an account
 How to Automate WordPress and Social Media with IFTTT (and more)Apr 18, 2025 am 11:27 AM
Are you looking for ways to automate your WordPress website and social media accounts? With automation, you will be able to automatically share your WordPress blog posts or updates on Facebook, Twitter, LinkedIn, Instagram and more. In this article, we will show you how to easily automate WordPress and social media using IFTTT, Zapier, and Uncanny Automator. Why Automate WordPress and Social Media? Automate your WordPre
 How to Fix Custom Menu Item Limits in WordPressApr 18, 2025 am 11:18 AM
Just a few days ago, one of our users reported an unusual problem. The problem is that he reaches the limit of custom menu items. Any content he saves after reaching the menu item limit will not be saved at all. We've never heard of this issue, so we decided to give it a try on our local installation. More than 200 menu items were created and saved. The effect is very good. Move 100 items to the drop-down list and save them very well. Then we knew it had to do with the server. After further research, it seems that many others have encountered the same problem. After digging deeper, we found a trac ticket ( #14134 ) that highlighted this issue. Read very
 How to add custom metafields to custom classification in WordPressApr 18, 2025 am 11:11 AM
Do you need to add custom metafields to custom taxonomy in WordPress? Custom taxonomy allows you to organize content besides categories and tags. Sometimes it is useful to add other fields to describe them. In this article, we will show you how to add other metafields to the taxonomy they create. When should custom metafields be added to custom taxonomy? When you create new content on your WordPress site, you can organize it using two default taxonomy (category and tag). Some websites benefit from the use of custom taxonomy. These allow you to sort content in other ways. For example,
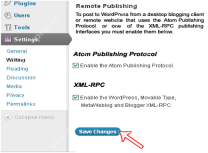 How to Remotely Publish to WordPress using Windows Live WriterApr 18, 2025 am 11:02 AM
Windows live writer is a versatile tool that allows you to post posts directly from your desktop to your WordPress blog. This means you don't need to log in to the WordPress admin panel to update your blog at all. In this tutorial, I will show you how to enable desktop publishing for your WordPress blog using Windows Live Writer. How to set up Windows Live Writer on WordPress Step 1: To use Windows Live Writer in WordPr
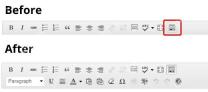 How to Fix White Text and Missing Buttons in WordPress Visual EditorApr 18, 2025 am 10:52 AM
Recently, one of our users reported a very strange installation problem. When writing a post, they can’t see anything they write. Because the text in the post editor is white. What's more, all the visual editor buttons are missing, and the ability to switch from visual to HTML doesn't work either. In this article, we will show you how to fix the white text and missing button issues in the WordPress visual editor. Be a Beginner Note: If you are looking for hidden buttons that may be seen in screenshots of other websites, you may be looking for a kitchen sink. You have to click on the kitchen sink icon to see other options such as underline, copy from word, etc.
 How to display avatar in user email in WordPressApr 18, 2025 am 10:51 AM
Do you want to display avatars in user emails in WordPress? Gravatar is a network service that connects a user's email address to an online avatar. WordPress automatically displays visitors’ profile pictures in the comments section, but you may also want to add them to other areas of the site. In this article, we will show you how to display avatars in user emails in WordPress. What is Gravatar and why should I display it? Gravatar stands for globally recognized avatars, which allows people to link images to their email addresses. If the website supports
 How to change the default media upload location in WordPressApr 18, 2025 am 10:47 AM
Do you want to change the default media upload location in WordPress? Moving media files to other folders can improve website speed and performance and help you create backups faster. It also gives you the freedom to organize your files in the way that suits you best. In this article, we will show you how to change the default media upload location in WordPress. Why change the default media upload location? By default, WordPress stores all images and other media files in the /wp-content/uploads/ folder. In this folder you will find children of different years and months


Hot AI Tools

Undresser.AI Undress
AI-powered app for creating realistic nude photos

AI Clothes Remover
Online AI tool for removing clothes from photos.

Undress AI Tool
Undress images for free

Clothoff.io
AI clothes remover

AI Hentai Generator
Generate AI Hentai for free.

Hot Article
Hot Tools

PhpStorm Mac version
The latest (2018.2.1) professional PHP integrated development tool

SublimeText3 Linux new version
SublimeText3 Linux latest version

VSCode Windows 64-bit Download
A free and powerful IDE editor launched by Microsoft

ZendStudio 13.5.1 Mac
Powerful PHP integrated development environment

Notepad++7.3.1
Easy-to-use and free code editor

