


Do you want to move your blog from WordPress.com to WordPress.org?
Many beginners start with WordPress.com, but quickly realize their limitations and want to switch to the self-hosted WordPress.org platform.
In this step-by-step guide, we will show you how to properly move your blog from WordPress.com to WordPress.org.

Why migrate from WordPress.com to WordPress.org?
WordPress.com allows anyone to create a blog by creating an account. However, beginners quickly realized that there are many limitations on their free WordPress.com blogs, such as limited profitability, inability to install plugins, displaying third-party ads to users, and more.
That's why users quickly move to the stronger and more popular self-hosted WordPress.org platform.
To see the differences between the two platforms, see our complete comparison of WordPress.com vs. WordPress.org.
We recommend using WordPress.org because it gives you full ownership of the website and freely control over all its features. To learn more about all of these features, see our full WordPress reviews and the pros and cons.
That being said, let's see how to properly migrate your blog from WordPress.com to WordPress.org.
Things you need before you start
To get started with self-hosted WordPress.org, you need a WordPress hosting account and a domain name.
We recommend Bluehost because they are one of the largest hosting companies in the world and are officially recommended WordPress hosting providers.
They also offer WPBeginner users free domain names and 60% discount on web hosting. You can start with it for $2.75 per month (this also includes free SSL).
→ Click here to receive exclusive Bluehost deal←
If your WordPress site already has a custom domain name, you still need web hosting. Continue to register Bluehost and add your blog domain under the Domain step.
In the later steps, we will show you how to keep the same domain without losing search rankings when transferring from WordPress.com to WordPress.org.
In addition to hosting accounts, you need to access your WordPress.com account so that you can easily move posts, pages, images, comments, and other data to your self-hosted WordPress website.
Free Bonus: Since many people ask for this, we now offer a free migration from WordPress.com to WordPress.org as part of our free WordPress blog setup service. During this guided transfer, one of our team of experts will complete the entire migration for you (100% free). This means you can switch from WordPress.com to WordPress.org without any risks.
However, if you like to learn and do things yourself, you can follow our step-by-step tutorial below.
Video tutorial
https://www.youtube.com/embed/X11eujRBo_c?version=3&rel=0&fs=1&showsearch=0&showinfo=1&iv_load_policy=1&wmode=transparentSubscribe to WPBeginner
https://www.youtube.com/subscribe_embed?usegapi=1&channel=wpbeginner&layout=default&count=default&origin=https://wpbeginner.com&gsrc=3p&ic=1&jsh=m;/_/scs/apps-static/_/js/k=oz.gapi.en.vQiXRrxCe40.O/am =AQ/d=1/rs=AGLTcCMBxIGVyXSdvvcs43a64yHt_P7dfg/m=__features__#_methods=onPlusOne,_ready,_close,_open,_resizeMe,_renderstart,oncircled,drefresh,erefresh&id=I0_1448178294715&parent=https://wpbeginner.com
If you prefer written instructions, please continue reading.
Step 1: Export data from WordPress.com
First, you need to log in to the WordPress.com website and go to your account dashboard.
In the left column, you need to click on the Tools » Export menu and then click on the Export All button.

This allows you to export your WordPress website. Once the export file is ready, the download link will be displayed. You can click to download the zip file to your computer.
WordPress.com will also email the link to your email address.

After you download the file to your computer, you need to unzip it.
In it, you will find an XML file containing all posts, pages, images, comments, custom fields, categories, tags, navigation menus, and other data.
Step 2: Set up WordPress
Now that you have exported your WordPress.com data, the next step is to set up a brand new WordPress installation on your web hosting.
The installation of WordPress is very simple, with just a few clicks. If you register Bluehost like the one mentioned above, WordPress will be installed automatically for you.
Or, if you choose a different hosting service, you can follow our step-by-step tutorial to install WordPress in 5 minutes.
Once WordPress is installed, you can import the content into a new self-hosted WordPress website.
Step 3: Import content into a self-hosted WordPress site
To import the old WordPress.com site content to the new WordPress.org site, you need to log in to the admin area of the newly installed WordPress site.
From here, you need to visit the Tools » Import page and click the Install Now button below WordPress.

WordPress will now install the WordPress importer for you.
When finished, click the "Run Import Program" link to continue.

It will take you to a screen where you will be asked to upload the WordPress.com XML file that was downloaded in Step 1 of this tutorial.
Click the Select File button to select the file, and then click the Upload File and Import button.

Note: If your file size is greater than 2MB, then you have two options. One is to ask your web hosting company to temporarily increase the limit so that you can continue the process. Another option is to use the WXR file splitter to split the file.
When you start importing, you can assign the imported content to existing users or create new users.
You can also choose to import file attachments. You must check this box to correctly import the image file.

Step 4: Import your Blogroll link
If you have been using the linking feature on your WordPress.com blog to store blogrolls or other links, you need to follow these instructions to import them. Users who do not use this feature can skip to step 5.
WordPress itself does not support blogroll. If you don't have many links in your blog volume, see our guide on how to add blog volume links in WordPress without using plugins.
However, if you have too many links or you want to keep the blog feature, keep reading.
Blogroll links are exported in OPML format. It is an XML format that allows you to export and import links and link categories. Your WordPress.com link has an OPML file with the following address:
http://example.wordpress.com/wp-links-opml.php
Replace the example with a subdomain of your WordPress.com blog.
If you use a custom domain on the WordPress.com website, you can access your OPML file by visiting the following URL:
http://www.example.com/wp-links-opml.php
Your OPML file will open in a browser window and you need to save it to your desktop. Press CTRL S (Command S on Mac) to save the file to your computer.

Now that you have backed up your WordPress.com links, the next step is to import them into WordPress. However, self-hosted WordPress does not enable Link Manager by default.
You need to install and activate the Link Manager plugin. The page of the plugin shows that it hasn't been updated for many years. That's because it doesn't require updates, you can install this plugin with confidence.
Once activated, the plugin will add a new menu item marked "Link" to your WordPress admin bar.

Next, you need to install and activate the OPML Importer plugin. The plugin enables a new importer tool that allows you to import blogroll links.
Once activated, you need to visit the Tools » Import page and click the Run Importer link below the Blogroll Importer.

On the Blogroll importer page, you need to upload the previously saved OPML file.
Click the Select File button to select the file, and then click the Import OPML File button to continue.

WordPress will now import your links and link categories from the OPML file.
You will be able to see the progress and once completed, you will see the success message.

Step 5: Set your WordPress.com blog to private
Now, if you don't want to redirect old users to a new website, this will be your last step.
First, visit the WordPress.com dashboard for your old blog. From the menu on the left you need to click on Settings » General menu and scroll down to the Privacy section.

From here, you need to select the "Private" option and click the "Save Settings" button.
This will make your old WordPress.com blog a private blog and will only be visible to you or other logged in users you approved.
Note: If you have been writing for a while and have a loyal reader, it doesn’t make sense to leave them hanging.
Also, if your blog has been around for a while, it is likely to be indexed by Google and other search engines.
You can follow Step 6 to keep all search engine rankings and easily redirect your old users to your new blog (highly recommended if your website is already established).
Step 6: Redirect visitors and retain SEO
Redirecting users to a new location using 301 headers is the standard solution to maintain search rankings when moving websites from one place to another.
Since you do not have access to the .htaccess file on WordPress.com, you cannot make any changes to preserve search engine rankings.
However, WordPress.com offers a paid upgrade feature called Site Redirection, which provides this feature.
Just go to the site redirect page. If you have multiple websites on WordPress.com, you will be asked which one you want to redirect.

On the next screen, you will be asked to provide the domain name you want to redirect visitors to. Enter the domain name for the new WordPress.org site and click the Start button.
Note: Site redirection is a paid upgrade, and costs $13 per year. It will add 301 redirects to redirect visitors and search engines of your WordPress.com blog to your new website.

Some people will ask: How long should I continue to pay for this off-site redirection feature?
The answer is as long as you want. However, we believe 2 years is enough for your old users to remember your new domain name.
If you are changing the domain name, the other thing you want to do is update all the URLs in the post. If you have ever created links to each other in your post, you must update these links. You can use our article to learn how to update your URL when you move your WordPress website.
If you have a custom domain on WordPress.com, you don't need to worry about anything. Simply change the DNS record to your host and you will retain all SEO benefits.
FAQ
We wrote the first version of this article in January 2013. Since then, we have received a lot of good questions. We've answered a lot of these questions via email or comments, so we think it would be nice to put the popular questions together in a place that everyone can see.
What happens to my WordPress.com subscribers?
Thankfully, WordPress.com allows you to migrate your subscribers in one condition. You must use their Jetpack plugin, which adds the same subscriber features as WordPress.com.
After installing and activating the Jetpack plugin, you will need to contact the WordPress.com team and ask them to migrate subscribers for you. We hope that in subsequent versions of Jetpack, this will become easier and users will be able to do it themselves.
Can you help me transfer from WordPress.com to WordPress.org for free?
Absolutely. As part of the free WordPress blog setup service, we offer migration from WordPress.com. If you need our help, just sign up. free 
How much does it cost to switch to WordPress.org?
WordPress is free. However, there are some of the lowest web hosting costs. We recommend you read this article: Why is WordPress free? What is the cost and what are the gains?
I've paid WordPress.com. Can I get a refund?
Yes you can. If you recently purchased a custom domain or paid plan from WordPress.com, you can ask them for a full refund.
Note: Domain name registration can be cancelled within 48 hours after registration. Plans and other purchases can be cancelled within 30 days of purchase.
Will my image be corrupted?
No, they won't. When you use the import file for transfer, all additional images are downloaded and the link is updated.
However, we noticed a warning. If your image URLs start with files.wordpress.com, they are not converted. If you find that the image URL has not changed and still points to WordPress.com, we recommend that you use the Import External Image Plugin, which will solve this problem.
I registered my domain through WordPress.com. Can I still move?
Yes you can. WordPress believes in empowering users and giving them complete control over their content. If you already have a domain name through WordPress.com, you only need a web hosting account.
We recommend that you use Bluehost or any other WordPress hosting provider to set it up. During the registration phase, you will be asked if you have a domain name or want to register a new domain name.
Simply select the "I Have a Domain" option and insert the domain name you registered with WordPress.com.
The next thing you want to do is change the name server to point to the hosting provider. We can assist as part of the free setup service. You can also seek support from your web hosting provider.
Will my website crash when I switch?
If you do it right, NO. The method we suggest above will ensure that your website will never go down. If you are worried, please know we are here to help you. Welcome to use our free setup service at any time.
Can I add an online store to my WordPress.org site?
Yes, you can easily add an online store to your self-hosted WordPress.org site at no extra cost. Since Bluehost and other popular web hosts offer free SSL certificates, you can simply install the WordPress e-commerce plugin to add the online store.
What must-have WordPress plugins do you recommend?
Now that you have switched to self-hosted WordPress.org, you can install as many plugins as you like.
Here are our recommended options:
- AIOSEO – Improve your website’s SEO ranking (used by 3 million websites).
- WPForms – Add a smart contact form to your website (has been used by 6 million websites).
- SeedProd – Easily customize your login page with drag-and-drop builder – for all WordPress themes.
- MonsterInsights – Learn how people find and use your website. This is a must-have for bloggers and small business owners.
- PushEngage – Connect with visitors after they leave their website.
- Copyer – Create daily backups for your new website in an emergency.
- OptinMonster – Helps you get more email subscribers and succeed in your blog journey.
Apart from that, we recommend that you check out our expert selection of essential WordPress plugins and useful blogging tools to manage and grow your blog.
You can install all these plugins from inside the WordPress dashboard. We have created a step-by-step guide on how to install WordPress plugins.
I want to change the WordPress theme of the website, is that OK?
Yes, you can change your WordPress theme at any time. Another great thing about switching to WordPress.org is that you get extra customization options and more themes to choose from.
In the WordPress admin sidebar, click the Appearance Menu drop-down menu and select Theme to install the theme.
We have carefully selected some of the best topics to help users avoid choice paralysis. See our guide on the best free blog themes and the best WordPress versatile themes.
You may also want to check out our guide on how to properly change WordPress themes.
We hope this article helps you correctly migrate your blog from WordPress.com to WordPress.org. You might also want to check out our list of the most important things you need to do after installing WordPress, and our ultimate guide on increasing your blog traffic.
The above is the detailed content of How to easily move your blog from WordPress.com to WordPress.org. For more information, please follow other related articles on the PHP Chinese website!

 How to easily move your blog from WordPress.com to WordPress.orgApr 18, 2025 am 11:33 AM
Do you want to move your blog from WordPress.com to WordPress.org? Many beginners start with WordPress.com but quickly realize their limitations and want to switch to the self-hosted WordPress.org platform. In this step-by-step guide, we will show you how to properly move your blog from WordPress.com to WordPress.org. Why migrate from WordPress.com to WordPress.org? WordPress.com allows anyone to create an account
 How to Automate WordPress and Social Media with IFTTT (and more)Apr 18, 2025 am 11:27 AM
Are you looking for ways to automate your WordPress website and social media accounts? With automation, you will be able to automatically share your WordPress blog posts or updates on Facebook, Twitter, LinkedIn, Instagram and more. In this article, we will show you how to easily automate WordPress and social media using IFTTT, Zapier, and Uncanny Automator. Why Automate WordPress and Social Media? Automate your WordPre
 How to Fix Custom Menu Item Limits in WordPressApr 18, 2025 am 11:18 AM
Just a few days ago, one of our users reported an unusual problem. The problem is that he reaches the limit of custom menu items. Any content he saves after reaching the menu item limit will not be saved at all. We've never heard of this issue, so we decided to give it a try on our local installation. More than 200 menu items were created and saved. The effect is very good. Move 100 items to the drop-down list and save them very well. Then we knew it had to do with the server. After further research, it seems that many others have encountered the same problem. After digging deeper, we found a trac ticket ( #14134 ) that highlighted this issue. Read very
 How to add custom metafields to custom classification in WordPressApr 18, 2025 am 11:11 AM
Do you need to add custom metafields to custom taxonomy in WordPress? Custom taxonomy allows you to organize content besides categories and tags. Sometimes it is useful to add other fields to describe them. In this article, we will show you how to add other metafields to the taxonomy they create. When should custom metafields be added to custom taxonomy? When you create new content on your WordPress site, you can organize it using two default taxonomy (category and tag). Some websites benefit from the use of custom taxonomy. These allow you to sort content in other ways. For example,
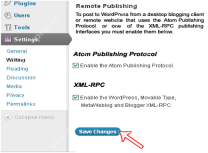 How to Remotely Publish to WordPress using Windows Live WriterApr 18, 2025 am 11:02 AM
Windows live writer is a versatile tool that allows you to post posts directly from your desktop to your WordPress blog. This means you don't need to log in to the WordPress admin panel to update your blog at all. In this tutorial, I will show you how to enable desktop publishing for your WordPress blog using Windows Live Writer. How to set up Windows Live Writer on WordPress Step 1: To use Windows Live Writer in WordPr
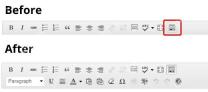 How to Fix White Text and Missing Buttons in WordPress Visual EditorApr 18, 2025 am 10:52 AM
Recently, one of our users reported a very strange installation problem. When writing a post, they can’t see anything they write. Because the text in the post editor is white. What's more, all the visual editor buttons are missing, and the ability to switch from visual to HTML doesn't work either. In this article, we will show you how to fix the white text and missing button issues in the WordPress visual editor. Be a Beginner Note: If you are looking for hidden buttons that may be seen in screenshots of other websites, you may be looking for a kitchen sink. You have to click on the kitchen sink icon to see other options such as underline, copy from word, etc.
 How to display avatar in user email in WordPressApr 18, 2025 am 10:51 AM
Do you want to display avatars in user emails in WordPress? Gravatar is a network service that connects a user's email address to an online avatar. WordPress automatically displays visitors’ profile pictures in the comments section, but you may also want to add them to other areas of the site. In this article, we will show you how to display avatars in user emails in WordPress. What is Gravatar and why should I display it? Gravatar stands for globally recognized avatars, which allows people to link images to their email addresses. If the website supports
 How to change the default media upload location in WordPressApr 18, 2025 am 10:47 AM
Do you want to change the default media upload location in WordPress? Moving media files to other folders can improve website speed and performance and help you create backups faster. It also gives you the freedom to organize your files in the way that suits you best. In this article, we will show you how to change the default media upload location in WordPress. Why change the default media upload location? By default, WordPress stores all images and other media files in the /wp-content/uploads/ folder. In this folder you will find children of different years and months


Hot AI Tools

Undresser.AI Undress
AI-powered app for creating realistic nude photos

AI Clothes Remover
Online AI tool for removing clothes from photos.

Undress AI Tool
Undress images for free

Clothoff.io
AI clothes remover

AI Hentai Generator
Generate AI Hentai for free.

Hot Article
Hot Tools

SecLists
SecLists is the ultimate security tester's companion. It is a collection of various types of lists that are frequently used during security assessments, all in one place. SecLists helps make security testing more efficient and productive by conveniently providing all the lists a security tester might need. List types include usernames, passwords, URLs, fuzzing payloads, sensitive data patterns, web shells, and more. The tester can simply pull this repository onto a new test machine and he will have access to every type of list he needs.

EditPlus Chinese cracked version
Small size, syntax highlighting, does not support code prompt function

Zend Studio 13.0.1
Powerful PHP integrated development environment

SublimeText3 English version
Recommended: Win version, supports code prompts!

PhpStorm Mac version
The latest (2018.2.1) professional PHP integrated development tool

