
Home >Backend Development >Golang >Build your own JA3 fingerprint with Go
Build your own JA3 fingerprint with Go
- Go语言进阶学习forward
- 2023-07-24 16:20:531327browse
The outline of this article is as follows. Please follow Lao Xu’s ideas and gradually build your own JA3 fingerprint.
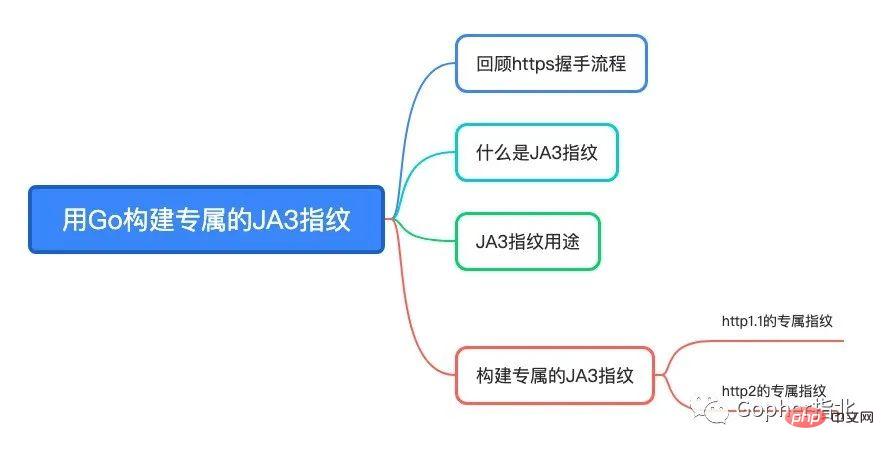
Review the HTTPS handshake process
Before we officially start to understand what JA3 fingerprint is, let’s review it first Let’s take a look at the HTTPS handshake process, which will help you understand the following.
I have coded more than 2,000 lines of code just to clarify the TLS handshake process. This article mainly analyzes the HTTPS one-way authentication and two-way authentication processes (TLS1.3).
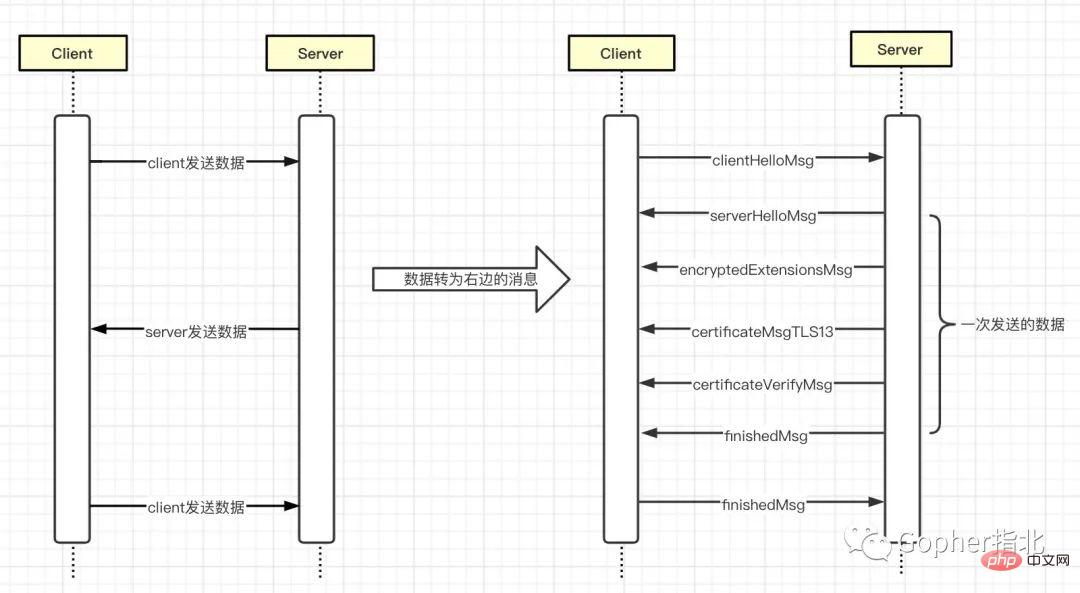
In One-way authentication, the client does not need a certificate, it only needs to verify that the server certificate is legal. The handshake process and msg exchanged are as follows.
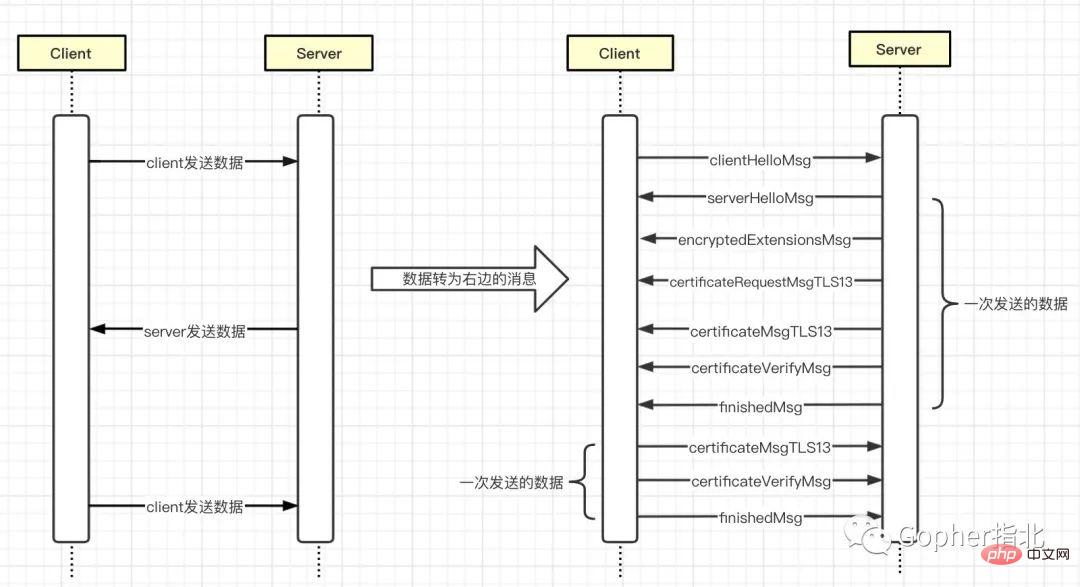
In two-way authentication, both the server and the client need to verify the legitimacy of the other party's certificate. The handshake process and msg exchanged are as follows.
Comparison of one-way authentication and two-way authentication:
In one-way authentication and two-way authentication, the total data is sent and received only three times, and the data sent in a single time contains one or more messages
clientHelloMsgandserverHelloMsgare not encrypted, and all subsequent messages are encryptedClient and Server will each calculate the key twice. The calculation timing is after reading the other party's
HelloMsgandfinishedMsgrespectivelyCompared with two-way authentication and one-way authentication, the server sends more
certificateRequestMsgTLS13messagesCompared with two-way authentication and one-way authentication, the client sends two more messages,
certificateMsgTLS13andcertificateVerifyMsg
Whether it is one-way authentication or two-way authentication, the Server's understanding of the Client's basic information completely relies on the Client actively telling the Server, and the more critical information isClient support TLS version , Encryption suites (cipherSuites) supported by the client , Signature algorithms supported by the client and key exchange protocols supported by the client and their corresponding public keys . This information is included in clientHelloMsg, which is also the key information for generating JA3 fingerprints, and clientHelloMsg and serverHelloMsg are not encrypted . Unencrypted means that the difficulty of modification is reduced, which also provides the possibility for us to customize our own JA3 fingerprint.
“If you are interested in learning more details about the HTTPS handshake process, please read the following article:
More than 2,000 lines of code were coded just to explain TLS clearly Handshake process
More than 2,000 lines of code have been coded just to explain clearly the TLS handshake process (continued)
”
What It’s JA3 fingerprint
I’ve said so much before, so what exactly is JA3 fingerprint? According to the article Open Sourcing JA3, Lao Xu simply understood it as JA3 is a method of online identification of TLS client fingerprints.
This method is used to collect the decimal byte values of the following fields in the clientHelloMsg data packet: TLS Version, Accepted Ciphers, List of Extensions , Elliptic Curves and Elliptic Curve Formats. It then concatenates these values, using "," to separate each field, and "-" to separate the values within each field. Finally, the md5 hash of these strings is calculated, resulting in a 32-character fingerprint that is easy to use and share.
In order to further describe the source of these data, Lao Xu combined the packet capture diagram in the John Althouse article with the clientHelloMsg structure in the Go source code. Fields are mapped one by one.
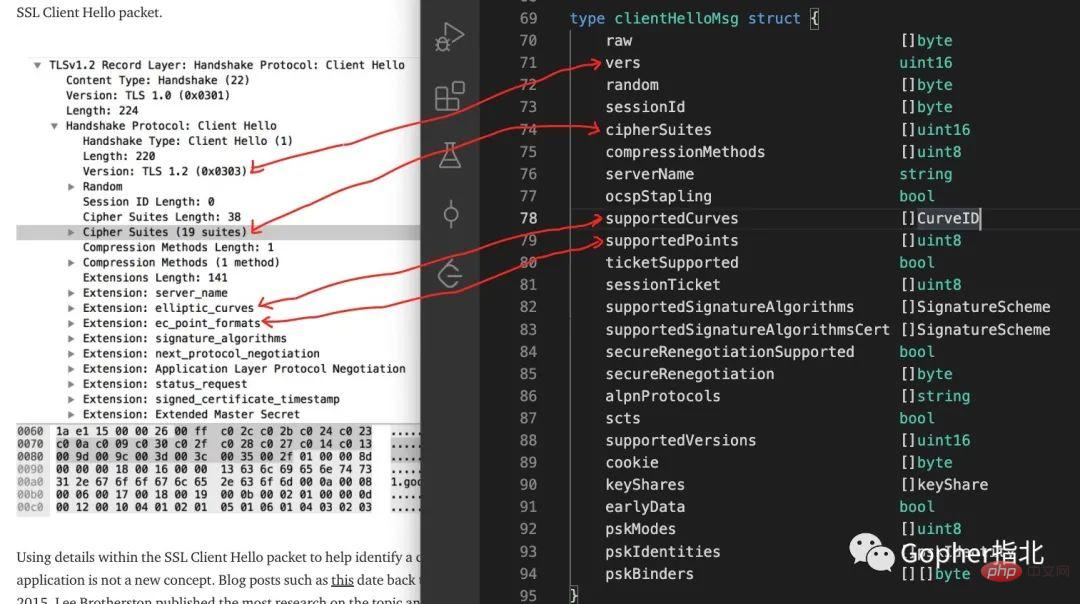
Careful students may have discovered that according to the previous description, the JA3 fingerprint has a total of 5 data fields, but only 4 are mapped in the picture above. That's because TLS has many extension fields, so I won't sort them out one by one. Although he did not list them one by one, Lao Xu prepared a unit test. Students who are interested in in-depth research can use this unit test to conduct debugging analysis.
https://github.com/Isites/go-coder/blob/master/http2/tls/handsh/msg_test.go
JA3 fingerprint usage
According to the previous description, JA3 fingerprint is an md5 string. Please recall the use of md5 in daily development.
判断内容是否一致 作为唯一标识
“md5虽然不安全,但是JA3选择md5作为哈希的主要原因是为了更好的向后兼容
”
很明显,JA3指纹也有其类似用途。举个简单的例子,攻击者构建了一个可执行文件,那么该文件的JA3指纹很有可能是唯一的。因此,我们能通过JA3指纹识别出一些恶意软件。
在本小节的最后,老许给大家推荐一个网站,该网站挂出了很多恶意JA3指纹列表。
https://sslbl.abuse.ch/ja3-fingerprints/
构建专属的JA3指纹
http1.1的专属指纹
前文提到clientHelloMsg和serverHelloMsg未经过加密,这为定制自己专属的JA3指纹提供了可能,而在github上面有一个库(https://github.com/refraction-networking/utls)可以在一定程度上修改clientHelloMsg。下面我们将通过这个库构建一个自己专属的JA3指纹。
// 关键import
import (
    xtls "github.com/refraction-networking/utls"
    "crypto/tls"
)

// 克隆一个Transport
tr := http.DefaultTransport.(*http.Transport).Clone()
// 自定义DialTLSContext函数,此函数会用于创建tcp连接和tls握手

tr.DialTLSContext = func(ctx context.Context, network, addr string) (net.Conn, error) {
 dialer := net.Dialer{}
 // 创建tcp连接
 con, err := dialer.DialContext(ctx, network, addr)
 if err != nil {
  return nil, err
 }
 // 根据地址获取host信息
 host, _, err := net.SplitHostPort(addr)
 if err != nil {
  return nil, err
 }
 // 构建tlsconf
 xtlsConf := &xtls.Config{
  ServerName:    host,
  Renegotiation: xtls.RenegotiateNever,
 }
 // 构建tls.UConn
 xtlsConn := xtls.UClient(con, xtlsConf, xtls.HelloCustom)
 clientHelloSpec := &xtls.ClientHelloSpec{
     // hellomsg中的最大最小tls版本
  TLSVersMax: tls.VersionTLS12,
  TLSVersMin: tls.VersionTLS10,
  // ja3指纹需要的CipherSuites
  CipherSuites: []uint16{
   tls.TLS_ECDHE_ECDSA_WITH_AES_256_GCM_SHA384,
   tls.TLS_ECDHE_ECDSA_WITH_AES_128_GCM_SHA256,
   // tls.TLS_ECDHE_ECDSA_WITH_AES_256_CBC_SHA384,
   tls.TLS_ECDHE_ECDSA_WITH_AES_128_CBC_SHA256,
   tls.TLS_ECDHE_ECDSA_WITH_AES_256_CBC_SHA,
   tls.TLS_ECDHE_ECDSA_WITH_AES_128_CBC_SHA,
   tls.TLS_ECDHE_ECDSA_WITH_CHACHA20_POLY1305,
   tls.TLS_ECDHE_RSA_WITH_AES_256_GCM_SHA384,
   tls.TLS_ECDHE_RSA_WITH_AES_128_GCM_SHA256,
   // tls.TLS_ECDHE_RSA_WITH_AES_256_CBC_SHA384,
   tls.TLS_ECDHE_RSA_WITH_AES_128_CBC_SHA256,
   tls.TLS_ECDHE_RSA_WITH_AES_256_CBC_SHA,
   tls.TLS_ECDHE_RSA_WITH_AES_128_CBC_SHA,
   tls.TLS_ECDHE_RSA_WITH_CHACHA20_POLY1305,
  },
  CompressionMethods: []byte{
   0,
  },
  // ja3指纹需要的Extensions
  Extensions: []xtls.TLSExtension{
   &xtls.RenegotiationInfoExtension{Renegotiation: xtls.RenegotiateOnceAsClient},
   &xtls.SNIExtension{ServerName: host},
   &xtls.UtlsExtendedMasterSecretExtension{},
   &xtls.SignatureAlgorithmsExtension{SupportedSignatureAlgorithms: []xtls.SignatureScheme{
    xtls.ECDSAWithP256AndSHA256,
    xtls.PSSWithSHA256,
    xtls.PKCS1WithSHA256,
    xtls.ECDSAWithP384AndSHA384,
    xtls.ECDSAWithSHA1,
    xtls.PSSWithSHA384,
    xtls.PSSWithSHA384,
    xtls.PKCS1WithSHA384,
    xtls.PSSWithSHA512,
    xtls.PKCS1WithSHA512,
    xtls.PKCS1WithSHA1}},
   &xtls.StatusRequestExtension{},
   &xtls.NPNExtension{},
   &xtls.SCTExtension{},
   &xtls.ALPNExtension{AlpnProtocols: []string{"h2", "http/1.1"}},
   // ja3指纹需要的Elliptic Curve Formats
   &xtls.SupportedPointsExtension{SupportedPoints: []byte{1}}, // uncompressed
   // ja3指纹需要的Elliptic Curves
   &xtls.SupportedCurvesExtension{
    Curves: []xtls.CurveID{
     xtls.X25519,
     xtls.CurveP256,
     xtls.CurveP384,
     xtls.CurveP521,
    },
   },
  },
 }
 // 定义hellomsg的加密套件等信息
 err = xtlsConn.ApplyPreset(clientHelloSpec)
 if err != nil {
  return nil, err
 }
 // TLS握手
 err = xtlsConn.Handshake()
 if err != nil {
  return nil, err
 }
 fmt.Println("当前请求使用协议:", xtlsConn.HandshakeState.ServerHello.AlpnProtocol)
 return xtlsConn, err
}
上述代码总结起来分为三步。
创建TCP连接
构建
clientHelloMsg需要的信息完成TLS握手
有了上述代码后,我们通过请求https://ja3er.com/json来得到自己的JA3指纹。
c := http.Client{
 Transport: tr,
}
resp, err := c.Get("https://ja3er.com/json")
if err != nil {
 fmt.Println(err)
 return
}
bts, err := ioutil.ReadAll(resp.Body)
resp.Body.Close()
fmt.Println(string(bts), err)
最后得到的JA3指纹如下。

我们已经得到了第一个JA3指纹,这个时候对代码稍加改动以期得到专属的JA3指纹。例如我们将2333这个数值加入到CipherSuites列表中,最后得到结果如下。
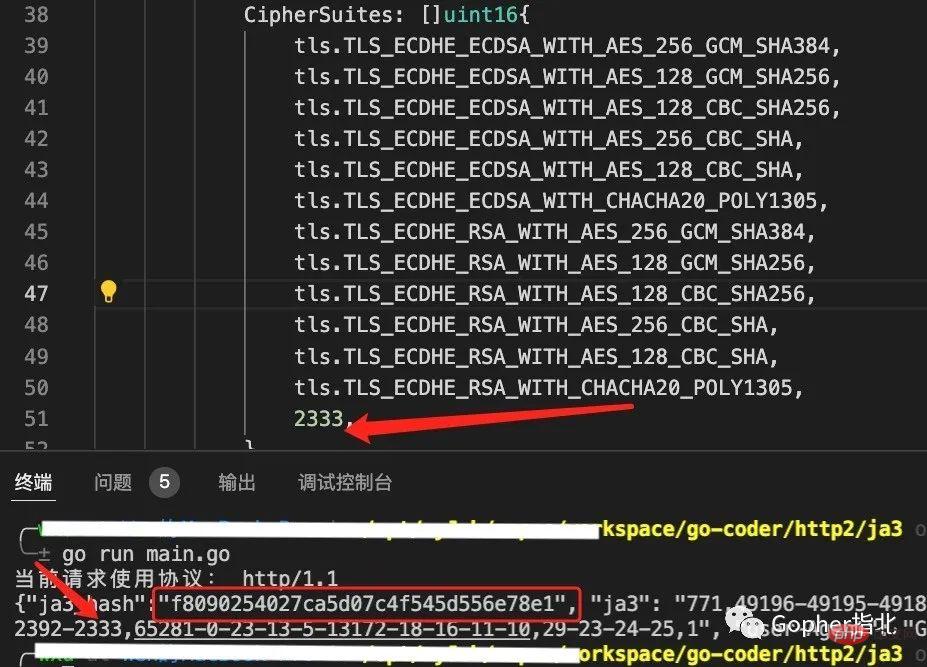
最终,JA3指纹又发生了变化,并且可称得上是自己专属的指纹。不用我说,看标题就应该知道问题还没有结束。从前面请求得到JA3指纹的结果图也可以看出来,当前使用的协议为http1.1,因此老许从某度中找了一个支持http2的链接继续验证。
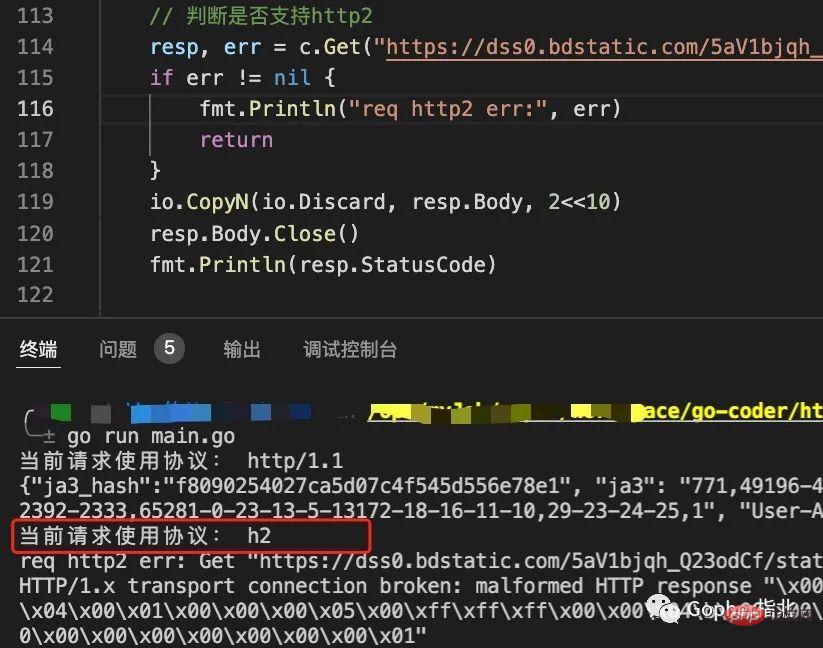
看过Go发起HTTP2.0请求流程析(前篇)这篇文章的同学应该知道,http2连接在建立时需要发送PRI * HTTP/2.0\r\n\r\nSM\r\n\r\n这么一个字符串。很明显,在自定义了DialTLSContext函数之后相关流程缺失。此时,我们该如何构建http2的专属指纹呢?
http2的专属指纹
通过DialTLSContext拨号之后只能得到一个已经完成TLS握手的连接,此时它还不支持http2的数据帧、多路复用等特性。所以,我们需要自己构建一个支持http2各种特性的连接。
下面,我们通过golang.org/x/net/http2来完成自定义TLS握手流程后的http2请求。
// 手动拨号,得到一个已经完成TLS握手后的连接
con, err := tr.DialTLSContext(context.Background(), "tcp", "dss0.bdstatic.com:443")
if err != nil {
 fmt.Println("DialTLSContext", err)
 return
}

// 构建一个http2的连接
tr2 := http2.Transport{}
// 这一步很关键,不可缺失
h2Con, err := tr2.NewClientConn(con)
if err != nil {
 fmt.Println("NewClientConn", err)
 return
}

req, _ := http.NewRequest("GET", "https://dss0.bdstatic.com/5aV1bjqh_Q23odCf/static/superman/img/topnav/newzhidao-da1cf444b0.png", nil)
// 向一个支持http2的链接发起请求并读取请求状态
resp2, err := h2Con.RoundTrip(req)
if err != nil {
 fmt.Println("RoundTrip", err)
 return
}
io.CopyN(io.Discard, resp2.Body, 2<<10)
resp2.Body.Close()
fmt.Println("响应code: ", resp2.StatusCode)
结果如下。
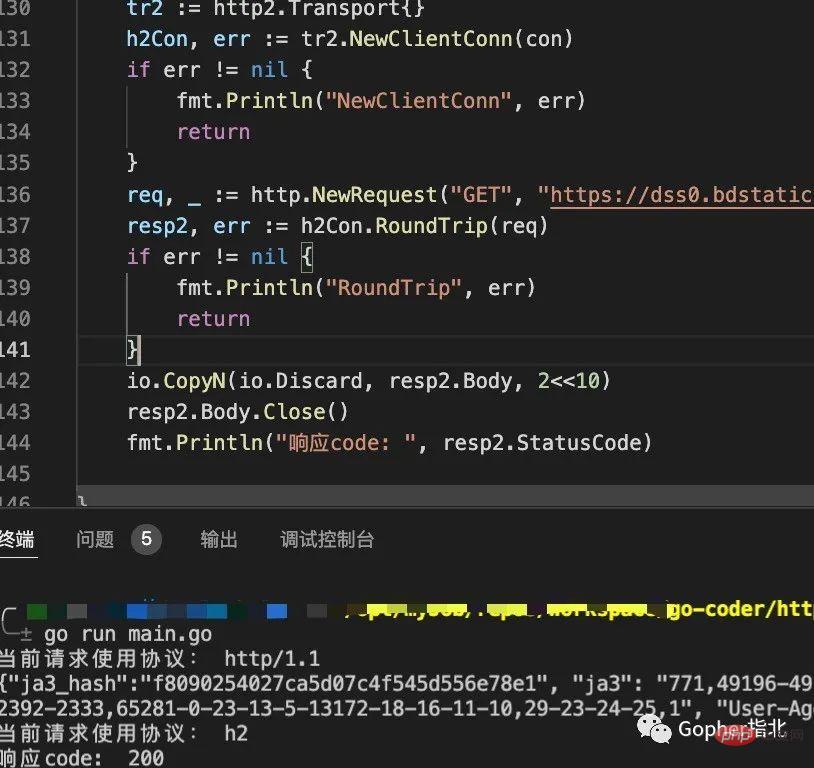
可以看到,最终在自定义JA3指纹后,http2的请求也能正常读取。至此,在支持http2的请求中构建专属的JA3指纹就完成了(生成JA3指纹的信息在clientHelloMsg中,完成本部分仅是为了确保从发起请求到读取响应都能够正常进行)。
A few additional words, completing http2 requests manually NewClientConn has great limitations. For example, you need to manage the life cycle of the connection yourself, cannot automatically reconnect, etc. Of course, these are all things for later. If there is a real need for this, developers may need to fork the net package from the go source code and maintain it themselves.
The above is the detailed content of Build your own JA3 fingerprint with Go. For more information, please follow other related articles on the PHP Chinese website!