
Home >Common Problem >How to change win7 desktop save path to d drive operation process of changing win7 desktop save path to d drive
How to change win7 desktop save path to d drive operation process of changing win7 desktop save path to d drive

- 王林forward
- 2023-07-20 15:37:069654browse
Under normal circumstances, the win7 desktop save path is set to the C drive by default. However, if there are too many things on the C drive, the computer will easily become laggy. So how to change the win7 desktop save path to the d drive? The method is very simple. You first create a desktop folder on the D drive, then find desktop, open its properties dialog box, switch to the location menu bar, click Move, select the folder we just created as the moving path, and save it. Just set it up.
Operation process to change win7 desktop save path to D drive:
1. First create a desktop folder in D drive;

2. Then find the desktop folder in the menu on the right, click "desktop", and then click to select properties;

3. Then click under the location menu bar , click Move, find the desktop folder we just created on the D drive, and then click Select;
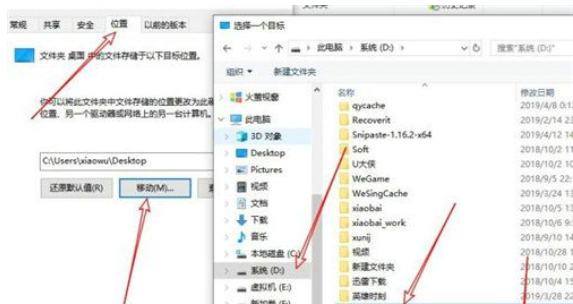
4. Finally, click OK to apply, and a pop-up box will appear. Just click it.

The above is the shared content of how to change the win7 desktop save path to the D drive. The win7 desktop save path is changed to the D drive.
The above is the detailed content of How to change win7 desktop save path to d drive operation process of changing win7 desktop save path to d drive. For more information, please follow other related articles on the PHP Chinese website!