 Web Front-end
 H5 Tutorial
 Tutorial on using layered canvas to optimize HTML5 rendering_html5 tutorial tips
Tutorial on using layered canvas to optimize HTML5 rendering_html5 tutorial tips
Introduction
Typically, when playing 2D games or rendering HTML5 canvases, you need to perform optimizations to use multiple layers to build a composite scene. In low-level rendering, such as OpenGL or WebGL, rendering is performed by cleaning and painting the scene on a frame-by-frame basis. After rendering is implemented, the game needs to be optimized to reduce the amount of rendering, and the cost varies depending on the situation. Because the canvas is a DOM element, it enables you to layer multiple canvases as a method of optimization.
Commonly used abbreviations
- CSS: Cascading Style Sheets
DOM: Document Object Model
HTML: HyperText Markup Language
This article will explore the rationale for layering canvases. Understand DOM settings to implement layered canvases. Optimizing using layering requires various practices. This article will also explore some optimization strategy concepts and techniques that extend the layered approach.
You can download the source code for the examples used in this article.
Choose an optimization strategy
Choosing the best optimization strategy can be difficult. When choosing a layered scene, you need to consider how the scene is composed. Rendering of stationary objects on large screens often requires the reuse of several components, and they are excellent candidates for study. Effects such as parallax or animated entities often require large amounts of varying screen space. It's a good idea to be aware of these situations when exploring your optimal optimization strategy. While canvas layering optimization requires several different techniques, when applied correctly these techniques often result in significant performance improvements.
Set layer
When using the layered approach, the first step is to set up the canvas on the DOM. Typically this is as simple as defining the canvas element and placing it in the DOM, but the canvas layer may require some additional styling. There are two requirements for successfully implementing canvas layering when using CSS:
Each canvas element must coexist in the same position in the viewport.
Each canvas must be visible underneath another canvas.
Figure 1 shows the general overlay concept behind layer settings.
Figure 1. Layer example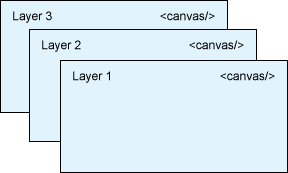
The steps to set up a layer are as follows:
- Add canvas element to DOM.
Add canvas element positioning style to support layering.
Stylize the canvas element to generate a transparent background.
Set canvas overlap stack
Creating an overlay stack in CSS may require a small amount of styling. There are many ways to overlap using HTML and CSS. The examples in this article use a
List 1. Canvas positioning style
- #viewport {
- /**
- * Position relative so that canvas elements
- * inside of it will be relative to the parent
- */
- position: relative;
- }
- #viewport canvas {
- /**
- * Position absolute provides canvases to be able
- * to be layered on top of each other
- * Be sure to remember a z-index!
- */
- position: absolute;
- }
Container
The order of these HTML5 canvas elements is also important. The order can be managed by the order in which elements appear on the DOM, or by styling z-index styles in the order in which the canvas should appear. Although not always the case, other styles may affect rendering; be careful when introducing additional styles (such as any kind of CSS transform).
Transparent background
Achieve the second styling requirement of the layer technique by using overlapping visibility. The example uses this option to set the DOM element background color, as shown in Listing 2.
Listing 2. Style sheet rules for setting transparent background
- canvas {
- /**
- * Set transparent to let any other canvases render through
- */
- background-color: transparent;
- }
Style the canvas to have a transparent background, which fulfills the second requirement of having a visible overlapping canvas. Now that you've structured your markup and styles to meet your layering needs, you can set up a layered scene.
Layering considerations
When choosing an optimization strategy, you should be aware of all the trade-offs when using that strategy. Layering HTML5 canvas scenes is a runtime memory-focused strategy used to gain runtime speed advantages. You can add more weight to the page's browser to get a faster frame rate. Generally speaking, the canvas is considered a graphics plane on the browser, which includes a graphics API.
By testing in Google Chrome 19 and recording the browser's tab memory usage, you can see clear trends in memory usage. This test uses an already styled
In Google Chrome’s Task Manager, you can see the amount of memory (also called RAM) used by a page. Chrome also provides GPU memory, or the memory being used by the GPU. This is common information like geometry, textures, or any form of cached data that the computer might need to push your canvas data to the screen. The lower the memory, the less weight will be placed on the computer. While there aren't any firm numbers to base it on yet, you should always test this to make sure your program doesn't push its limits and use too much memory. If too much memory is used, the browser or page will crash due to lack of memory resources. GPU processing is an ambitious programming pursuit that is beyond the scope of this article. You can start by learning OpenGL or checking Chrome's documentation (see Resources).
Table 1. Memory overhead of canvas layer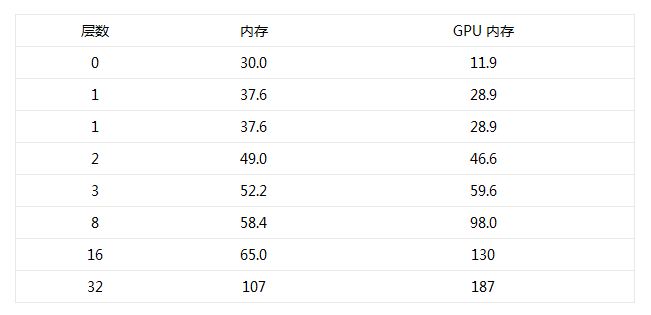
In Table 1, as more HTML5 canvas elements are introduced and used on the page, more memory is used. General memory also has a linear correlation, but with each additional layer, the memory growth will be significantly reduced. While this test doesn't detail the performance impact of these layers, it does show that canvas can severely impact GPU memory. Always remember to perform stress testing on your target platform to ensure that platform limitations do not render your application unable to perform.
When choosing to change the single canvas rendering cycle of a layered solution, consider the performance gains regarding memory overhead. Despite the memory cost, this technique does its job by reducing the number of pixels modified on each frame.
The next section explains how to use layers to organize a scene.
Layering Scenes: Games
In this section, we'll look at a multi-layered solution by refactoring a single-canvas implementation of a parallax effect on a scrolling platform runner-style game. Figure 2 shows the composition of the game view, which includes clouds, hills, ground, background and some interactive entities.
Figure 2. Synthetic game view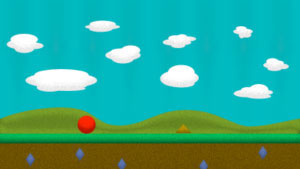
In the game, clouds, hills, ground and background all move at different speeds. Essentially, elements further in the background move slower than elements in front, thus creating a parallax effect. To make things more complicated, the background moves slowly enough that it only re-renders every half a second.
Typically a good solution would be to clear all frames and re-render the screen since the background is an image and is constantly changing. In this case, since the background only changes twice per second, you don't need to re-render each frame.
Currently, you have defined your workspace, so you can decide which parts of your scene should be on the same layer. With the layers organized, we'll explore various rendering strategies for layering. First, you need to consider how to implement this solution using a single canvas, as shown in Listing 3.
Listing 3. Pseudocode for single-canvas rendering loop
- /**
- * Render call
- *
- * @param {CanvasRenderingContext2D} context Canvas context
- */
- function renderLoop(context)
- {
- context.clearRect(0, 0, width, height);
- background.render(context);
- ground .render(context);
- hills.render(context);
- cloud.render(context);
- player.render(context);
- }
Like the code in Listing 3, this solution would have a render function that is called every game loop call or every update interval. In this case, rendering is abstracted away from the main loop calls and update calls that update the position of each element.
Following the "clear to render" solution, render calls the clear context and keeps track of it by calling the entities on screen's respective render functions. Listing 3 follows a programmatic path to place elements on the canvas. While this solution is effective for rendering entities on the screen, it neither describes all rendering methods used nor does it support any form of rendering optimization.
In order to better specify the rendering method of entities, two types of entity objects need to be used. Listing 4 shows the two entities you will use and refine.
Listing 4. Renderable Entity pseudocode
- var Entity = function() {
- /**
- Initialization and other methods
- **/
- /**
- * Render call to draw the entity
- *
- * @param {CanvasRenderingContext2D} context
- */
- this.render = function(context) {
- context.drawImage(this.image, this.x, this.y);
- }
- };
- var PanningEntity = function() {
- /**
- Initialization and other methods
- **/
- /**
- * Render call to draw the panned entity
- *
- * @param {CanvasRenderingContext2D} context
- */
- this.render = function(context) {
- context.drawImage(
- this.image,
- this.x - this.width,
- this.y - this.height);
- context.drawImage(
- this.image,
- this.x,
- this.y);
- context.drawImage(
- this.image,
- this.x this.width,
- this.y this.height);
- }
- };
The object in Listing 4 stores instance variables for the entity's image, x, y, width, and height. These objects follow JavaScript syntax, but for the sake of brevity, only incomplete pseudocode for the target objects is provided. Currently, rendering algorithms are very greedy at rendering their images on the canvas, without regard to any other requirements of the game loop.
To improve performance, it is important to note that the panning render call outputs a larger image than the desired image. This article ignores this specific optimization, however, if the space used is smaller than what your image provides, then make sure to only render the necessary patches.
Determine layering
Now that you know how to implement this example using a single canvas, let's see if there are any ways we can refine this type of scene and speed up the rendering loop. To use layering techniques, you must identify the HTML5 canvas elements required for layering by finding the rendering overlap of entities.
Redraw area
To determine if there is an overlap, consider some invisible area called the redraw area. The redraw area is the area where the canvas needs to be cleared when drawing the entity's image. Redraw regions are important for rendering analysis because they allow you to find optimization techniques to perfect your rendered scene, as shown in Figure 3.
Figure 3. Synthetic game view and redraw area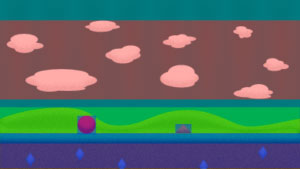
To visualize the effect in Figure 3, each entity in the scene has an overlay representing the redraw area, which spans the viewport width and the entity's image height. Scenes can be divided into three groups: background, foreground, and interactions. The repainted areas in the scene have a colored overlay to differentiate between different areas:
- Background – black
Clouds – red
Hill – green
Ground – blue
Red ball – blue
Yellow obstacle – blue
For all overlaps except balls and obstacles, the redraw area spans the viewport width. Images of these entities fill nearly the entire screen. Because of their translation requirements, they will render the entire viewport width, as shown in Figure 4. Balls and obstacles are expected to pass through this viewport, and may have their own areas defined by entity positions. You can easily see the individual layers if you remove the image rendered to the scene, leaving only the redrawn area.
Figure 4. Redraw area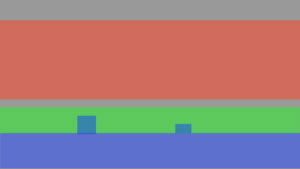
The initial layer is obvious because you can notice the various areas that overlap each other. Because the ball and obstacle areas cover the hill and ground, these entities can be grouped into one layer, called the interaction layer. According to the rendering order of game entities, the interaction layer is the top layer.
Another way to find additional layers is to collect all areas without overlap. The red, green, and blue areas that occupy the viewport do not overlap, and they form the second layer, the foreground. The areas of the cloud and interactive entities do not overlap, but because the ball has the potential to jump to the red area, you should consider making this entity a separate layer.
For the black area, it can be easily deduced that the background entities will make up the final layer. Any area that fills the entire viewport (such as a background entity) should be considered to fill that area in the entire layer, although this does not apply to this scene. After defining our three layers, we can start assigning this layer to the canvas, as shown in Figure 5.
Figure 5. Layered game view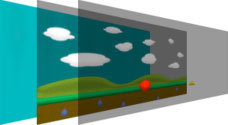
Now that you have defined layers for each grouped entity, you can start optimizing canvas clearing. The goal of this optimization is to save processing time, which can be achieved by reducing the number of on-screen fixtures rendered at each step. It's important to note that images may be better optimized using different strategies. The next section explores optimization methods for various entities or layers.
Rendering optimization
Optimizing entities is the core of the layered strategy. Layering entities allows rendering strategies to be adopted. Typically, optimization techniques attempt to eliminate overhead. As mentioned in Table 1, you have increased memory overhead due to the introduction of layers. The optimization techniques discussed here will reduce the amount of work the processor has to do in order to speed up gaming. Our goal is to find a way to reduce the amount of space to render and remove as many render and clean calls as possible from each step.
Single Entity Clear
The first optimization targets clearing space, speeding up processing by clearing only the subset of the screen that makes up the entity. First reduce the amount of the redraw area that overlaps the transparent pixels around each entity of the area. Use of this technique includes relatively small entities that fill a small area of the viewport.
The first target is the ball and obstacle entities. The single entity clearing technique involves clearing the position where the entity was rendered in the previous frame before rendering the entity to its new position. We will introduce a cleanup step to the rendering of each entity and store the bounding box of the entity's image. Adding this step modifies the entity object to include the cleanup step, as shown in Listing 5.
Listing 5. Entities containing single box clearing
- var Entity = function() {
- /**
- Initialization and other methods
- **/
- /**
- * Render call to draw the entity
- *
- * @param {CanvasRenderingContext2D} context
- */
- this.render = function(context) {
- context.clearRect(
- this.prevX,
- this.prevY,
- this.width,
- this.height);
- context.drawImage(this.image, this.x, this.y);
- thisthis.prevX = this.x;
- thisthis.prevY = this.y;
- }
- };
An update to the render function introduces a clearRect call that occurs before the regular drawImage. For this step, the object needs to store the previous location. Figure 6 shows the steps taken by the subject with respect to the previous position.
Figure 6. Clear rectangle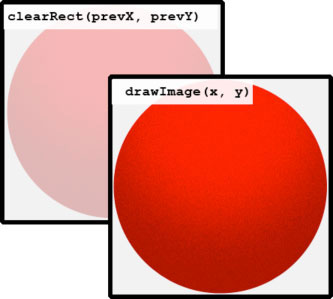
You can implement this rendering solution by creating a clear method for each entity that is called before the update step (but this article will not use the clear method). You can also introduce this clearing strategy to PanningEntity to add clearing on ground and cloud entities, as shown in Listing 6.
Listing 6. PanningEntity with single box clearing
- var PanningEntity = function() {
- /**
- Initialization and other methods
- **/
- /**
- * Render call to draw the panned entity
- *
- * @param {CanvasRenderingContext2D} context
- */
- this.render = function(context) {
- context.clearRect(
- this.x,
- this.y,
- context.canvas.width,
- this.height);
- context.drawImage(
- this.image,
- this.x - this.width,
- this.y - this.height);
- context.drawImage(
- this.image,
- this.x,
- this.y);
- context.drawImage(
- this.image,
- this.x this.width,
- this.y this.height);
- }
- };
Because the PanningEntity spans the entire viewport, you can use the canvas width as the size of the clearing rectangle. If you use this clearing strategy, you will be given redraw areas that have been defined for clouds, hills, and ground entities.
To further optimize cloud entities, clouds can be separated into separate entities with their own redraw areas. Doing so will significantly reduce the amount of screen space to clear within the cloud redraw area. Figure 7 shows the new redraw area.
Figure 7. Cloud with separate redraw areas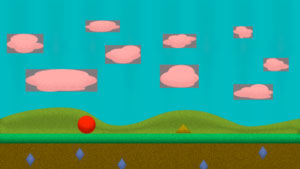
A single entity clearing strategy produces a solution that solves most problems on a layered canvas game like this one, but it can still be optimized. To find the extreme cases for this rendering strategy, we assume that the ball will collide with the triangle. If two entities collide, it is possible for the entity's redraw areas to overlap and create an undesired rendering artifact. Another cleanup optimization, more suitable for entities that may collide, which will also benefit layering.
Dirty Rectangle Clear
In the absence of a single cleaning strategy, the dirty rectangle cleaning strategy can be a powerful alternative. You can use this clearing strategy with large entities that have repainted areas, such as dense particle systems, or space games with asteroids.
Conceptually, the algorithm collects the redraw area of all entities managed by the algorithm and clears the entire area in one clear call. For added optimization, this cleanup strategy also removes duplicate cleanup calls made by each independent entity, as shown in Listing 7.
Listing 7.DirtyRectManager
- var DirtyRectManager = function() {
- // Set the left and top edge to the max possible
- // (the canvas width) amd right and bottom to least-most
- // Left and top will shrink as more entities are added
- this.left = canvas.width;
- this.top = canvas.height;
- // Right and bottom will grow as more entities are added
- this.right = 0;
- this.bottom = 0;
- // Dirty check to avoid clearing if no entities were added
- this.isDirty = false;
- // Other Initialization Code
- /**
- * Other utility methods
- */
- /**
- * Adds the dirty rect parameters and marks the area as dirty
- *
- * @param {number} x
- * @param {number} y
- * @param {number} width
- * @param {number} height
- */
- this.addDirtyRect = function(x, y, width, height) {
- // Calculate out the rectangle edges
- var left = x;
- var right = x width;
- var top = y;
- var bottom = y height;
- // Min of left and entity left
- this.left = left this.left left : this.left;
- // Max of right and entity right
- this.right = right > this.right right : this.right;
- // Min of top and entity top
- this.top = top this.top top : this.top;
- // Max of bottom and entity bottom
- this.bottom = bottom > this.bottom bottom : this.bottom;
- this.isDirty = true;
- };
- /**
- * Clears the rectangle area if the manager is dirty
- *
- * @param {CanvasRenderingContext2D} context
- */
- this.clearRect = function(context) {
- if (!this.isDirty) {
- return;
- }
- // Clear the calculated rectangle
- context.clearRect(
- this.left,
- this.top,
- this.right - this.left,
- this.bottom - this.top);
- // Reset base values
- this.left = canvas.width;
- this.top = canvas.height;
- this.right = 0;
- this.bottom = 0;
- this.isDirty = false;
- }
- };
将脏矩形算法集成到渲染循环,这要求在进行渲染调用之前调用清单 7中的管理器。将实体添加到管理器,使管理器可以在清除时计算清除矩形的维度。虽然管理器会产生预期的优化,但根据游戏循环,管理器能够针对游戏循环进行优化,如图 8所示。
图 8. 交互层的重绘区域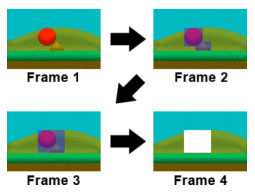
- 帧 1 – 实体在碰撞,几乎重叠。
帧 2 – 实体重绘区域是重叠的。
帧 3 – 重绘区域重叠,并被收集到一个脏矩形中。
帧 4 – 脏矩形被清除。
图 8显示了由针对在交互层的实体的算法计算出的重绘区域。因为游戏在这一层上包含交互,所以脏矩形策略足以解决交互和重叠的重绘区域问题。
作为清除的重写
对于在恒定重绘区域中动画的完全不透明实体,可以使用重写作为一项优化技术。将不透明的位图渲染为一个区域(默认的合成操作),这会将像素放在该区域中,不需要考虑该区域中的原始渲染。这个优化消除了渲染调用之前所需的清除调用,因为渲染会覆盖原来的区域。
通过在之前的渲染的上方重新渲染图像,重写可以加快地面实体。也可以通过相同的方式加快最大的层,比如背景。
通过减少每一层的重绘区域,您已经有效地为层和它们所包含的实体找到优化策略。
结束语
对画布进行分层是一个可以应用于所有交互式实时场景的优化策略。如果想利用分层实现优化,您需要通过分析场景的重绘区域来考虑场景如何重叠这些区域。一些场景是具有重叠的重绘区域的集合,可以定义层,因此它们是渲染分层画布的良好候选。如果您需要粒子系统或大量物理对象碰撞在一起,对画布进行分层可能是一个很好的优化选择。
 H5 and HTML5: Commonly Used Terms in Web DevelopmentApr 13, 2025 am 12:01 AM
H5 and HTML5 refer to the same thing, namely HTML5. HTML5 is the fifth version of HTML, bringing new features such as semantic tags, multimedia support, canvas and graphics, offline storage and local storage, improving the expressiveness and interactivity of web pages.
 What Does H5 Refer To? Exploring the ContextApr 12, 2025 am 12:03 AM
H5referstoHTML5,apivotaltechnologyinwebdevelopment.1)HTML5introducesnewelementsandAPIsforrich,dynamicwebapplications.2)Itsupportsmultimediawithoutplugins,enhancinguserexperienceacrossdevices.3)SemanticelementsimprovecontentstructureandSEO.4)H5'srespo
 H5: Tools, Frameworks, and Best PracticesApr 11, 2025 am 12:11 AM
The tools and frameworks that need to be mastered in H5 development include Vue.js, React and Webpack. 1.Vue.js is suitable for building user interfaces and supports component development. 2.React optimizes page rendering through virtual DOM, suitable for complex applications. 3.Webpack is used for module packaging and optimize resource loading.
 The Legacy of HTML5: Understanding H5 in the PresentApr 10, 2025 am 09:28 AM
HTML5hassignificantlytransformedwebdevelopmentbyintroducingsemanticelements,enhancingmultimediasupport,andimprovingperformance.1)ItmadewebsitesmoreaccessibleandSEO-friendlywithsemanticelementslike,,and.2)HTML5introducednativeandtags,eliminatingthenee
 H5 Code: Accessibility and Semantic HTMLApr 09, 2025 am 12:05 AM
H5 improves web page accessibility and SEO effects through semantic elements and ARIA attributes. 1. Use, etc. to organize the content structure and improve SEO. 2. ARIA attributes such as aria-label enhance accessibility, and assistive technology users can use web pages smoothly.
 Is h5 same as HTML5?Apr 08, 2025 am 12:16 AM
"h5" and "HTML5" are the same in most cases, but they may have different meanings in certain specific scenarios. 1. "HTML5" is a W3C-defined standard that contains new tags and APIs. 2. "h5" is usually the abbreviation of HTML5, but in mobile development, it may refer to a framework based on HTML5. Understanding these differences helps to use these terms accurately in your project.
 What is the function of H5?Apr 07, 2025 am 12:10 AM
H5, or HTML5, is the fifth version of HTML. It provides developers with a stronger tool set, making it easier to create complex web applications. The core functions of H5 include: 1) elements that allow drawing graphics and animations on web pages; 2) semantic tags such as, etc. to make the web page structure clear and conducive to SEO optimization; 3) new APIs such as GeolocationAPI support location-based services; 4) Cross-browser compatibility needs to be ensured through compatibility testing and Polyfill library.
 How to do h5 linkApr 06, 2025 pm 12:39 PM
How to create an H5 link? Determine the link target: Get the URL of the H5 page or application. Create HTML anchors: Use the <a> tag to create an anchor and specify the link target URL. Set link properties (optional): Set target, title, and onclick properties as needed. Add to webpage: Add HTML anchor code to the webpage where you want the link to appear.


Hot AI Tools

Undresser.AI Undress
AI-powered app for creating realistic nude photos

AI Clothes Remover
Online AI tool for removing clothes from photos.

Undress AI Tool
Undress images for free

Clothoff.io
AI clothes remover

AI Hentai Generator
Generate AI Hentai for free.

Hot Article

Hot Tools

DVWA
Damn Vulnerable Web App (DVWA) is a PHP/MySQL web application that is very vulnerable. Its main goals are to be an aid for security professionals to test their skills and tools in a legal environment, to help web developers better understand the process of securing web applications, and to help teachers/students teach/learn in a classroom environment Web application security. The goal of DVWA is to practice some of the most common web vulnerabilities through a simple and straightforward interface, with varying degrees of difficulty. Please note that this software

VSCode Windows 64-bit Download
A free and powerful IDE editor launched by Microsoft

MinGW - Minimalist GNU for Windows
This project is in the process of being migrated to osdn.net/projects/mingw, you can continue to follow us there. MinGW: A native Windows port of the GNU Compiler Collection (GCC), freely distributable import libraries and header files for building native Windows applications; includes extensions to the MSVC runtime to support C99 functionality. All MinGW software can run on 64-bit Windows platforms.
ZendStudio 13.5.1 Mac
Powerful PHP integrated development environment

WebStorm Mac version
Useful JavaScript development tools


