
 Web Front-endH5 TutorialTutorial on using HTML5 to achieve the eraser smearing effect_html5 tutorial skills
Tutorial on using HTML5 to achieve the eraser smearing effect_html5 tutorial skills

This effect has just been used in a recent project, which is a bit like a scratch card. On a mobile device, a picture is scratched off to display another picture. The rendering is as follows: 
DEMO please click on the right: DEMO
This is quite common on the Internet. I originally wanted to just find a demo online and apply his method. After applying it, I found out that in android Because of customer requirements, it is not required to be particularly smooth on Android, at least it must be playable, but the demo I found online is too laggy and cannot be played at all. So I just wanted to write one myself, and this article is just for recording the research process.
The first thing that comes to mind for this scraping effect is to use the HTML5 canvas. In the canvas API, the clearRect method that can clear pixels is the clearRect method, but the clearRect method clears the area rectangle. After all, most people are used to it. Erasers are all round, so the powerful function of the clipping area is introduced, which is the clip method. Usage is very simple:
- ctx.save()
- ctx.beginPath()
- ctx.arc(x2,y2,a,0,2*Math.PI);
- ctx.clip()
- ctx.clearRect(0,0,canvas.width,canvas.height);
- ctx.restore();
The above code realizes the erasure of a circular area, that is, first implements a circular path, and then uses this path as the clipping area, and then clears the pixels. One thing to note is that you need to save the drawing environment first, and reset the drawing environment after clearing the pixels. If you do not reset, future drawings will be limited to that clipping area.
Now that the erasing effect is there, now it’s time to write the erasing effect of mouse movement. I’ll use the mouse to describe it below, because the mobile version is similar, that is, replace mousedown with touchstart, mousemove with touchmove, and mouseup with touchend. , and the coordinate point acquisition is changed from e.clientX to e.targetTouches[0].pageX.
To implement mouse movement erasure, I first thought of erasing the circular area where the mouse is located in the mousemove event triggered when the mouse moves. After writing it out, I found that when the mouse moves very fast, the erased The area is no longer coherent, and the following effect will appear. This is obviously not the eraser effect we want. 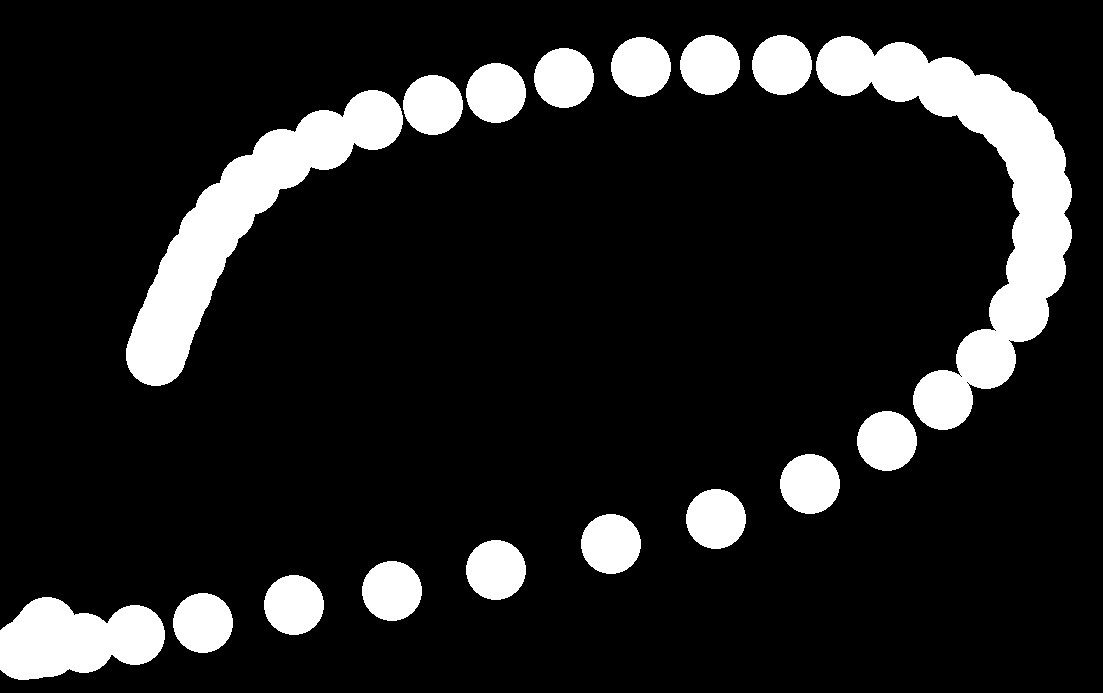
Since all the points are incoherent, the next thing to do is to connect these points. If you are implementing the drawing function, you can directly connect the two points through lineTo and then draw, but the erasure effect is The clipping area requires a closed path. If you simply connect two points, the clipping area cannot be formed. Then I thought of using calculation methods to calculate the four endpoint coordinates of the rectangles in the two erasing areas, which is the red rectangle in the picture below: 
The calculation method is also very simple, because we can know the coordinates of the two endpoints of the line connecting the two clipping areas, and also know how wide the line we want, the coordinates of the four endpoints of the rectangle become easy to find, so there is Code below:
XML/HTML CodeCopy content to clipboard
- var aasin = a*Math.sin(Math.atan((y2-y1)/(x2- x1)));
- var aacos = a*Math.cos(Math.atan((y2-y1)/(x2-x1)) )
- var x3 = x1 asin;
- var y3 = y1-acos;
- var x4 = x1-asin;
- var y4 = y1 acos;
- var x5 = x2 asin;
- var y5 = y2-acos;
- var x6 = x2-asin;
- var y6 = y2 acos;
x1, y1 and x2, y2 are the two endpoints, thus the coordinates of the four endpoints are obtained. In this way, the clipping area is a circle plus a rectangle, and the code is organized as follows:
XML/HTML CodeCopy the content to the clipboard
- var hastouch = "ontouchstart" in window?true:false,//determine whether For mobile devices
- tapstart = hastouch?"touchstart":"mousedown",
- tapmove = hastouch?"touchmove":"mousemove",
- tapend = hastouch?"touchend":"mouseup";
- canvas.addEventListener(tapstart , function(e){
- e.preventDefault();
- x1 = hastouch?e.targetTouches[0].pageX:e.clientX-canvas.offsetLeft ;
- y1 = hastouch?e.targetTouches[0].pageY:e.clientY-canvas.offsetTop ;
- // Erase a circular area when the mouse is clicked for the first time, and record the first coordinate point at the same time
- ctx.save()
- ctx.beginPath()
- ctx.arc(x1,y1,a,0,2*Math.PI);
- ctx.clip()
- ctx.clearRect(0,0,canvas.width,canvas.height);
- ctx.restore();
- canvas.addEventListener(tapmove, tapmoveHandler);
- canvas.addEventListener(tapend, function(){
- canvas.removeEventListener(tapmove, tapmoveHandler);
- });
- //This event is triggered when the mouse moves
- function tapmoveHandler(e){
- e.preventDefault()
- x2 = hastouch?e.targetTouches[0].pageX:e.clientX-canvas.offsetLeft ;
- y2 = hastouch?e.targetTouches[0].pageY:e.clientY-canvas.offsetTop ;
- //Get the four endpoints of the clipping area between two points
- var aasin = a*Math.sin(Math.atan((y2-y1)/(x2-x1)) );
- var aacos = a*Math.cos(Math.atan((y2-y1)/(x2-x1)) )
- var x3 = x1 asin;
- var y3 = y1-acos;
- var x4 = x1-asin;
- var y4 = y1 acos;
- var x5 = x2 asin;
- var y5 = y2-acos;
- var x6 = x2-asin;
- var y6 = y2 acos;
- // Ensure the continuity of the lines, so draw a circle at one end of the rectangle
- ctx.save()
- ctx.beginPath()
- ctx.arc(x2,y2,a,0,2*Math.PI);
- ctx.clip()
- ctx.clearRect(0,0,canvas.width,canvas.height);
- ctx.restore();
- // Clear the pixels in the rectangular clipping area
- ctx.save()
- ctx.beginPath()
- ctx.moveTo(x3,y3);
- ctx.lineTo(x5,y5);
- ctx.lineTo(x6,y6);
- ctx.lineTo(x4,y4);
- ctx.closePath();
- ctx.clip()
- ctx.clearRect(0,0,canvas.width,canvas.height);
- ctx.restore();
- //Record the last coordinates
- x1 = x2;
- y1 = y2;
- }
- })
In this way, the mouse erasing effect is achieved, but there is another point to be achieved, which is the effect of most erasing. When you erase a certain number of pixels, all the image content will be automatically Shown, this effect, I use imgData to achieve. The code is as follows:
Copy code
- var imgData = ctx.getImageData(0,0,canvas.width,canvas. height);
- var dd = 0;
- for(var x=0;ximgData.width;x =1){
- for(var y=0;yimgData.height;y =1){
- var i = (y*imgData.width x)*4;
- if(imgData.data[i 3] > 0){
- dd dd
- }
- }
- if(dd/(imgData.width*imgData.height)
- 0.4){
- canvas.className = "noOp"; }
Obtain imgData, traverse the pixels in imgData, and then analyze the alpha in rgba in the data array of imgData, that is, analyze the transparency. If the pixel is erased, the transparency will be 0, that is It is to compare the number of pixels with non-zero transparency in the current canvas to the total number of pixels on the canvas. If the proportion of pixels with non-zero transparency is less than 40%, it means that there will be more than 60% of the area on the current canvas. Once erased, the picture can be automatically presented.
Note here that I put the code for checking pixels in the mouseup event, because the amount of calculation is relatively large. If the user clicks the mouse wildly, the mouseup event will be triggered wildly, which means he will be crazy. Triggering that loop to calculate pixels, the amount of calculation is so large that it blocks the process and causes the interface to get stuck. The solution is as follows: add a timeout to delay the execution of the pixel calculation, and clear the timeout every time the user clicks, that is, if the user clicks for a long time Quickly, this calculation will no longer be triggered. Another way to improve is to do random inspections. The way I wrote it above is to check pixel by pixel. If the number of pixels is too large, it will definitely get stuck, so you can use random inspection, such as Check every 30 pixels. The modified code is as follows:
Copy code
- timeout = setTimeout(function(){
- var imgData = ctx.getImageData(0,0,canvas.width,canvas.height);
- var dd = 0;
- for(var x=0;ximgData.width;x =30){
- for(var y=0;yimgData.height;y =30){
- var i = (y*imgData.width x)*4;
- if(imgData.data[i 3] >0){
- dd dd
- }
- if(dd/(imgData.width*imgData.height/900) 0.4){ canvas.className
- = "noOp"; }
- },100)
-
This can prevent users from clicking wildly to the greatest extent. If there are other better checking methods, please give your opinions, thank you.
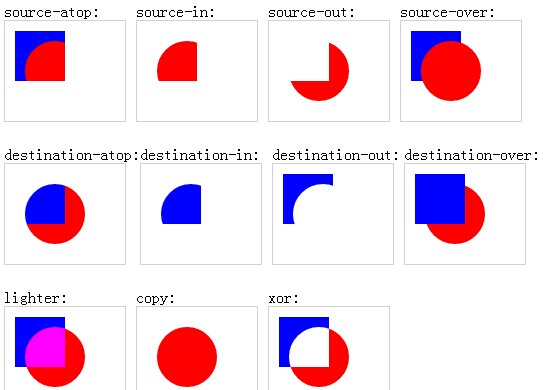
At this step, everything was written, and then it was time to test. The results were not optimistic. It was still stuck on android, so I had to think of another way. Finally, I discovered the globalCompositeOperation attribute in the drawing environment. The default value of this property is source-over, that is, it will be overlaid when you draw on existing pixels, but there is also a property called destination-out. The official explanation is: display the destination image outside the source image. Only the portion of the target image outside the source image will be displayed, and the source image is transparent. It seems hard to understand, but in fact, if you test it yourself, you will find that it is very simple. That is, when you draw based on existing pixels, the existing pixels in the area you draw will be made transparent. You can change it directly by looking at the picture. Easy to understand:

Illustration of the effect of globalCompositeOperation attribute.
With this attribute, it means that there is no need to use clip, and there is no need to use sin or cos to calculate the clipping area. Just use a thick line, which can greatly reduce the cost. The amount of calculation is reduced, and the calls to the drawing environment API are reduced. The performance is improved, and running on Android should be much smoother. The following is the modified code:XML/HTML CodeCopy content to clipboard- //Achieve erasure effect by modifying globalCompositeOperation
- function tapClip(){
- var hastouch = "ontouchstart" in window?true:false,
- tapstart = hastouch?"touchstart":"mousedown",
- tapmove = hastouch?"touchmove":"mousemove",
- tapend = hastouch?"touchend":"mouseup";
- canvas.addEventListener(tapstart, function(e){
- clearTimeout(timeout)
- e.preventDefault();
- x1 = hastouch?e.targetTouches[0].pageX:e.clientX-canvas.offsetLeft ;
- y1 = hastouch?e.targetTouches[0].pageY:e.clientY-canvas.offsetTop ;
- ctx.lineCap = "round"; //Set both ends of the line as arcs
- ctx.lineJoin = "round"; //Set the line turning to arc
- ctx.lineWidth = a*2;
- ctx.globalCompositeOperation = "destination-out";
- ctx.save();
- ctx.beginPath()
- ctx.arc(x1,y1,1,0,2*Math.PI);
- ctx.fill();
- ctx.restore();
- canvas.addEventListener(tapmove, tapmoveHandler);
- canvas.addEventListener(tapend, function(){
- canvas.removeEventListener(tapmove, tapmoveHandler);
- timeout
-
= setTimeout(function(){
- var imgData = ctx.getImageData(0,0,canvas.width,canvas.height);
- var dd = 0;
- for(var x=0;ximgData.width;x =30){
- for(var y=0;yimgData.height;y =30){
- var i = (y*imgData.width x)*4;
- if(imgData.data[i 3] > 0){
- dd
- }
- }
- }
- if(dd/(imgData.width*imgData.height/900)0.4){
- canvas.className = "noOp";
- }
- },100)
- });
- function tapmoveHandler(e){
- e.preventDefault()
- x2 = hastouch?e.targetTouches[0].pageX:e.clientX-canvas.offsetLeft;
- y2 = hastouch?e.targetTouches[0].pageY:e.clientY-canvas.offsetTop;
- ctx.save();
- ctx.moveTo(x1,y1);
- ctx.lineTo(x2,y2);
- ctx.stroke();
- ctx.restore()
- x1 = x2;
- y1 = y2;
- }
- })
- }
擦除那部分代码就这么一点,也就相当于画图功能,直接设置line属性后通过lineTo进行绘制线条,只要事前把globalCompositeOperation设成destination-out,你所进行的一切绘制,都变成了擦除效果。鼠标滑动触发的事件里面代码也少了很多,绘图对象的调用次数减少了,计算也减少了,性能提升大大滴。
改好代码后就立即用自己的android机子测试了一下,果然如此,跟上一个相比,流畅了很多,至少达到了客户要求的能玩的地步了。
源码地址:https://github.com/whxaxes/canvas-test/blob/gh-pages/src/Funny-demo/clip/clip.html

 The Connection Between H5 and HTML5: Similarities and DifferencesApr 24, 2025 am 12:01 AM
H5 and HTML5 are different concepts: HTML5 is a version of HTML, containing new elements and APIs; H5 is a mobile application development framework based on HTML5. HTML5 parses and renders code through the browser, while H5 applications need to run containers and interact with native code through JavaScript.
 The Building Blocks of H5 Code: Key Elements and Their PurposeApr 23, 2025 am 12:09 AM
Key elements of HTML5 include,,,,,, etc., which are used to build modern web pages. 1. Define the head content, 2. Used to navigate the link, 3. Represent the content of independent articles, 4. Organize the page content, 5. Display the sidebar content, 6. Define the footer, these elements enhance the structure and functionality of the web page.
 HTML5 and H5: Understanding the Common UsageApr 22, 2025 am 12:01 AM
There is no difference between HTML5 and H5, which is the abbreviation of HTML5. 1.HTML5 is the fifth version of HTML, which enhances the multimedia and interactive functions of web pages. 2.H5 is often used to refer to HTML5-based mobile web pages or applications, and is suitable for various mobile devices.
 HTML5: The Building Blocks of the Modern Web (H5)Apr 21, 2025 am 12:05 AM
HTML5 is the latest version of the Hypertext Markup Language, standardized by W3C. HTML5 introduces new semantic tags, multimedia support and form enhancements, improving web structure, user experience and SEO effects. HTML5 introduces new semantic tags, such as, ,, etc., to make the web page structure clearer and the SEO effect better. HTML5 supports multimedia elements and no third-party plug-ins are required, improving user experience and loading speed. HTML5 enhances form functions and introduces new input types such as, etc., which improves user experience and form verification efficiency.
 H5 Code: Writing Clean and Efficient HTML5Apr 20, 2025 am 12:06 AM
How to write clean and efficient HTML5 code? The answer is to avoid common mistakes by semanticizing tags, structured code, performance optimization and avoiding common mistakes. 1. Use semantic tags such as, etc. to improve code readability and SEO effect. 2. Keep the code structured and readable, using appropriate indentation and comments. 3. Optimize performance by reducing unnecessary tags, using CDN and compressing code. 4. Avoid common mistakes, such as the tag not closed, and ensure the validity of the code.
 H5: How It Enhances User Experience on the WebApr 19, 2025 am 12:08 AM
H5 improves web user experience with multimedia support, offline storage and performance optimization. 1) Multimedia support: H5 and elements simplify development and improve user experience. 2) Offline storage: WebStorage and IndexedDB allow offline use to improve the experience. 3) Performance optimization: WebWorkers and elements optimize performance to reduce bandwidth consumption.
 Deconstructing H5 Code: Tags, Elements, and AttributesApr 18, 2025 am 12:06 AM
HTML5 code consists of tags, elements and attributes: 1. The tag defines the content type and is surrounded by angle brackets, such as. 2. Elements are composed of start tags, contents and end tags, such as contents. 3. Attributes define key-value pairs in the start tag, enhance functions, such as. These are the basic units for building web structure.
 Understanding H5 Code: The Fundamentals of HTML5Apr 17, 2025 am 12:08 AM
HTML5 is a key technology for building modern web pages, providing many new elements and features. 1. HTML5 introduces semantic elements such as, , etc., which enhances web page structure and SEO. 2. Support multimedia elements and embed media without plug-ins. 3. Forms enhance new input types and verification properties, simplifying the verification process. 4. Offer offline and local storage functions to improve web page performance and user experience.


Hot AI Tools

Undresser.AI Undress
AI-powered app for creating realistic nude photos

AI Clothes Remover
Online AI tool for removing clothes from photos.

Undress AI Tool
Undress images for free

Clothoff.io
AI clothes remover

Video Face Swap
Swap faces in any video effortlessly with our completely free AI face swap tool!

Hot Article
Hot Tools

Dreamweaver CS6
Visual web development tools

WebStorm Mac version
Useful JavaScript development tools

ZendStudio 13.5.1 Mac
Powerful PHP integrated development environment

SecLists
SecLists is the ultimate security tester's companion. It is a collection of various types of lists that are frequently used during security assessments, all in one place. SecLists helps make security testing more efficient and productive by conveniently providing all the lists a security tester might need. List types include usernames, passwords, URLs, fuzzing payloads, sensitive data patterns, web shells, and more. The tester can simply pull this repository onto a new test machine and he will have access to every type of list he needs.

SublimeText3 Mac version
God-level code editing software (SublimeText3)

