Home >Common Problem >How to move the Win10 system search box from the bottom to the top of the screen
How to move the Win10 system search box from the bottom to the top of the screen
- 王林forward
- 2023-07-10 13:21:132767browse
Although Win10 can help us find files quickly, it sets the file location to the lower left corner of the screen by default. So, if you want to move the search box to the top of the screen during a search so that keywords and results may be closer, how do you do that? Let’s take a look with the editor.
How to move the search box from the bottom to the top of the screen in Win10?
1. First, right-click the mouse on the Win logo in the lower left corner of the screen, and then click Operation in the pop-up right-click menu.

#2. Enter regedit in the opened operation window and return to the car.

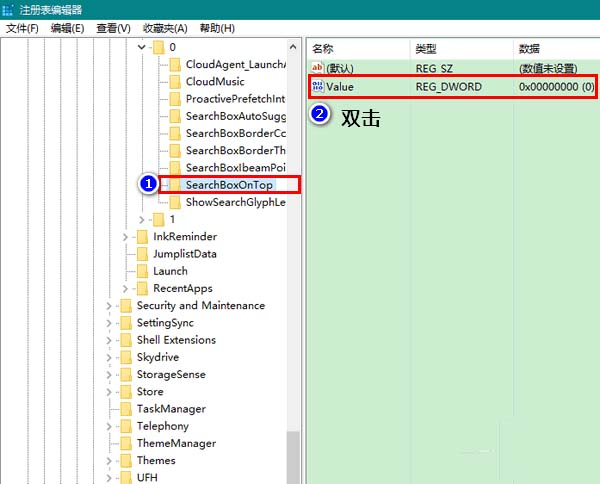
#3. At this point, open the Registry Editor. Locate HKEY_CURRENT_USER\Software\Microsoft\Windows\Curentversion\Search\Flighting\0\Searchboxontop in the Registry Editor, and then double-click on the Value key on the right.

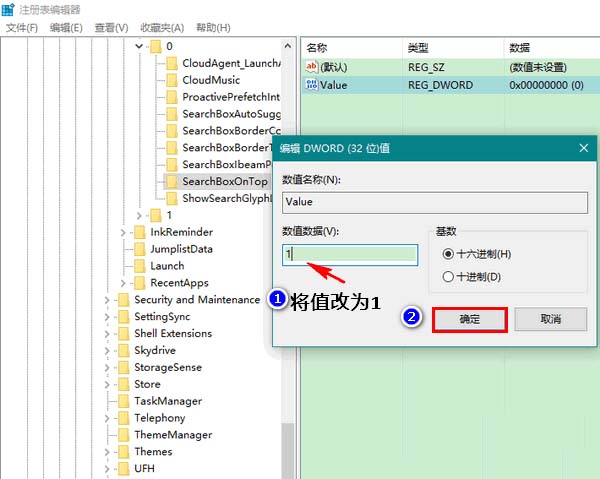
#4. Change the numerical data from 0 to 1 in the pop-up window and click OK to close the window. Finally, close the Registry Editor.

The above is the detailed content of How to move the Win10 system search box from the bottom to the top of the screen. For more information, please follow other related articles on the PHP Chinese website!
Related articles
See more- How to disable search highlighting in Windows 11?
- Can you get a job through Qianfeng training?
- Obscura 3 camera app gets overhauled interface and new shooting modes
- New File Explorer for Windows 11 with support for tabs is coming soon, possibly after 22H2
- Studio Buds, the 'best-selling” Beats product yet, now available in three new colors

