Home >Database >Mysql Tutorial >How to quickly build a master-slave replication architecture in MySQL
How to quickly build a master-slave replication architecture in MySQL
- PHPzforward
- 2023-05-30 10:01:331492browse

1. Master-slave replication and read-write separation
1.1 Master-slave replication (data level)
Master-slave replication is the prerequisite for read-write separation . The master-slave replication function provided by the MySQL database can easily realize automatic backup of data on multiple servers, realize the expansion of the database, and greatly enhance the security of the data. After master-slave replication is implemented, read-write separation can further improve the load performance of the database.
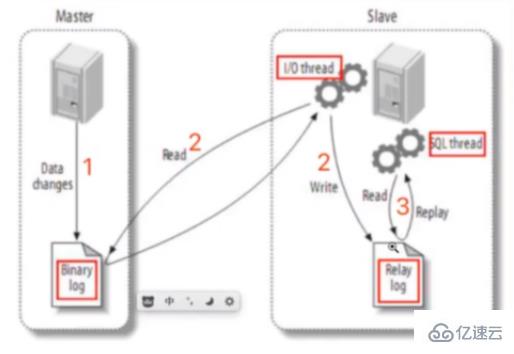
As shown in the figure is the general implementation process of master-slave replication.

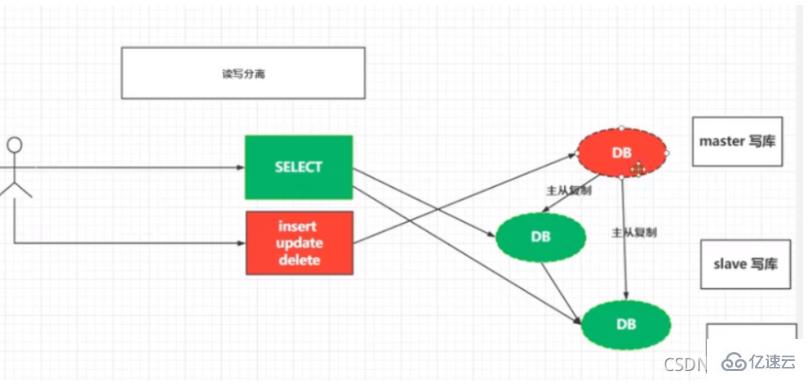
1.2 Read and write separation (business level)
To achieve read and write separation, master-slave replication of the database must first be implemented. The understanding of read-write separation is that query operations are completed in the sub-database, while write operations are performed in the main database. Data is backed up to sub-databases through master-slave replication to ensure data consistency. This is done after the data has been written to the main database.

2. Implementation
Let’s first understand the principle of master-slave replication:
Be the master first After the data in the database changes, the change record will be written to the binlog log.
The slave database will detect the binlog log in the master database within a certain period of time. If changes occur, it will request the master log file information.
After understanding its principle, we need to know the prerequisites for enabling master-slave replication:
The master node needs to enable binlog logs (mysql does not enable it by default) binlog)
slave node, specify a binlog file, and the synchronized offset
-
Specify the ip of the master node
Username and password for executing the master node
Now we all understand roughly, next we build a database model with one master and one slave. , demonstrate the configuration process of database master-slave setup.
Prepare two CentOS servers and install mysql5.7 in advance.
2.1 Open the binlog log of the master server
Edit the my.cnf file of mysql: (The installation method is different, the file location may be different, specific problems will be analyzed in detail~)
vim /etc/my.cnf
The original file does not have the following content, we need to add it ourselves. My side is to perform master-slave replication of data in the myslave database
server-id = 1 #server-id 服务器唯一标识log_bin = master-bin
#log_bin 启动MySQL二进制日志log_bin_index = master-bin.index
binlog_do_db = myslave #binlog_do_db 指定记录二进制日志的数据库 这两个指定可以不添加binlog_ignore_db = mysql
#binlog_ignore_db 指定不记录二进制日志的数据库
Use the following command to restart mysql. Different Linux versions may have different commands.
service mysql restart
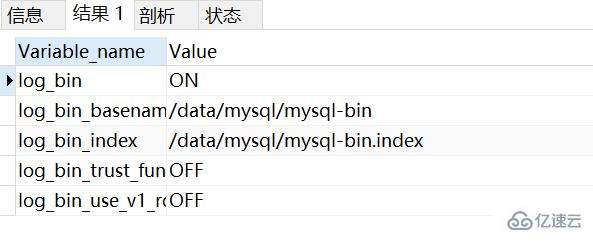
After successful startup, we can see the bin-log opening status through the following statement: (Query directly in Navicat)
show variables like 'log_bin%';

2.2 Remote access
#允许远程用户访问
GRANT ALL PRIVILEGES ON *.* TO 'root'@'192.168.221.131' IDENTIFIED BY '123456' WITH GRANT OPTION;
#刷新
FLUSH PRIVILEGES;
2.3 Slave node configuration
First on the master node, run the following command to understand the status of the master node and get the information shown in the figure below.
show master status;

-
Modify relevant configuration
vim /etc/my.cnf
Add relevant information:
server-id = 2  #唯一标识relay-log = slave-relay-bin
relay-log-index = slave-relay-bin.index
replicate-do-db=myslave #备份数据库 对应master中设置的,可以不设置replicate-ignore-db=mysql #忽略数据库
Remember Restart the service;
service mysql restart
-
Execute the following command on the slave node.
change master to master_host='192.168.221.128',master_user='root',master_password='123456',master_log_file='binlog.000009',master_log_pos=2339;
master_log_file is the file name obtained in the first step;
master_log_pos is the synchronization position obtained in the first step;
-
Start slave synchronization
start slave;
-
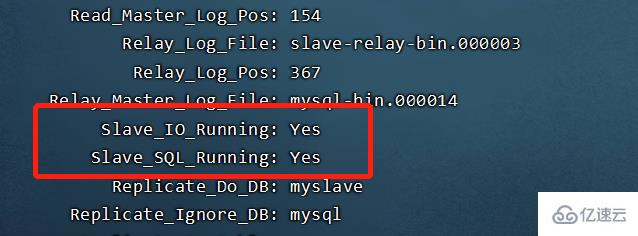
Check the synchronization status and get the status shown in the figure below, which means that the master-slave synchronization is successfully established. Table tests can be created in the main database.
show slave status\G

The above is the detailed content of How to quickly build a master-slave replication architecture in MySQL. For more information, please follow other related articles on the PHP Chinese website!


