


PHP速学视频免费教程(入门到精通)
PHP怎么学习?PHP怎么入门?PHP在哪学?PHP怎么学才快?不用担心,这里为大家提供了PHP速学教程(入门到精通),有需要的小伙伴保存下载就能学习啦!
根据您当前面临的问题,您可以通过以下 7 种不同方式在 windows 11 中重置声音设置。让我们开始吧。
按下Windows + i键盘以打开“设置”应用。现在单击右侧的“声音”。

向下滚动并单击“音量混合器”。

现在点击底部的“重置”。

此选项会将第三方应用程序和预装程序的所有设置重置为默认设置。

如果您在使用这些应用程序中的任何一个时遇到音频输入或输出问题,那么现在应该在您的 PC 上修复它们。
如果您无法为您的系统修复音频,那么可能是时候重置您的音频驱动程序了。您可以通过重新安装最新版本或回滚到以前在您的系统中工作的已知版本来执行此操作。请遵循以下任一教程,以帮助您完成该过程。
按Windows + x键盘并选择“设备管理器”。

现在通过双击展开底部的“声音、视频和游戏控制器”。

双击遇到问题的音频适配器。

单击并切换到屏幕顶部的“驱动程序”选项卡。

现在点击“卸载设备”。

选中“尝试删除此设备的驱动程序”复选框。

完成后单击“卸载”。

我们现在建议您重新启动系统。这将强制 Windows 在启动时使用默认的 OEM 驱动程序,以防万一。这将有助于在大多数系统上重置音频并修复问题,但是,如果您需要手动重新安装驱动程序,请再次打开“设备管理器”并单击顶部的“扫描硬件更改”。
您的音频适配器现在应该会被自动识别并添加到您的设备管理器中。
在将驱动程序回滚到以前的版本时,您可以按照上面的教程进行操作,直到您在 Windows 的设备管理器中进入您的声音适配器的驱动程序选项卡。在那里,单击“回滚驱动程序”。

选择您希望回滚的原因,然后单击“是”。如果现在系统提示您重新启动 PC,我们建议您尽早这样做。重新启动后,您的 PC 应该为您的声音适配器使用较旧的驱动程序。
Windows 服务用于管理您计算机中长时间运行的进程,例如网络连接、声音、帐户、安全、电源、蓝牙等。这些服务在后台运行,并在您的 PC 启动时启动。
与系统上的声音有关的 Windows 服务是:
让我们看看如何在 Windows 11 上重新启动这些服务。
按 Windows键盘上的键打开开始菜单。

在开始菜单中,搜索“服务”,然后从搜索结果中单击相同的内容。

在服务中,向下滚动并找到“Windows 音频”服务。

右键单击相同的,然后单击“重新启动”。

如果您看到类似于下面的提示,请单击“是”。

现在,重复上述步骤以重新启动Windows 音频端点生成器和远程过程调用 (RPC)服务。
Windows 疑难解答是一种修复工具,可帮助您检测和解决 PC 问题。让我们看看如何使用此工具来检测和修复 PC 上特定于音频的问题。
按 Windows 键盘上的键打开开始菜单。
在开始菜单中,搜索“疑难解答设置”,然后从搜索结果中单击它。

在疑难解答设置中,单击“其他疑难解答”。

在其他疑难解答中,单击“播放音频”旁边的“运行”选项。

选择您要进行故障排除的音频设备,然后单击“下一步”。疑难解答程序现在将检查此音频设备的问题。

选择您要应用的维修,然后单击“下一步”。

现在,按照屏幕上的说明修复检测到的问题。
系统声音是应用于 Windows 和程序中的事件的声音。当触发紧急停止、通知、设备连接、电池电量不足警报等基本操作时,Windows 会使用这些声音。
Windows 11 允许您修改系统声音的默认设置并创建自定义声音方案。但是,如果出现任何问题并且您想要恢复默认声音方案,请按照以下步骤操作。
按 Windows 键盘上的键打开开始菜单。
在开始菜单中,搜索“更改系统声音”,然后从搜索结果中单击相同的选项。

在“声音”窗口中,单击“声音方案”选项中的向下箭头,然后选择“Windows 默认”。

单击“应用”以保存所做的更改。

最后,单击“确定”退出“声音”窗口。

最后,将 Windows 重置为其默认出厂状态是重置 Windows 11 PC 中所有设置(包括声音设置)的最后一种方法。这将删除对 Windows 中的声音设置所做的所有自定义和修改。
让我们看看如何在 Windows 11 上执行此操作。
按 Windows 键盘上的键打开开始菜单。
在开始菜单中,搜索“重置此电脑”,然后从搜索结果中单击相同的内容。

在恢复设置中,单击“重置此电脑”。

选择以下选项之一,然后按照屏幕上的说明重置您的 PC。

如果您正在寻找配置音频设备,那么您可以在 Windows 11 上执行此操作。这可以帮助您解决音频问题,同时在第三方应用程序中配置设备。
如果您希望通过其他设备路由输入或输出音频,则可以使用以下教程之一。
单击位于任务栏右下角的“音频”图标。

单击音量搜索栏旁边的“>”图标。

从音频设备列表中,单击要用作输出设备的设备。

如果您想更改 PC 上的输入设备,请按照以下步骤操作。
按下Windows + i您的 PC,然后单击右侧的“声音”。

向下滚动并单击以在“选择用于讲话或录音的设备”下选择您喜欢的输入设备。

就是这样!您现在将更改 PC 上的默认输入设备。
下面介绍了如何在 Windows 11 上为输出或输入设备配置声音设置。
单击位于任务栏右下角的“音频”图标。

单击音量搜索栏旁边的“>”图标。
单击“更多音量设置”选项。


您现在可以在此窗口中查看您选择的输出设备的各种声音设置。让我们一一查看每个声音设置。

要停止将此设备用作输出音频设备,请单击“不允许”

要更改音频格式,请单击“向下箭头”图标。


要增加音量,请将“音量”选项旁边的音量搜索栏拖到右侧。要降低音量,请将此搜索栏拖到左侧。
注意:更改此音量也会将“左声道”和“右声道”音量更改为相同级别。此外,即使该设备当前未使用,您也可以更改音频设备的音量。

您还可以单独更改左右声道。为此,只需拖动与您要更改的频道相对应的音量搜索栏。

要启用增强功能,请单击“增强音频”切换按钮。

启用后,切换按钮将显示“开启”状态

Windows 11 还提供更加身临其境的音频体验,使用 3D 空间声音模拟真实环境。
要启用它,请单击“空间声音”部分下的“类型”选项旁边的“向下”箭头。

单击“Windows Sonic for Headphone”选项。

按下Windows + i键盘并单击右侧的“声音”。
现在单击“选择用于讲话或录音的设备”下的首选输入设备以查看其属性。
您现在可以通过单击“不允许”来阻止设备。
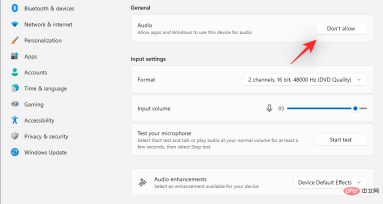

您还可以使用下一个滑块控制通用输入音量。

如果您的适配器或麦克风支持它,您将能够看到“音频增强”部分。单击相同的下拉菜单,然后选择您喜欢的增强选项。

这就是您可以在 Windows 11 上配置输入设备的方式。
以下是在设备上切换单声道和立体声音频的方法。
单声道 (Mono) 声音用于在单个音频通道中录制和播放声音,而立体声 (Stereo) 声音可以使用两个音频通道,并且能够在听众中产生宽度和空间意识的感觉。让我们看看如何在 Windows 11 上的两种播放模式之间切换。
按 Windows 键盘上的键打开开始菜单。
在开始菜单中,搜索“Mono Sound”,然后从搜索结果中单击它。

现在,如果您想在 PC 上启用单声道音频,请单击“单声道音频”切换按钮。

启用后,切换按钮将显示“开启”。

如果要禁用单声道音频,请单击“单声道音频”切换按钮。

一旦禁用,此切换按钮将显示“关闭”。


已抢7591个
抢
已抢97606个
抢
已抢15268个
抢
已抢54025个
抢
已抢198505个
抢
已抢88415个
抢