
Home >Technology peripherals >AI >Interview record: core knowledge of HashMap, disturbance function, load factor, expansion linked list splitting
Interview record: core knowledge of HashMap, disturbance function, load factor, expansion linked list splitting

- PHPzforward
- 2023-05-04 17:52:06874browse
1. Foreword
Thanks to the work of Mr. Doug Lea, HashMap has become the most frequently used and interviewed API. There is no way to design it too well!
HashMap first appeared in JDK 1.2, and the underlying implementation is based on the hash algorithm. HashMap allows null keys and null values. When calculating the hash value of a hash key, the null key hash value is 0. HashMap does not guarantee the order of key-value pairs, which means that the order of key-value pairs may change after certain operations. In addition, it should be noted that HashMap is a non-thread-safe class and may cause problems in a multi-threaded environment.
HashMap first appeared in JDK 1.2. The bottom layer is based on the hash algorithm. With several generations of optimization and updates, its source code has become more complex so far, and involves many knowledge points. Included in JDK 1.8; 1. Hash table implementation, 2. Disturbance function, 3. Initialization capacity, 4. Load factor, 5. Expansion element splitting, 6. Linked list tree formation, 7. Red-black tree, 8. Insertion, 9. Search, 10. Delete, 11. Traverse, 12. Segment lock, etc. Because they involve many knowledge points, they need to be explained separately. In this chapter, we will focus on the first five items first, which is about data. on the use of structures.
Data structures are often related to mathematics. It is recommended to download the corresponding source code for experimental verification during the learning process. This process may be a bit brain-burning, but after learning it, you can understand this part of the knowledge without memorizing it by rote.
2. Resource download
The source code and resources involved in this chapter are in the project, interview-04, including;
100,000 word test data, in the doc folder
Perturbation function excel display, in the doc folder
The test source code part is in the interview-04 project
You can obtain it by following the public account: bugstack wormhole stack and replying to download {Open the obtained link after replying to download and find the number ID: 19}
3. Source code analysis
1. Write the simplest HashMap
Before learning HashMap, the most important thing is A good way is to first understand what kind of data structure this is to store data. After iterating through multiple versions of HashMap, the code is still very complicated at first glance. Just like you used to only wear shorts, but now you also wear long johns and a windbreaker. So let’s first take a look at what the most basic HashMap looks like, that is, what the effect is of wearing only underpants, and then analyze its source code.
Question: Suppose we have a set of 7 strings that need to be stored in an array, but the time complexity when retrieving each element is required to be O(1). That is to say, you cannot obtain it through loop traversal, but you must locate the array ID and directly obtain the corresponding element.
Solution: If we need to get elements from the array by ID, then we need to calculate a position ID in the array for each string. What ways can you think of to get the ID from a string? The most direct way to obtain number-related information from a string is HashCode, but the value range of HashCode is too large [-2147483648, 2147483647], making it impossible to use it directly. Then you need to use HashCode and the array length to perform an AND operation to get a position that can appear in the array. If there are two elements with the same ID, then two strings are stored under this array ID.
The above is actually a basic idea for hashing a string into an array. Next, we will implement this idea in code.
1.1 Code implementation
// 初始化一组字符串
List<String> list = new ArrayList<>();
list.add("jlkk");
list.add("lopi");
list.add("小傅哥");
list.add("e4we");
list.add("alpo");
list.add("yhjk");
list.add("plop");

// 定义要存放的数组
String[] tab = new String[8];

// 循环存放
for (String key : list) {
int idx = key.hashCode() & (tab.length - 1);// 计算索引位置
System.out.println(String.format("key值=%s Idx=%d", key, idx));
if (null == tab[idx]) {
tab[idx] = key;
continue;
}
tab[idx] = tab[idx] + "->" + key;
}
// 输出测试结果
System.out.println(JSON.toJSONString(tab));
This code overall looks very simple and has no complexity. It mainly includes the following contents;
- Initialize a set of strings, 7 are initialized here.
- Define an array to store strings. Note that the length here is 8, which is the third power of 2. Such an array length will have the characteristic that 0111 is all 1 except for the high bits, which is also for hashing.
- The next step is to store the data in a loop and calculate the position of each string in the array. key.hashCode() & (tab.length - 1).
- In the process of storing the string into the array, if the same element is encountered, the connection operation is performed to simulate the process of a linked list.
- Finally output the stored result.
Test results
key值=jlkk Idx=2
key值=lopi Idx=4
key值=小傅哥 Idx=7
key值=e4we Idx=5
key值=alpo Idx=2
key值=yhjk Idx=0
key值=plop Idx=5
测试结果:["yhjk",null,"jlkk->alpo",null,"lopi","e4we->plop",null,"小傅哥"]
- In the test results, the first step is to calculate the Idx of each element in the array, and there are also repeated positions.
- The last is the output of the test results, 1, 3, 6, the positions are empty, 2, 5, there are two elements linked together e4we->plop.
- This has achieved one of our most basic requirements, hashing the string elements into an array, and finally obtaining the corresponding string through the index ID of the string element. This is the most basic principle of HashMap. With this foundation, it will be easier to understand the source code implementation of HashMap.
1.2 Hash hash diagram
If the above test results cannot well establish a data structure in your mind, then you can look at the following hash diagram, Easy to understand;

bugstack.cn Hash hash diagram
- 这张图就是上面代码实现的全过程,将每一个字符串元素通过Hash计算索引位置,存放到数组中。
- 黄色的索引ID是没有元素存放、绿色的索引ID存放了一个元素、红色的索引ID存放了两个元素。
1.3 这个简单的HashMap有哪些问题
以上我们实现了一个简单的HashMap,或者说还算不上HashMap,只能算做一个散列数据存放的雏形。但这样的一个数据结构放在实际使用中,会有哪些问题呢?
- 这里所有的元素存放都需要获取一个索引位置,而如果元素的位置不够散列碰撞严重,那么就失去了散列表存放的意义,没有达到预期的性能。
- 在获取索引ID的计算公式中,需要数组长度是2的幂次方,那么怎么进行初始化这个数组大小。
- 数组越小碰撞的越大,数组越大碰撞的越小,时间与空间如何取舍。
- 目前存放7个元素,已经有两个位置都存放了2个字符串,那么链表越来越长怎么优化。
- 随着元素的不断添加,数组长度不足扩容时,怎么把原有的元素,拆分到新的位置上去。
以上这些问题可以归纳为;扰动函数、初始化容量、负载因子、扩容方法以及链表和红黑树转换的使用等。接下来我们会逐个问题进行分析。
2. 扰动函数
在HashMap存放元素时候有这样一段代码来处理哈希值,这是java 8的散列值扰动函数,用于优化散列效果;
static final int hash(Object key){
int h;
return (key == null) ? 0 : (h = key.hashCode()) ^ (h >>> 16);
}
2.1 为什么使用扰动函数
理论上来说字符串的hashCode是一个int类型值,那可以直接作为数组下标了,且不会出现碰撞。但是这个hashCode的取值范围是[-2147483648, 2147483647],有将近40亿的长度,谁也不能把数组初始化得这么大,内存也是放不下的。
我们默认初始化的Map大小是16个长度 DEFAULT_INITIAL_CAPACITY = 1
那么,hashMap源码这里不只是直接获取哈希值,还进行了一次扰动计算,(h = key.hashCode()) ^ (h >>> 16)。把哈希值右移16位,也就正好是自己长度的一半,之后与原哈希值做异或运算,这样就混合了原哈希值中的高位和低位,增大了随机性。计算方式如下图;

bugstack.cn 扰动函数
- 说白了,使用扰动函数就是为了增加随机性,让数据元素更加均衡的散列,减少碰撞。
2.2 实验验证扰动函数
从上面的分析可以看出,扰动函数使用了哈希值的高半区和低半区做异或,混合原始哈希码的高位和低位,以此来加大低位区的随机性。
但看不到实验数据的话,这终究是一段理论,具体这段哈希值真的被增加了随机性没有,并不知道。所以这里我们要做一个实验,这个实验是这样做;
- 选取10万个单词词库
- 定义128位长度的数组格子
- 分别计算在扰动和不扰动下,10万单词的下标分配到128个格子的数量
- 统计各个格子数量,生成波动曲线。如果扰动函数下的波动曲线相对更平稳,那么证明扰动函数有效果。
扰动函数对比方法
public class Disturb {

public static int disturbHashIdx(String key, int size){
return (size - 1) & (key.hashCode() ^ (key.hashCode() >>> 16));
}

public static int hashIdx(String key, int size){
return (size - 1) & key.hashCode();
}

}
- disturbHashIdx扰动函数下,下标值计算
- hashIdx非扰动函数下,下标值计算
单元测试
// 10万单词已经初始化到words中
@Test
public void test_disturb(){
Map<Integer, Integer> map = new HashMap<>(16);
for (String word : words) {
// 使用扰动函数
int idx = Disturb.disturbHashIdx(word, 128);
// 不使用扰动函数
// int idx = Disturb.hashIdx(word, 128);
if (map.containsKey(idx)) {
Integer integer = map.get(idx);
map.put(idx, ++integer);
} else {
map.put(idx, 1);
}
}
System.out.println(map.values());
}
以上分别统计两种函数下的下标值分配,最终将统计结果放到excel中生成图表。
以上的两张图,分别是没有使用扰动函数和使用扰动函数的,下标分配。实验数据;
- 10万个不重复的单词
- 128个格子,相当于128长度的数组
未使用扰动函数

bugstack.cn 未使用扰动函数
使用扰动函数

bugstack.cn 使用扰动函数
- 从这两种的对比图可以看出来,在使用了扰动函数后,数据分配的更加均匀了。
- 数据分配均匀,也就是散列的效果更好,减少了hash的碰撞,让数据存放和获取的效率更佳。
3. 初始化容量和负载因子
接下来我们讨论下一个问题,从我们模仿HashMap的例子中以及HashMap默认的初始化大小里,都可以知道,散列数组需要一个2的幂次方的长度,因为只有2的幂次方在减1的时候,才会出现01111这样的值。
那么这里就有一个问题,我们在初始化HashMap的时候,如果传一个17个的值new HashMap(17);,它会怎么处理呢?
3.1 寻找2的幂次方最小值
在HashMap的初始化中,有这样一段方法;
public HashMap(int initialCapacity, float loadFactor){
...
this.loadFactor = loadFactor;
this.threshold = tableSizeFor(initialCapacity);
}
- 阈值threshold,通过方法tableSizeFor进行计算,是根据初始化来计算的。
- 这个方法也就是要寻找比初始值大的,最小的那个2进制数值。比如传了17,我应该找到的是32(2的4次幂是16
计算阈值大小的方法;
static final int tableSizeFor(int cap) {
int n = cap - 1;
n |= n >>> 1;
n |= n >>> 2;
n |= n >>> 4;
n |= n >>> 8;
n |= n >>> 16;
return (n < 0) ? 1 : (n >= MAXIMUM_CAPACITY) ? MAXIMUM_CAPACITY : n + 1;
}
- MAXIMUM_CAPACITY = 1
- 乍一看可能有点晕怎么都在向右移位1、2、4、8、16,这主要是为了把二进制的各个位置都填上1,当二进制的各个位置都是1以后,就是一个标准的2的幂次方减1了,最后把结果加1再返回即可。
那这里我们把17这样一个初始化计算阈值的过程,用图展示出来,方便理解;
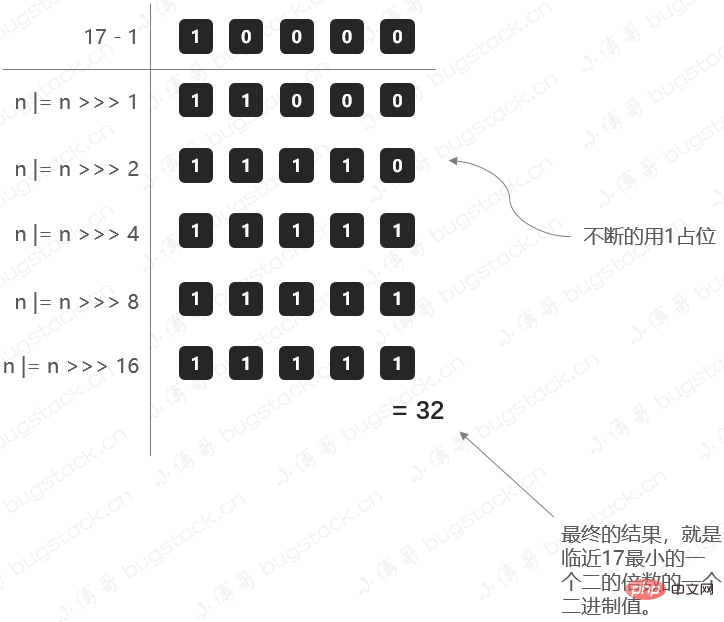
bugstack.cn 计算阈值
3.2 负载因子
static final float DEFAULT_LOAD_FACTOR = 0.75f;
负载因子是做什么的?
负载因子,可以理解成一辆车可承重重量超过某个阈值时,把货放到新的车上。
那么在HashMap中,负载因子决定了数据量多少了以后进行扩容。这里要提到上面做的HashMap例子,我们准备了7个元素,但是最后还有3个位置空余,2个位置存放了2个元素。 所以可能即使你数据比数组容量大时也是不一定能正正好好的把数组占满的,而是在某些小标位置出现了大量的碰撞,只能在同一个位置用链表存放,那么这样就失去了Map数组的性能。
所以,要选择一个合理的大小下进行扩容,默认值0.75就是说当阈值容量占了3/4时赶紧扩容,减少Hash碰撞。
同时0.75是一个默认构造值,在创建HashMap也可以调整,比如你希望用更多的空间换取时间,可以把负载因子调的更小一些,减少碰撞。
4. 扩容元素拆分
为什么扩容,因为数组长度不足了。那扩容最直接的问题,就是需要把元素拆分到新的数组中。拆分元素的过程中,原jdk1.7中会需要重新计算哈希值,但是到jdk1.8中已经进行优化,不再需要重新计算,提升了拆分的性能,设计的还是非常巧妙的。
4.1 测试数据
@Test
public void test_hashMap(){
List<String> list = new ArrayList<>();
list.add("jlkk");
list.add("lopi");
list.add("jmdw");
list.add("e4we");
list.add("io98");
list.add("nmhg");
list.add("vfg6");
list.add("gfrt");
list.add("alpo");
list.add("vfbh");
list.add("bnhj");
list.add("zuio");
list.add("iu8e");
list.add("yhjk");
list.add("plop");
list.add("dd0p");
for (String key : list) {
int hash = key.hashCode() ^ (key.hashCode() >>> 16);
System.out.println("字符串:" + key + " tIdx(16):" + ((16 - 1) & hash) + " tBit值:" + Integer.toBinaryString(hash) + " - " + Integer.toBinaryString(hash & 16) + " ttIdx(32):" + ((
System.out.println(Integer.toBinaryString(key.hashCode()) +" "+ Integer.toBinaryString(hash) + " " + Integer.toBinaryString((32 - 1) & hash));
}
}
测试结果
字符串:jlkkIdx(16):3Bit值:1100011101001000010011 - 10000 Idx(32):19
1100011101001000100010 1100011101001000010011 10011
字符串:lopiIdx(16):14Bit值:1100101100011010001110 - 0 Idx(32):14
1100101100011010111100 1100101100011010001110 1110
字符串:jmdwIdx(16):7Bit值:1100011101010100100111 - 0 Idx(32):7
1100011101010100010110 1100011101010100100111 111
字符串:e4weIdx(16):3Bit值:1011101011101101010011 - 10000 Idx(32):19
1011101011101101111101 1011101011101101010011 10011
字符串:io98Idx(16):4Bit值:1100010110001011110100 - 10000 Idx(32):20
1100010110001011000101 1100010110001011110100 10100
字符串:nmhgIdx(16):13Bit值:1100111010011011001101 - 0 Idx(32):13
1100111010011011111110 1100111010011011001101 1101
字符串:vfg6Idx(16):8Bit值:1101110010111101101000 - 0 Idx(32):8
1101110010111101011111 1101110010111101101000 1000
字符串:gfrtIdx(16):1Bit值:1100000101111101010001 - 10000 Idx(32):17
1100000101111101100001 1100000101111101010001 10001
字符串:alpoIdx(16):7Bit值:1011011011101101000111 - 0 Idx(32):7
1011011011101101101010 1011011011101101000111 111
字符串:vfbhIdx(16):1Bit值:1101110010111011000001 - 0 Idx(32):1
1101110010111011110110 1101110010111011000001 1
字符串:bnhjIdx(16):0Bit值:1011100011011001100000 - 0 Idx(32):0
1011100011011001001110 1011100011011001100000 0
字符串:zuioIdx(16):8Bit值:1110010011100110011000 - 10000 Idx(32):24
1110010011100110100001 1110010011100110011000 11000
字符串:iu8eIdx(16):8Bit值:1100010111100101101000 - 0 Idx(32):8
1100010111100101011001 1100010111100101101000 1000
字符串:yhjkIdx(16):8Bit值:1110001001010010101000 - 0 Idx(32):8
1110001001010010010000 1110001001010010101000 1000
字符串:plopIdx(16):9Bit值:1101001000110011101001 - 0 Idx(32):9
1101001000110011011101 1101001000110011101001 1001
字符串:dd0pIdx(16):14Bit值:1011101111001011101110 - 0 Idx(32):14
1011101111001011000000 1011101111001011101110 1110
- 这里我们随机使用一些字符串计算他们分别在16位长度和32位长度数组下的索引分配情况,看哪些数据被重新路由到了新的地址。
- 同时,这里还可以观察出一个非常重要的信息,原哈希值与扩容新增出来的长度16,进行&运算,如果值等于0,则下标位置不变。如果不为0,那么新的位置则是原来位置上加16。{这个地方需要好好理解下,并看实验数据}
- 这样一来,就不需要在重新计算每一个数组中元素的哈希值了。
4.2 数据迁移

bugstack.cn 数据迁移
- 这张图就是原16位长度数组元素,向32位扩容后数组转移的过程。
- 对31取模保留低5位,对15取模保留低4位,两者的差异就在于第5位是否为1,是的话则需要加上增量,为0的话则不需要改变
- 其中黄色区域元素zuio因计算结果hash & oldCap低位第5位为1,则被迁移到下标位置24。
- 同时还是用重新计算哈希值的方式验证了,确实分配到24的位置,因为这是在二进制计算中补1的过程,所以可以通过上面简化的方式确定哈希值的位置。
那么为什么 e.hash & oldCap == 0 为什么可以判断当前节点是否需要移位, 而不是再次计算hash;
仍然是原始长度为16举例:
old:
 10: 0000 1010
 15: 0000 1111
 &: 0000 1010

 new:
 10: 0000 1010
 31: 0001 1111
 &: 0000 1010
从上面的示例可以很轻易的看出, 两次indexFor()的差别只是第二次参与位于比第一次左边有一位从0变为1, 而这个变化的1刚好是oldCap, 那么只需要判断原key的hash这个位上是否为1: 若是1, 则需要移动至oldCap + i的槽位, 若为0, 则不需要移动;
这也是HashMap的长度必须保证是2的幂次方的原因, 正因为这种环环相扣的设计, HashMap.loadFactor的选值是3/4就能理解了, table.length * 3/4可以被优化为((table.length >> 2) > 2) == table.length - (table.length >> 2), JAVA的位运算比乘除的效率更高, 所以取3/4在保证hash冲突小的情况下兼顾了效率;
四、总结
- 如果你能坚持看完这部分内容,并按照文中的例子进行相应的实验验证,那么一定可以学会本章节涉及这五项知识点;1、散列表实现、2、扰动函数、3、初始化容量、4、负载因子、5、扩容元素拆分。
- 对我个人来说以前也知道这部分知识,但是没有验证过,只知道概念如此,正好借着写面试手册专栏,加深学习,用数据验证理论,让知识点可以更加深入的理解。
- 这一章节完事,下一章节继续进行HashMap的其他知识点挖掘,让懂了就是真的懂了。好了,写到这里了,感谢大家的阅读。如果某处没有描述清楚,或者有不理解的点,欢迎与我讨论交流。
The above is the detailed content of Interview record: core knowledge of HashMap, disturbance function, load factor, expansion linked list splitting. For more information, please follow other related articles on the PHP Chinese website!
Related articles
See more- Technology trends to watch in 2023
- How Artificial Intelligence is Bringing New Everyday Work to Data Center Teams
- Can artificial intelligence or automation solve the problem of low energy efficiency in buildings?
- OpenAI co-founder interviewed by Huang Renxun: GPT-4's reasoning capabilities have not yet reached expectations
- Microsoft's Bing surpasses Google in search traffic thanks to OpenAI technology