


Python Deep Learning 18-DeepDream of Generative Deep Learning

DeepDream Introduction
DeepDream is an artistic image modification technology, which is mainly based on the trained convolutional neural network CNN to generate images.
When generating images, the neural network is frozen, that is, the weights of the network are no longer updated, only the input images need to be updated. Commonly used pre-trained convolutional networks include Google's Inception, VGG network and ResNet network, etc.
Basic steps of DeePDream:
- Get the input image
- Input the image into the network and get the output value of the neuron you want to visualize
- Calculate the gradient of the neuron output value to each pixel of the picture
- Use gradient descent to continuously update the picture
Repeat steps 2, 3, and 4 until the set conditions are met
The following is the general process of using Keras to implement DeepDream:
Using Keras to implement DeepDream
Get the test image
In [1]:
# ---------------
from tensorflow import keras
import matplotlib.pyplot as plt
%matplotlib inline

base_image_path = keras.utils.get_file(
"coast.jpg",
origin="https://img-datasets.s3.amazonaws.com/coast.jpg")

plt.axis("off")
plt.imshow(keras.utils.load_img(base_image_path))
plt.show()

The above is a picture of the coastline that comes with Keras. Here are the changes to this picture.
Prepare the pre-trained model InceptionV3
In [2]:
# 使用Inception V3实现
from keras.applications import inception_v3

# 使用预训练的ImageNet权重来加载模型
model = inception_v3.InceptionV3(weights="imagenet", # 构建不包含全连接层的Inceptino
 include_top=False)
Downloading data from https://storage.googleapis.com/tensorflow/keras-applications/inception_v3/inception_v3_weights_tf_dim_ordering_tf_kernels_notop.h5
87916544/87910968 [==============================] - 74s 1us/step
87924736/87910968 [==============================] - 74s 1us/step
In [3]:
model.summary()

Set DeepDream configuration
In [4]:
# 层的名称 + 系数:该层对需要最大化的损失的贡献大小

layer_settings = {"mixed4":1.0,
"mixed5":1.5,
"mixed6":2.0,
"mixed7":2.5}

outputs_dict = dict(
[
(layer.name, layer.output) # 层的名字 + 该层的输出
for layer in [model.get_layer(name) for name in layer_settings.keys()]
]
)

outputs_dict
Out[4]:
{'mixed4': <KerasTensor: shape=(None, None, None, 768) dtype=float32 (created by layer 'mixed4')>,
 'mixed5': <KerasTensor: shape=(None, None, None, 768) dtype=float32 (created by layer 'mixed5')>,
 'mixed6': <KerasTensor: shape=(None, None, None, 768) dtype=float32 (created by layer 'mixed6')>,
 'mixed7': <KerasTensor: shape=(None, None, None, 768) dtype=float32 (created by layer 'mixed7')>}
In [5]:
# 特征提取

feature_extractor = keras.Model(inputs=model.inputs, outputs=outputs_dict)
feature_extractor
Out[5]:
<keras.engine.functional.Functional at 0x15b5ff0d0>
Calculating loss
In [6]:
def compute_loss(image):
features = feature_extractor(image)# 特征提取
loss = tf.zeros(shape=())# 损失初始化

for name in features.keys():# 遍历层
coeff = layer_settings[name] # 某个层的系数
activation = features[name]# 某个层的激活函数
#为了避免出现边界伪影,损失中仅包含非边界的像素
loss += coeff * tf.reduce_mean(tf.square(activation[:, 2:-2, 2:-2, :])) # 将该层的L2范数添加到loss中;
return loss
Gradient ascent process
In [7]:
import tensorflow as tf

@tf.function
def gradient_ascent_step(image, lr): # lr--->learning_rate学习率
with tf.GradientTape() as tape:
tape.watch(image)
loss = compute_loss(image)# 调用计算损失方法
grads = tape.gradient(loss, image)# 梯度更新
grads = tf.math.l2_normalize(grads)
image += lr * grads
return loss, image

def gradient_ascent_loop(image, iterations, lr, max_loss=None):
for i in range(iterations):
loss, image = gradient_ascent_step(image, lr)
if max_loss is not None and loss > max_loss:
break
print(f"第{i}步的损失值是{loss:.2f}")

return image
Picture generation
np.expand_dims usage (personal addition)
In [8]:
import numpy as np

array = np.array([[1,2,3],
[4,5,6]]
)
array
Out[8]:
array([[1, 2, 3],
 [4, 5, 6]])
In [9]:
array.shape
Out[9]:
(2, 3)
In [10]:
array1 = np.expand_dims(array,axis=0)
array1
Out[10]:
array([[[1, 2, 3],
[4, 5, 6]]])
In [ 11]:
array1.shape
Out[11]:
(1, 2, 3)
In [12]:
array2 = np.expand_dims(array,axis=1)
array2
Out[12]:
array([[[1, 2, 3]],

 [[4, 5, 6]]])
In [13] :
array2.shape
Out[13]:
(2, 1, 3)
In [14]:
array3 = np.expand_dims(array,axis=-1)
array3
Out[14]:
array([[[1],
[2],
[3]],

 [[4],
[5],
[6]]])
In [15]:
array3.shape
Out[15]:
(2, 3, 1)
np.clip function (personally added)
np.clip(
array,
min(array),
max(array),
out=None):
In [16]:
array = np.array([1,2,3,4,5,6])

np.clip(array, 2, 5)# 输出长度和原数组相同
Out[16]:
array([2, 2, 3, 4, 5, 5])
In [17]:
array = np.arange(18).reshape((6,3))
array
Out[17]:
array([[ 0,1,2],
 [ 3,4,5],
 [ 6,7,8],
 [ 9, 10, 11],
 [12, 13, 14],
 [15, 16, 17]])
In [18]:
np.clip(array, 5, 15)
Out[18]:
array([[ 5,5,5],
 [ 5,5,5],
 [ 6,7,8],
 [ 9, 10, 11],
 [12, 13, 14],
 [15, 15, 15]])
Parameter setting
In [19]:
step = 20.#梯度上升的步长
num_octave = 3# 运行梯度上升的尺度个数
octave_scale = 1.4# 两个尺度间的比例大小
iterations = 30# 在每个尺度上运行梯度上升的步数
max_loss = 15.# 损失值若大于15,则中断梯度上升过程
Picture preprocessing
In [20]:
import numpy as np

def preprocess_image(image_path):# 预处理
img = keras.utils.load_img(image_path)# 导入图片
img = keras.utils.img_to_array(img)# 转成数组
img = np.expand_dims(img, axis=0)# 增加数组维度;见上面解释(x,y) ---->(1,x,y)
img = keras.applications.inception_v3.preprocess_input(img)
return img


def deprocess_image(img):# 图片压缩处理
img = img.reshape((img.shape[1], img.shape[2], 3))
img /= 2.0
img += 0.5
img *= 255.
# np.clip:截断功能,保证数组中的取值在0-255之间
img = np.clip(img, 0, 255).astype("uint8")
return img
Generate picture
In [21]:
# step = 20.#梯度上升的步长
# num_octave = 3# 运行梯度上升的尺度个数
# octave_scale = 1.4# 两个尺度间的比例大小
# iterations = 30# 在每个尺度上运行梯度上升的步数
# max_loss = 15.0# 损失值若大于15,则中断梯度上升过程

original_img = preprocess_image(base_image_path)# 预处理函数
original_shape = original_img.shape[1:3]

print(original_img.shape)# 四维图像
print(original_shape)# 第2和3维度的值
(1, 900, 1200, 3)
(900, 1200)
In [22]:
successive_shapes = [original_shape]

for i in range(1, num_octave):
shape = tuple([int(dim / (octave_scale ** i)) for dim in original_shape])
successive_shapes.append(shape)
successive_shapes = successive_shapes[::-1]# 翻转

shrunk_original_img = tf.image.resize(original_img, successive_shapes[0])

img = tf.identity(original_img)
for i, shape in enumerate(successive_shapes):
print(f"Processing octave {i} with shape {shape}")
# resize
img = tf.image.resize(img, shape)
img = gradient_ascent_loop(# 梯度上升函数调用
img,
iteratinotallow=iterations,
lr=step,
max_loss=max_loss
)
# resize
upscaled_shrunk_original_img = tf.image.resize(shrunk_original_img, shape)
same_size_original = tf.image.resize(original_img, shape)

lost_detail = same_size_original - upscaled_shrunk_original_img
img += lost_detail
shrunk_original_img = tf.image.resize(original_img, shape)

keras.utils.save_img("dream.png", deprocess_image(img.numpy()))
The result is:
Processing octave 0 with shape (459, 612)
第0步的损失值是0.80
第1步的损失值是1.07
第2步的损失值是1.44
第3步的损失值是1.82
......
第26步的损失值是11.44
第27步的损失值是11.72
第28步的损失值是12.03
第29步的损失值是12.49
At the same time, a new picture is generated locally. Take a look at the effect:

Take another look at the original picture: In comparison, the new picture is a bit dreamy!

The above is the detailed content of Python Deep Learning 18-DeepDream of Generative Deep Learning. For more information, please follow other related articles on the PHP Chinese website!

 Tesla's Robovan Was The Hidden Gem In 2024's Robotaxi TeaserApr 22, 2025 am 11:48 AM
Since 2008, I've championed the shared-ride van—initially dubbed the "robotjitney," later the "vansit"—as the future of urban transportation. I foresee these vehicles as the 21st century's next-generation transit solution, surpas
 Sam's Club Bets On AI To Eliminate Receipt Checks And Enhance RetailApr 22, 2025 am 11:29 AM
Revolutionizing the Checkout Experience Sam's Club's innovative "Just Go" system builds on its existing AI-powered "Scan & Go" technology, allowing members to scan purchases via the Sam's Club app during their shopping trip.
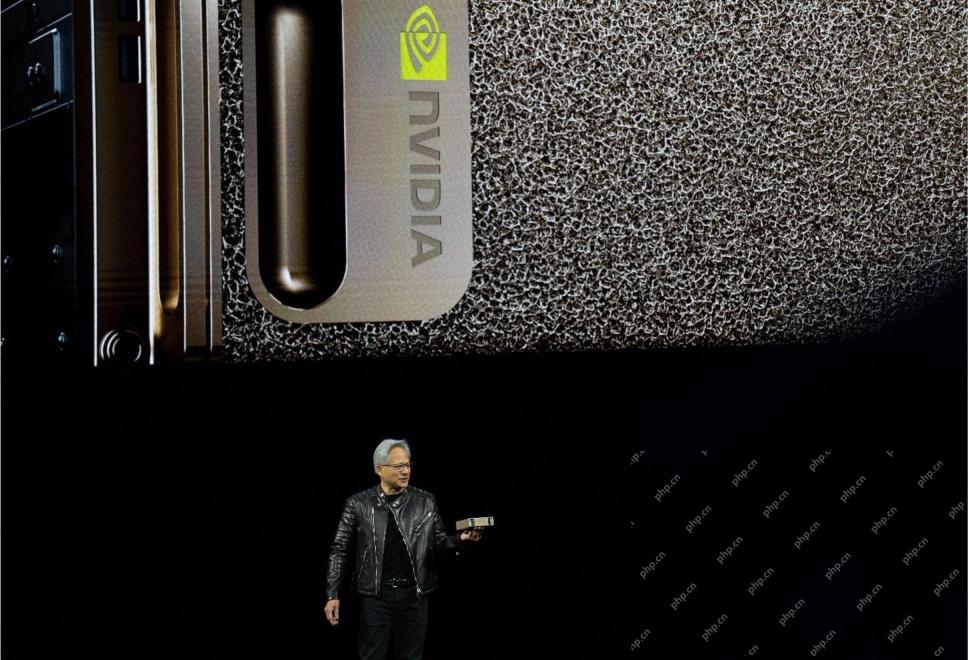 Nvidia's AI Omniverse Expands At GTC 2025Apr 22, 2025 am 11:28 AM
Nvidia's Enhanced Predictability and New Product Lineup at GTC 2025 Nvidia, a key player in AI infrastructure, is focusing on increased predictability for its clients. This involves consistent product delivery, meeting performance expectations, and
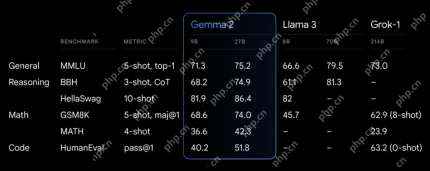 Exploring the Capabilities of Google's Gemma 2 ModelsApr 22, 2025 am 11:26 AM
Google's Gemma 2: A Powerful, Efficient Language Model Google's Gemma family of language models, celebrated for efficiency and performance, has expanded with the arrival of Gemma 2. This latest release comprises two models: a 27-billion parameter ver
 The Next Wave of GenAI: Perspectives with Dr. Kirk Borne - Analytics VidhyaApr 22, 2025 am 11:21 AM
This Leading with Data episode features Dr. Kirk Borne, a leading data scientist, astrophysicist, and TEDx speaker. A renowned expert in big data, AI, and machine learning, Dr. Borne offers invaluable insights into the current state and future traje
 AI For Runners And Athletes: We're Making Excellent ProgressApr 22, 2025 am 11:12 AM
There were some very insightful perspectives in this speech—background information about engineering that showed us why artificial intelligence is so good at supporting people’s physical exercise. I will outline a core idea from each contributor’s perspective to demonstrate three design aspects that are an important part of our exploration of the application of artificial intelligence in sports. Edge devices and raw personal data This idea about artificial intelligence actually contains two components—one related to where we place large language models and the other is related to the differences between our human language and the language that our vital signs “express” when measured in real time. Alexander Amini knows a lot about running and tennis, but he still
 Jamie Engstrom On Technology, Talent And Transformation At CaterpillarApr 22, 2025 am 11:10 AM
Caterpillar's Chief Information Officer and Senior Vice President of IT, Jamie Engstrom, leads a global team of over 2,200 IT professionals across 28 countries. With 26 years at Caterpillar, including four and a half years in her current role, Engst
 New Google Photos Update Makes Any Photo Pop With Ultra HDR QualityApr 22, 2025 am 11:09 AM
Google Photos' New Ultra HDR Tool: A Quick Guide Enhance your photos with Google Photos' new Ultra HDR tool, transforming standard images into vibrant, high-dynamic-range masterpieces. Ideal for social media, this tool boosts the impact of any photo,


Hot AI Tools

Undresser.AI Undress
AI-powered app for creating realistic nude photos

AI Clothes Remover
Online AI tool for removing clothes from photos.

Undress AI Tool
Undress images for free

Clothoff.io
AI clothes remover

Video Face Swap
Swap faces in any video effortlessly with our completely free AI face swap tool!

Hot Article
Hot Tools

Notepad++7.3.1
Easy-to-use and free code editor

Dreamweaver CS6
Visual web development tools

ZendStudio 13.5.1 Mac
Powerful PHP integrated development environment

MantisBT
Mantis is an easy-to-deploy web-based defect tracking tool designed to aid in product defect tracking. It requires PHP, MySQL and a web server. Check out our demo and hosting services.

SublimeText3 Mac version
God-level code editing software (SublimeText3)

